
1. Introduzione
The Pentax IQ Zoom 160 is a compact 35mm film camera designed for ease of use and versatility. It features a powerful 38-160mm zoom lens, an advanced autofocus system, and various shooting modes to capture a wide range of photographic situations. This manual provides detailed instructions for the proper operation and care of your camera.

Figura 1: Fronte view of the Pentax IQ Zoom 160 camera, showing the lens, flash, and viewcercatore.
Caratteristiche principali:
- 38-160mm power zoom lens for versatile framing.
- Five-point passive autofocus system for precise focusing.
- Six-segment multipattern metering system for optimal exposure.
- Automatic backlight compensation.
- Actual-image zoom viewfinder with diopter adjustment.
- Panorama mode for wide-angle shots.
- Multiexposure mode for creative effects.
- Self-timer function.
- Easy-to-read LCD instruction panel with automatic illumination.
2. Impostazione
2.1. Installazione della batteria
The Pentax IQ Zoom 160 requires one 3V Lithium battery, type CR123A or SF123A. Ensure the battery is inserted with the correct polarity as indicated inside the battery compartment.
- Individuare il coperchio del vano batteria nella parte inferiore della fotocamera.
- Slide or twist the cover latch to open the compartment.
- Insert one CR123A/SF123A battery, matching the (+) and (-) terminals with the indicators.
- Chiudere saldamente il coperchio del vano batteria finché non scatta in posizione.
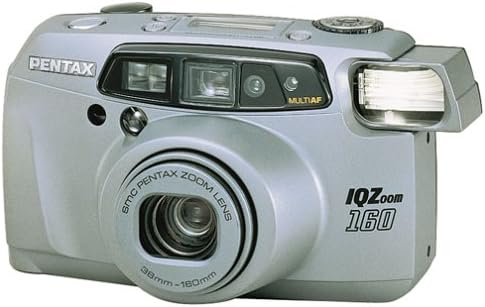
Figura 2: In basso view of the camera, showing the battery compartment and tripod mount.
2.2. Caricamento della pellicola
The camera uses standard 35mm film rolls. Always load film in subdued light to prevent accidental exposure.
- Aprire il dorso della fotocamera facendo scorrere il fermo di rilascio dello sportello della pellicola (solitamente situato sul lato o sulla parte superiore della fotocamera).
- Inserire una nuova cartuccia di pellicola da 35 mm nell'apposito vano sul lato sinistro.
- Tirare la parte iniziale della pellicola verso la bobina di avvolgimento della pellicola sul lato destro, assicurandosi che si agganci ai denti della bobina.
- Close the camera back firmly until it latches. The camera will automatically advance the film to the first frame. The exposure counter on the LCD panel will display "1".

Figura 3: Posteriore view della telecamera, che mostra il viewfinder and film door release.
3. Utilizzo della fotocamera
3.1. Accensione/spegnimento e selezione della modalità
The user-friendly mode dial allows you to turn the camera on and off, and select various shooting modes.

Figura 4: in alto view of the camera, highlighting the mode dial and LCD instruction panel.
- Accensione: Rotate the mode dial from "OFF" to any desired shooting mode (e.g., Auto). The lens will extend.
- Spegni: Rotate the mode dial to "OFF". The lens will retract.
- Mode Dial Settings: The dial typically includes modes such as Auto, Red-eye Reduction, Flash Off, Self-timer, and Multiexposure. Refer to the icons on the dial for specific functions.
3.2. Scattare foto
- Punta la telecamera: Guarda attraverso il viewmirino e inquadra il soggetto.
- Ingrandisci: Use the zoom buttons (usually marked 'W' for Wide and 'T' for Telephoto) to adjust the focal length of the 38-160mm lens.
- Messa a fuoco: Lightly press the shutter button halfway down. The camera's five-point passive autofocus system will focus on the subject. A focus indicator in the viewil mirino confermerà la messa a fuoco.
- Sparare: Premere completamente il pulsante di scatto per scattare la foto.
3.3. Modalità flash
The built-in flash provides illumination in low-light conditions. The camera features automatic backlight compensation, firing the flash when necessary to properly expose the subject.
- Flash automatico: La fotocamera determina automaticamente se è necessario il flash.
- Riduzione occhi rossi: Fires a pre-flash before the main flash to reduce red-eye effect.
- Flash disattivato: Prevents the flash from firing, useful in situations where flash is prohibited or undesirable.
3.4. Special Shooting Functions
- Modalità Panorama: Switch to panorama mode via the mode dial or a dedicated button. The viewfinder will adjust to show the panorama framing area. This mode allows for wider aspect ratio images.
- Autoscatto: Activate the self-timer (typically 10 seconds) using the mode dial or a dedicated button. The camera will delay taking the picture, allowing the photographer to be included in the shot.
- Multiexposure Mode: This creative mode allows you to combine two or more exposures onto a single frame of film. Consult the LCD instruction panel for guidance on activating and using this feature.
3.5. Viewfinder and LCD Panel
The actual-image zoom viewil cercatore fornisce una chiara view of your subject and includes a diopter adjustment for users with varying eyesight. The large LCD instruction panel displays essential camera settings and indicators, such as exposure counter, battery exhaustion warning, flash status, and selected mode. It automatically lights up for visibility in any lighting condition.
4. Manutenzione
4.1. Pulizia della fotocamera
- Lente: Use a soft, lint-free cloth or a lens brush to gently remove dust. For smudges, use a specialized lens cleaning solution and cloth. Avoid touching the lens surface with your fingers.
- Corpo macchina fotografica: Pulire il corpo della fotocamera con un panno morbido e asciutto. Per lo sporco ostinato, leggermente dampen the cloth with water. Do not use solvents or abrasive cleaners.
- Viewcercatore: Utilizzare una spazzola morbida o un soffiatore d'aria per rimuovere la polvere dal viewoculare cercatore.
4.2. Conservazione
- Quando non si utilizza la batteria per lunghi periodi, rimuoverla per evitare perdite.
- Store the camera in a cool, dry place, away from direct sunlight, high humidity, and extreme temperatures.
- Utilizzare una custodia o una borsa per proteggere la macchina fotografica dalla polvere e dai danni fisici.
5. Risoluzione Dei Problemi
| Problema | Soluzione | |
|---|---|---|
| La fotocamera non si accende. | Batteria scarica o inserita in modo errato. | Replace battery with a fresh CR123A/SF123A, ensuring correct polarity. |
| La pellicola non avanza. | Film not properly loaded or end of roll. | Re-load film, ensuring the leader catches the take-up spool. Check if the film counter shows 'S' or 'E'. |
| Le immagini sono sfocate. | Camera shake, subject too close, or focus error. | Hold camera steady, ensure subject is within focusing range, or use a tripod. Ensure focus confirmation appears before shooting. |
| Il flash non si attiva. | Flash is set to "Flash Off" mode or battery is low. | Check flash mode setting. Replace battery if low. |
| Occhi rossi nelle foto. | Flash fired directly at subject's eyes. | Use Red-eye Reduction flash mode. Increase ambient lighting if possible. |
6. Specifiche
| Generale | |
|---|---|
| Marca | Pentax |
| Nome del modello | IQ Zoom 160 |
| Numero di modello | 10124 |
| Fattore di forma | Compatto |
| Peso dell'articolo | 16 once |
| Materiale di recinzione | Plastica |
| Lente | |
| Tipo di lente | Ingrandire |
| Lunghezza focale minima | 38 millimetri |
| Lunghezza focale massima | 160 millimetri |
| Apertura minima | 4.5 |
| Modalità di apertura | 4.5-12 |
| Exposure & Focus | |
| Controllo dell'esposizione | Automatico |
| Metodi di misurazione | Spot, Multi-pattern |
| Velocità minima dell'otturatore | 1/400 secondi |
| Velocità massima dell'otturatore | 2 secondi |
| Tecnologia di messa a fuoco automatica | Rilevamento del contrasto, multiarea, sensore |
| Punti di messa a fuoco automatica | 5 |
| Modalità di messa a fuoco | AF monoservo (AF-S) |
| Impostazioni del bilanciamento del bianco | Auto |
| Minimo ISO espanso | 100 |
| Flash | |
| Flash della fotocamera | Incorporato |
| Modalità flash | Automatic, Red Eye Reduction |
| Velocità di sincronizzazione del flash | 1/400 secondi |
| Altre caratteristiche | |
| Viewcercatore | Ottico |
| Tipo di visualizzazione | LCD |
| Autoscatto | 10 secondi |
| Modalità di scatto | Automatic, Panorama, Multiexposure, Self-timer |
| Caratteristica speciale | Panorama |
| Tipo di batteria | 3V Lithium CR123A/SF123A |
| Livello di resistenza all'acqua | Non resistente all'acqua |
| Ha la stabilizzazione dell'immagine | NO |
7. Garanzia e supporto
For specific warranty information, please refer to the documentation included with your purchase or visit the official Pentax website. For technical support or service inquiries, please contact Pentax customer service directly.
You can often find additional support resources, FAQs, and contact information on the manufacturer's official websito.