
Introduzione
This manual provides instructions for the installation, operation, and maintenance of the Juno Lighting IC22 6-Inch IC Rated Universal Incandescent Housing. This housing is designed for new construction applications and features an Air-Loc seal to minimize air leakage, contributing to energy efficiency. It is suitable for direct contact with insulation (IC-rated).
Le caratteristiche principali includono:
- Adjustable Socket Plate: Accommodates various lamp and trim combinations.
- Presa staccabile: Features snap-in springs for easy bulb and trim changes.
- Air-Loc Seal: Reduces heating and cooling costs by preventing air infiltration and exfiltration.
- Classificazione IC: Approved for direct contact with insulation.
- Volume standardtage: Operates on 120 volts, suitable for most residential applications.

Image: The Juno Lighting IC22 6-Inch IC Rated Universal Incandescent Housing, showing its main components.
Informazioni sulla sicurezza
Si prega di leggere attentamente tutte le istruzioni prima dell'installazione e dell'uso. Il mancato rispetto di queste istruzioni può causare scosse elettriche, incendi o altri pericoli.
- AVVERTIMENTO: Rischio di scossa elettrica. Scollegare l'alimentazione dal fusibile o dall'interruttore prima dell'installazione o della manutenzione.
- ATTENZIONE: Risk of fire. Use only incandescent lamps entro il wat specificatotage and type for the chosen trim. Refer to trim instructions for specific lamp requisiti.
- Ensure all electrical connections are made in accordance with local codes and ordinances, as well as the National Electrical Code (NEC).
- Questo prodotto deve essere installato da un elettricista qualificato.
- Non alterare o modificare l'apparecchio.
- Tenere i materiali infiammabili lontano dalla lamp.
Contenuto della confezione
Verificare che tutti i componenti siano presenti prima di iniziare l'installazione:
- Juno Lighting IC22 Universal Incandescent Housing (1 unit)
Note: Trims and light bulbs are sold separately.
Configurazione e installazione
The IC22 housing is designed for new construction installations. Follow these steps for proper setup:
1. Preparare l'area di installazione
- Turn off power at the circuit breaker or fuse box before starting.
- Determine the desired location for the recessed light fixture. Ensure there is sufficient clearance above the ceiling for the housing.
- The housing is IC-rated, allowing direct contact with insulation.
2. Mount the Housing
The IC22 features a Real Nail 3 telescoping system for secure mounting:
- Extend the bar hangers to span between ceiling joists. The bugle-headed nails allow for easy repositioning.
- For suspended ceiling grids, use the integral T-bar clips to secure the housing.
- Utilize the patented breakaway bars for installations in tight joist spacing.
- The curved foot on the bar hangers facilitates alignment with the joist bottom.
- Once positioned, use the Quick-Loc slot and oversized set screw to lock the fixture in place.
- Bar hangers can be re-positioned 90 degrees if needed for specific installations.
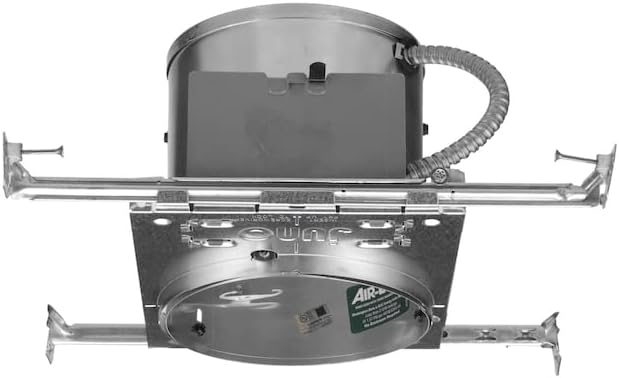
Immagine: In basso view of the IC22 housing, illustrating the adjustable bar hangers and mounting points.
3. Collegamenti elettrici
The IC22 includes a pre-wired junction box:
- Aprire il coperchio della scatola di giunzione.
- Connect the building's electrical supply wires to the housing's wires (black to black, white to white, ground to ground).
- The junction box has (5) 1/2-inch and (1) 3/4-inch knockouts for wiring entry.
- Use the (4) non-metallic sheathed cable connectors provided for secure wire entry.
- Ensure the ground wire is properly connected.
- The housing is UL Listed and C-UL/CSA certified for through-branch wiring, allowing a maximum of (8) 12-AWG conductors.
- Chiudere bene il coperchio della scatola di giunzione.

Immagine: Lato view of the IC22 housing, highlighting the pre-wired junction box for electrical connections.
4. Install Bulb and Trim
- The housing features an adjustable socket plate and a detachable medium base porcelain socket with nickel-plated copper screw shell.
- Insert the appropriate incandescent light bulb into the socket. Recommended lamp types include A19, BR30, BR40, PAR16, PAR20, PAR30, PAR30L, PAR38, and R20.
- Install the desired trim (sold separately) according to its specific instructions.
- The housing is wet location listed when using specific trims (239, 241, 242, 28, 29 with PAR30/PAR38 outdoor rated bulbs).
Istruzioni per l'uso
Once installed, the Juno IC22 housing operates as a standard incandescent recessed light fixture.
- Ensure the correct incandescent bulb type and wattage are used as specified by the chosen trim.
- The fixture is designed for 120-volt electrical systems.
- Control the light fixture using a standard wall switch or a compatible remote control system, if applicable to your setup.
Manutenzione
Regular maintenance ensures optimal performance and longevity of your recessed housing.
- Pulizia: Disconnect power before cleaning. Wipe the trim and exposed parts with a soft, dry cloth. Do not use abrasive cleaners or solvents.
- Sostituzione della lampadina: Always disconnect power before replacing a bulb. Allow the old bulb to cool completely before removal. Replace with a bulb of the same type and wattage as originally installed or as specified by the trim manufacturer.
- Ispezione: Periodically inspect the fixture for any signs of damage or loose connections. If any issues are found, consult a qualified electrician.
Risoluzione dei problemi
If you experience issues with your Juno IC22 housing, refer to the following common problems and solutions:
| Problema | Possibile causa | Soluzione |
|---|---|---|
| La luce non si accende | Nessuna alimentazione all'apparecchio Lampadina allentata Lampadina difettosa Cablaggio non corretto | Controllare l'interruttore/fusibile Stringere la lampadina Sostituire la lampadina Verify wiring connections (consult electrician) |
| La luce tremola | Lampadina allentata Interruttore dimmer incompatibile Collegamento del cablaggio allentato | Stringere la lampadina Ensure dimmer is compatible with incandescent loads Controllare i collegamenti elettrici (consultare un elettricista) |
| La lampadina si brucia rapidamente | Lampadina wat non correttatage Scarsa ventilazione Voltage fluttuazioni | Usa il wat correttotage lampadina Assicurare un corretto flusso d'aria attorno all'apparecchio Consult electrician for voltage problemi |
Specifiche
| Attributo | Dettaglio |
|---|---|
| Marca | Giunone |
| Numero di modello | IC22 |
| Nome del modello | Seleziona contraente |
| Nome del tipo di articolo | 6-Inch IC Rated Universal Incandescent Housing |
| Misurare | 6 pollici |
| Stile | Modello base |
| Colore | Nuova costruzione |
| Materiale | Alluminio |
| Forma | Girare |
| Dimensioni del prodotto (L x P x A) | 16.5" x 16.5" x 7.1" |
| Peso dell'articolo | 2.5 libbre |
| Fonte di alimentazione | Elettrico con cavo |
| Metodo di controllo | Remote (compatible with certain systems) |
| Sorgente luminosa | Incandescent |
| Numero di sorgenti luminose | 1 |
| Voltage | 120 Volt |
| Base della lampadina | E26 Medio |
| Tipo di montaggio | Da incasso |
| Tipo di installazione | Clip, Screw |
| Potenza luminosa massima | 1080 Lumens (dependent on bulb) |
| Componenti inclusi | Universal Incandescent Housing |
| Codice UPC | 661209700216 |
| Certificazioni | UL Listed, C-UL/CSA certified, IECC, MEC, City of Chicago IP requirements |

Image: The IC22 housing with key dimensions (7.125" height, 9.5" width) indicated.
Garanzia e supporto
Garanzia del produttore
Juno Lighting Group warrants that its products are free from defects in material and workmanship. Juno Lighting Group's obligation is expressly limited to repair or replacement, without charge, at Juno Lighting Group's factory after prior written return authorization has been granted. This warranty shall not apply to products which have been altered or repaired outside of Juno Lighting Group's factory. This warranty is in lieu of all other warranties, expressed or implied, and without limiting the generality of the foregoing phrase, excludes any implied warranty of merchantability. Also, there are no warranties which extend beyond the description of the product on the company's literature setting forth terms of sale.
The warranty period for general lighting products is one year from the date of purchase.
Assistenza clienti
For technical assistance, troubleshooting beyond this manual, or warranty claims, please contact Juno Lighting Group customer support. Refer to the official Juno websito per informazioni di contatto aggiornate.
Puoi anche visitare il Negozio Juno su Amazon per ulteriori informazioni e risorse sul prodotto.