
1. Introduzione
Thank you for choosing the Pyramid 903G 10 Band Half-DIN Graphic Equalizer Amplifier. This unit is designed to enhance your car audio system by providing precise sound control and amplification. Please read this manual thoroughly before installation and operation to ensure proper use and optimal performance.
2. Informazioni importanti sulla sicurezza
- Installazione professionale consigliata: Due to the complexity of car audio wiring, professional installation is highly recommended. Incorrect wiring can damage the unit or your vehicle's electrical system.
- Fonte di energia: This unit is designed for 12V DC negative ground systems only. Do not attempt to use it with other voltage sistemi.
- Ventilazione: Ensure adequate ventilation around the unit. The unit can generate heat during operation. Avoid installing in enclosed spaces without airflow.
- Cablaggio: Always disconnect the vehicle's battery before performing any wiring. Use appropriate gauge wires for power and speaker connections.
- Umidità: Non esporre l'unità a umidità o acqua.
- Protezione del fusibile: Ensure proper fuse protection is in place for the power supply.
3. Prodotto finitoview
3.1 Caratteristiche
- Half-DIN Design (1-Inch Tall)
- 10 Band Graphic Equalizer with 12dB Boost/Cut per band
- Interruttore di accensione/spegnimento
- Dual Channel Multi-Colored Power Level Indicators
- 100 Watts x 2 Maximum Output
- 2/4 Speaker Hook-up Capability
- Controllo fader
- Common or Floating Ground
- Automatic Overload Sensing Circuit
3.2 Contenuto della confezione
Si prega di verificare che tutti gli elementi siano presenti:
- Pyramid 903G Equalizer AmpUnità lificatore
- Hardware di montaggio (viti, staffe)
- Wiring Harness (if included)
- Manuale dell'utente (questo documento)
3.3 Controlli del pannello frontale
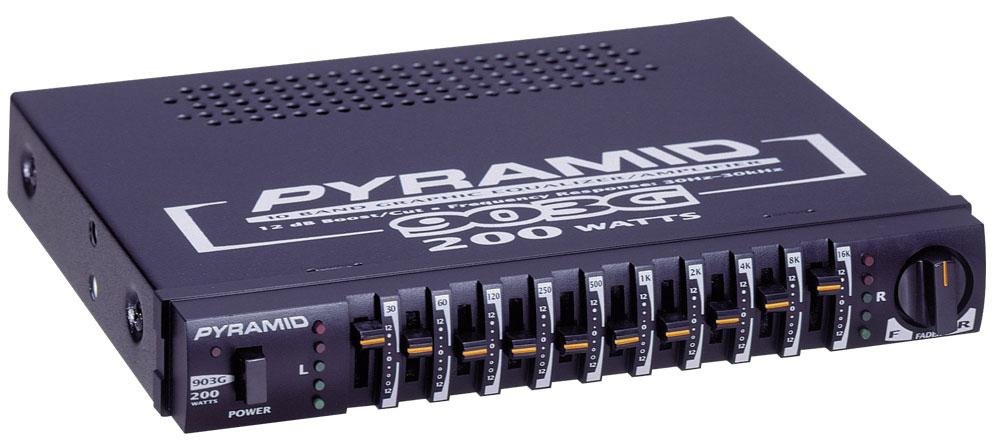
Figura 1: Davanti view of the Pyramid 903G Graphic Equalizer Amplifier. This image shows the 10 equalizer bands, power switch, fader control, and multi-colored power level indicators.
- Equalizer Bands (1-10): Sliders for adjusting specific frequency ranges.
- Interruttore di accensione/spegnimento: Attiva/disattiva l'alimentazione dell'unità.
- Controllo fader: Adjusts the balance between front and rear speakers.
- Indicatori del livello di potenza: Multi-colored LEDs indicating output power levels.
4. Installazione e cablaggio
Before beginning installation, ensure the vehicle's battery is disconnected to prevent electrical shorts. This unit is designed for 12V DC negative ground systems.
4.1 Montaggio
- The 903G features a Half-DIN design, allowing for flexible installation in various vehicle dashboards or consoles.
- Choose a location that provides adequate ventilation to dissipate heat, as the unit can become warm during operation.
- Fissare l'unità utilizzando l'hardware di montaggio fornito.
4.2 Collegamenti di cablaggio
Refer to the wiring diagram (if provided with your unit) for specific connections. The following describes general wiring principles:
- Power (RED wire): Connect to a switched 12V DC power source (e.g., ignition wire) that turns on and off with the vehicle's ignition. Ensure this connection is fused.
- Ground (BLACK wire): Connect securely to a clean, unpainted metal chassis point in the vehicle. A poor ground connection can lead to noise (ground loops).
- Remote Turn-On (BLUE wire - if present): Connect to the remote output of your head unit. This will turn the equalizer on and off with your head unit.
- Ingresso audio: Connect the speaker outputs from your head unit to the corresponding input terminals on the 903G. The unit supports 2 or 4 speaker hook-up.
- Uscita altoparlante: Connect your vehicle's speakers to the output terminals of the 903G. Ensure correct polarity (+ to + and - to -). The unit supports 4-8 Ohm output impedance.
Note: The unit's wiring may be angled downwards, which can reduce effective wire length. Plan your wire routing accordingly.
5. Funzionamento
Once installed and wired correctly, follow these steps to operate your Pyramid 903G:
- Accensione: Turn on your vehicle's ignition and your head unit. If wired correctly, the 903G should power on automatically or by using its Power ON/OFF switch. The multi-colored power level indicators will illuminate.
- Controllo audio iniziale: Start with all equalizer bands set to the center (flat) position. Play a familiar audio track.
- Adjust Fader Control: Use the Fader control to balance the sound between your front and rear speakers to your preference.
- Equalizzazione: Adjust the 10 equalizer band sliders to fine-tune the audio frequencies. Each band allows for up to 12dB of boost or cut.
- Lower frequencies (leftmost sliders) control bass.
- Mid-range frequencies (middle sliders) control vocals and instruments.
- Higher frequencies (rightmost sliders) control treble and clarity.
- Monitor Power Level Indicators: The multi-colored LEDs provide a visual indication of the amplifier's output. Avoid consistently high levels that may indicate clipping or distortion.
6. Manutenzione
- Pulizia: Use a soft, dry cloth to clean the unit's exterior. Do not use harsh chemicals or abrasive cleaners.
- Ventilazione: Periodically check that the ventilation areas are not obstructed by dust or debris.
- Connessioni: Ensure all wiring connections remain secure. Loose connections can lead to intermittent sound or noise.
7. Risoluzione Dei Problemi
| Problema | Possibile causa | Soluzione |
|---|---|---|
| Nessuna alimentazione / L'unità non si accende |
|
|
| Nessuna uscita audio |
|
|
| Engine noise (whine, hiss) |
|
|
| L'unità diventa eccessivamente calda |
|
|
8. Specifiche
| Numero di modello | 903G |
| Progetto | Half-DIN (1-Inch Tall) |
| Bande di equalizzazione | Bande 10 |
| Intervallo di aumento/riduzione | +/- 12 dB per banda |
| Potenza massima in uscita | 100 Watt x 2 |
| Speaker Hook-up | 2/4 Speaker |
| Risposta in frequenza | 30 Hz - 30 kHz |
| Impedenza di uscita | 4-8 Ohm |
| Sistema di alimentazione | 12V CC Massa negativa |
| Dimensioni (L x P x A) | 5-Inch x 7-Inch x 1-Inch (Product) |
| Peso | 1.7 pounds (Product) |
9. Informazioni sulla garanzia
The Pyramid 903G comes with a 1 ANNO limited warranty from the date of purchase. This warranty covers manufacturing defects in materials and workmanship under normal use. It does not cover damage resulting from improper installation, accident, misuse, abuse, neglect, unauthorized modification, or normal wear and tear. Please retain your proof of purchase for warranty claims.
10. Assistenza clienti
For technical assistance, troubleshooting, or warranty inquiries, please contact Pyramid customer support. Refer to the official Pyramid websito o nella documentazione di acquisto per le informazioni di contatto più aggiornate.
Note: When contacting support, please have your product model number (903G) and proof of purchase readily available.