1. Introduzione
This manual provides essential information for the safe and efficient operation of your Singer Tiny Tailor Mending Sewing Machine, Model TT600. Designed for quick mending tasks, this compact and portable machine offers a durable lockstitch for various fabric repairs.

Image 1.1: The Singer Tiny Tailor Mending Sewing Machine shown in its original packaging. This image provides a general overview del prodotto così come appare una volta disimballato.
2. Istruzioni di sicurezza
Please read all instructions before using this appliance to reduce the risk of fire, electric shock, or injury to persons.
- Always unplug the machine from the electrical outlet immediately after using and before cleaning, making any adjustments, or removing/attaching any parts.
- Non utilizzare la macchina se il cavo o la spina sono danneggiati, oppure se è caduta o è danneggiata.
- Tenere le dita lontane da tutte le parti in movimento. È necessaria una cura speciale intorno all'ago della macchina per cucire.
- Utilizzare solo accessori consigliati dal produttore.
- Non far cadere o inserire mai alcun oggetto in nessuna apertura.
- Non utilizzare all'aperto.
- Non operare in luoghi in cui vengono utilizzati prodotti aerosol (spray) o in cui viene somministrato ossigeno.
3. Contenuto della confezione
Verificare che tutti gli articoli siano presenti nel pacco:
- Singer Tiny Tailor Mending Sewing Machine (Model TT600)
- Controllo a pedale
- Adattatore di alimentazione
- Extra Needle
- Bobbins (pre-wound or empty)
- Infila ago
- Seam Opener/Thread Trimmer
- Manuale di istruzioni (questo documento)
4. Identificazione delle parti
Familiarize yourself with the components of your sewing machine:
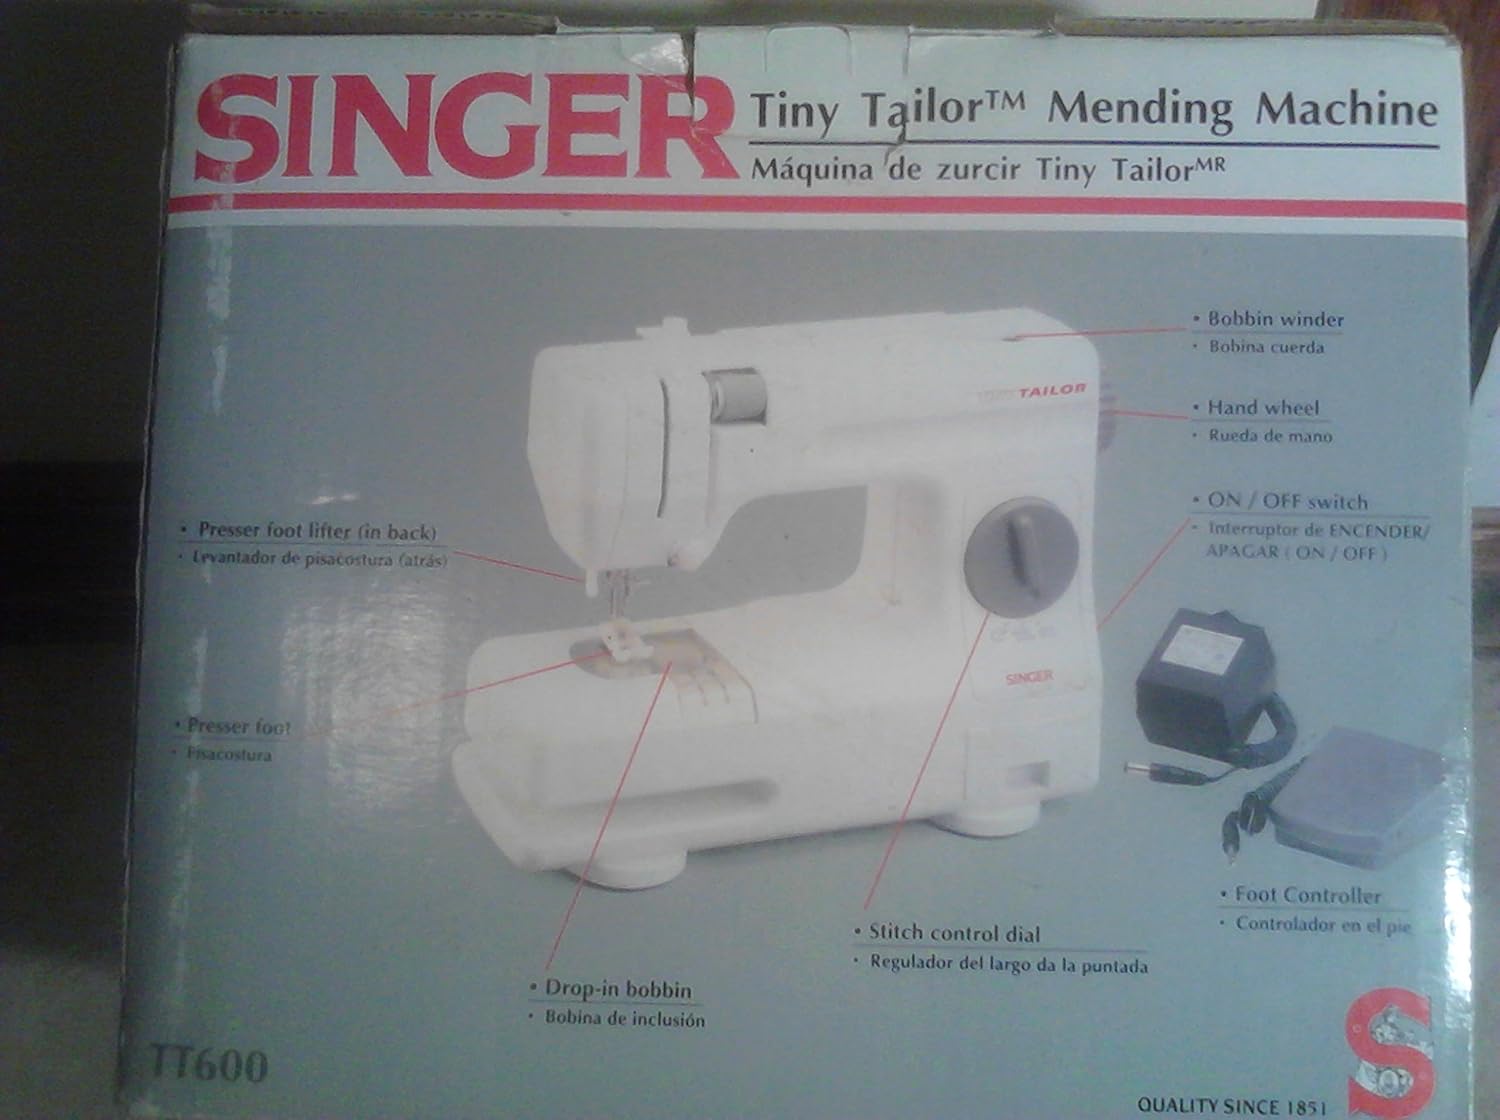
Image 4.1: Diagram illustrating the key parts of the Singer Tiny Tailor Mending Sewing Machine, including the bobbin winder, hand wheel, ON/OFF switch, presser foot lifter, presser foot, drop-in bobbin, stitch control dial, and foot controller.
- Avvolgitore della bobina: Used to wind thread onto bobbins.
- Volantino: Solleva e abbassa manualmente l'ago.
- Interruttore ON/OFF: Accende o spegne la macchina.
- Sollevatore del piedino: Solleva e abbassa il piedino premistoffa.
- Piedino premistoffa: Mantiene saldamente in posizione il tessuto durante la cucitura.
- Drop-in Bobbin: Easy access bobbin system.
- Stitch Control Dial: Adjusts the length of the stitch.
- Comando a pedale: Controls the sewing speed, freeing hands for fabric guidance.
5. Impostazione
5.1 Collegamento di alimentazione
- Ensure the ON/OFF switch is in the "OFF" position.
- Insert the power adapter plug into the machine's power jack.
- Collega l'alimentatore a una presa elettrica standard.
5.2 Foot Control Connection
- Locate the foot control jack on the machine.
- Insert the foot control plug firmly into the jack.
5.3 Avvolgimento della bobina
- Posizionare un rocchetto di filo sul portarocchetto.
- Far passare il filo attraverso il disco di tensione per l'avvolgimento della bobina.
- Posizionare una bobina vuota sul perno dell'avvolgitore.
- Avvolgere il filo attorno alla bobina alcune volte, quindi spingere il perno dell'avvolgitore della bobina verso destra.
- Turn on the machine and gently press the foot control until the bobbin is sufficiently wound.
- Push the bobbin winder spindle back to the left and trim the thread.
5.4 Inserting the Drop-in Bobbin
- Aprire la piastra di copertura della bobina.
- Inserire la bobina avvolta nella capsula, assicurandosi che il filo si svolga nella direzione corretta (solitamente in senso antiorario).
- Far passare il filo della bobina attraverso la molla di tensione e nella fessura del guidafilo.
- Chiudere la piastra di copertura della bobina.
5.5 Infilatura del filo superiore
- Sollevare l'alzapiedino.
- Posizionare un rocchetto di filo sul portarocchetto.
- Guide the thread through the upper thread guides and tension discs as indicated by the machine's markings.
- Thread the needle from front to back using the needle threader or manually.
- Tirare circa 6 cm di filo attraverso la cruna dell'ago.
5.6 Estrazione del filo della bobina
- Tenere delicatamente il filo superiore con la mano sinistra.
- Turn the hand wheel towards you to lower the needle into the needle plate and then raise it again.
- The needle thread will catch the bobbin thread, forming a loop.
- Pull the loop to bring the bobbin thread up through the needle plate opening.
- Tirare sia il filo superiore che quello della bobina sotto il piedino premistoffa e verso la parte posteriore della macchina.
6. Funzionamento della macchina
6.1 Cuciture di base
- Place the fabric under the presser foot, aligning the edge with a seam guide if available.
- Abbassare il piedino premistoffa utilizzando l'apposito alzapiedino.
- Accendere la macchina utilizzando l'interruttore ON/OFF.
- Gently press the foot control to start sewing. The harder you press, the faster the machine will sew.
- Guide the fabric gently with both hands, ensuring it feeds evenly. Do not pull or push the fabric forcefully.
- To stop sewing, release the foot control.
- Raise the needle to its highest position by turning the hand wheel.
- Raise the presser foot and pull the fabric away from the machine.
- Trim the threads using the seam opener/thread trimmer or scissors.
6.2 Adjusting Stitch Length
The Stitch Control Dial allows you to adjust the length of your stitches. Turn the dial to select the desired stitch length. Experiment on scrap fabric to find the appropriate setting for your project.
6.3 Mending Techniques
The Tiny Tailor is ideal for quick mending. For tears, align the edges of the fabric and stitch across the tear, overlapping the stitches slightly for reinforcement. For seams, simply stitch along the original seam line. For delicate fabrics, use a finer needle and thread and a shorter stitch length.
7. Manutenzione
7.1 Pulizia
Una pulizia regolare aiuta a mantenere le prestazioni della macchina:
- Scollegare sempre la macchina prima della pulizia.
- Use a soft brush or lint brush to remove lint and dust from the bobbin area and under the needle plate.
- Pulire l'esterno della macchina con un panno morbido e asciutto. Non utilizzare detergenti liquidi o prodotti chimici aggressivi.
7.2 Sostituzione dell'ago
Replace the needle regularly, especially if it becomes bent, dull, or if you experience skipped stitches or thread breakage.
- Assicurarsi che la macchina sia scollegata.
- Allentare l'ago clamp vite.
- Rimuovere il vecchio ago.
- Inserire un nuovo ago con il lato piatto rivolto verso il retro della macchina, spingendolo verso l'alto il più possibile.
- Stringere l'ago clamp avvitare saldamente.
8. Risoluzione Dei Problemi
| Problema | Possibile causa | Soluzione |
|---|---|---|
| La macchina non si accende | Power cord not plugged in; ON/OFF switch off. | Check power connections; ensure switch is ON. |
| Punti saltati | Bent or dull needle; incorrect needle size; improper threading. | Replace needle; ensure correct needle for fabric; re-thread machine. |
| Rottura del filo | Incorrect tension; poor quality thread; needle bent or dull; improper threading. | Adjust tension; use good quality thread; replace needle; re-thread machine. |
| Tessuto non alimentato | Presser foot not lowered; lint under needle plate. | Lower presser foot; clean bobbin area. |
| Il filo della bobina si aggroviglia | Improper bobbin insertion; incorrect bobbin winding. | Re-insert bobbin correctly; re-wind bobbin evenly. |
9. Specifiche
| Numero di modello | TT600 |
| Marca | SINGER |
| ASIN | B000KGIHVI |
| Codice UPC | 037431203144 |
| Colore | Bianco |
| è elettrico | SÌ |
| Batterie richieste | NO |
| Peso dell'articolo | 6.05 libbre |
| Dimensioni del pacco | 13.4 x 10.3 x 8.5 pollici |
10. Garanzia e supporto
For warranty information, product registration, or technical support, please refer to the official SINGER weboppure contatta direttamente il servizio clienti. Conserva la ricevuta d'acquisto come prova d'acquisto.
Nota: i termini specifici della garanzia possono variare in base alla regione e al rivenditore.