
Friedrich P12B
Manuale utente del condizionatore d'aria portatile Friedrich 11600 BTU
Modello: P12B
Introduzione
Thank you for choosing the Friedrich 11600 Btu Portable Air Conditioner. This manual provides important information for the proper installation, operation, and maintenance of your new air conditioner. Please read this manual thoroughly before using the appliance and keep it for future reference.
Informazioni importanti sulla sicurezza
Per ridurre il rischio di incendi, scosse elettriche o lesioni durante l'utilizzo del condizionatore d'aria, attenersi alle seguenti precauzioni di base:
- Leggere tutte le istruzioni prima di utilizzare l'apparecchio.
- Assicurarsi che l'alimentazione corrisponda al voltage specificato sulla targhetta dei dati tecnici.
- Non utilizzare il condizionatore d'aria se il cavo o la spina sono danneggiati.
- Non bloccare le prese d'aria o le prese d'aria.
- Scollegare sempre l'unità prima di pulirla o sottoporla a manutenzione.
- Keep the unit on a flat, stable surface to prevent water leakage.
- Questo apparecchio non è destinato all'uso da parte di persone (bambini compresi) con ridotte capacità fisiche, sensoriali o mentali, o prive di esperienza e conoscenza, a meno che non siano supervisionate o abbiano ricevuto istruzioni riguardanti l'uso dell'apparecchio da una persona responsabile della loro sicurezza.
Contenuto della confezione
Verificare che tutti i componenti siano presenti e in buone condizioni:
- Friedrich 11600 Btu Portable Air Conditioner Unit
- Telecomando
- (2) Exhaust Hoses
- Sliding Window Curtain for Each Side of the Hose to Seal Window Opening
- Manuale dell'utente (questo documento)
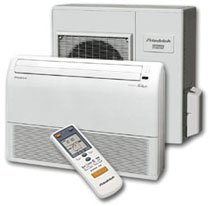
An image showing the Friedrich 11600 Btu Portable Air Conditioner unit, which is white and rectangular, along with its accompanying remote control. The unit features a front grille and control panel, while the remote control has a small display and various buttons.
Impostare
1. Disimballaggio
Estrarre con cautela il condizionatore e tutti gli accessori dall'imballaggio. Conservare l'imballaggio originale per un eventuale stoccaggio o trasporto futuro.
2. Posizionamento
- Place the unit on a firm, level surface in a location that is not exposed to direct sunlight or heat sources.
- Assicurarsi che ci siano almeno 50 cm di spazio attorno all'unità per una corretta circolazione dell'aria.
- The unit must be placed near a window or opening to allow for exhaust hose installation.
3. Installazione del kit per finestre
The unit comes with two exhaust hoses and a sliding window curtain system for sealing the window opening.
- Attach one end of each exhaust hose to the designated exhaust ports on the back of the air conditioner.
- Extend the sliding window curtain to fit your window opening.
- Insert the other ends of the exhaust hoses into the openings in the window curtain.
- Secure the window curtain in the window frame, ensuring a tight seal to prevent outside air from entering.
- Ensure the exhaust hoses are not kinked or bent sharply, as this can restrict airflow and reduce efficiency. The maximum exhaust hose length is 5 ft.
4. Collegamento elettrico
Plug the power cord into a grounded 120V, 60Hz electrical outlet. The power cord length is 6 ft. Do not use extension cords or adapter plugs.
Istruzioni per l'uso
Pannello di controllo Fineview
The control panel on the unit features buttons for Power, Mode, Fan Speed, Temperature Up/Down, and Timer. A digital display shows the current temperature or timer settings.
Funzioni del telecomando
The remote control provides full functionality from a distance. Ensure batteries are correctly installed.
- Pulsante di accensione: Accende o spegne l'unità.
- Pulsante Modalità: Cycles through cooling, fan-only, and dry (dehumidify) modes.
- Pulsante velocità ventola: Adjusts fan speed (Low, Medium, High). There are 3 cooling speeds and 3 fan-only speeds.
- Pulsanti della temperatura (su/giù): Adjusts the desired temperature in cooling mode.
- Pulsante Timer: Imposta il timer di accensione o spegnimento automatico.
Modalità operative
- Modalità fredda: Provides cooling. Set your desired temperature using the Up/Down buttons. The unit will cycle on and off to maintain the set temperature.
- Modalità ventola: Circulates air without cooling. Use this mode for ventilation.
- Modalità di asciugatura (deumidificazione): Riduce l'umidità nella stanza. In questa modalità, la velocità della ventola è solitamente fissa.
Manutenzione
Una manutenzione regolare garantisce prestazioni ottimali e prolunga la durata del tuo condizionatore.
1. Pulizia del filtro dell'aria
Il filtro dell'aria deve essere pulito ogni due settimane o più frequentemente, a seconda dell'utilizzo e della qualità dell'aria.
- Spegnere e scollegare l'unità.
- Locate and remove the air filter (usually behind a grille).
- Lavare il filtro con acqua calda e sapone. Risciacquare abbondantemente.
- Attendere che il filtro si asciughi completamente all'aria prima di reinstallarlo.
2. Drenaggio dell'acqua
The unit collects condensation during operation. Depending on humidity levels, you may need to drain the water periodically.
- Drenaggio continuo: For continuous operation in high humidity, connect a drain hose (not included) to the continuous drain port and route it to a floor drain or bucket.
- Drenaggio manuale: When the internal water tank is full, the unit may stop operating and display an indicator. Turn off and unplug the unit, place a shallow pan under the drain port, and remove the drain plug to empty the water.
3. Pulizia esterna
Pulire l'esterno dell'unità con un panno morbido, damp stoffa. Non utilizzare prodotti chimici aggressivi o detergenti abrasivi.
4. Conservazione
Se si conserva l'unità per un periodo prolungato:
- Scolare tutta l'acqua accumulata.
- Pulire il filtro dell'aria.
- Scollegare il cavo di alimentazione e arrotolarlo ordinatamente.
- Conservare l'unità in un luogo fresco e asciutto, preferibilmente nella sua confezione originale.
Risoluzione dei problemi
Prima di contattare l'assistenza clienti, prova questi comuni passaggi per la risoluzione dei problemi:
| Problema | Possibile causa | Soluzione |
|---|---|---|
| L'unità non si accende. | Nessuna alimentazione; cavo di alimentazione scollegato; interruttore automatico scattato. | Ensure unit is plugged in; check circuit breaker; try a different outlet. |
| L'unità non raffredda in modo efficace. | Air filter dirty; exhaust hose blocked/kinked; room too large; windows/doors open. | Clean air filter; check exhaust hose for obstructions; ensure room is sealed; verify unit BTU matches room size. |
| Perdita d'acqua. | Unit not level; drain plug loose; internal water tank full. | Place unit on a level surface; ensure drain plug is secure; drain water from the unit. |
| L'unità è rumorosa. | Unità non posizionata su una superficie piana; ostruzione della ventola. | Ensure unit is on a level surface; check for foreign objects near fan. |
Specifiche
| Caratteristica | Dettaglio |
|---|---|
| Numero di modello | P12B |
| Capacità di raffreddamento | 11,600 BtuH |
| Voltage | 120 Volt |
| Frequenza | Frequenza 60 Hz |
| Amprabbia | 11.5 Amps |
| Consumo energetico | 1351 Watt |
| Livello di rumore | 48 dB |
| Dimensioni (P x L x A) | 15.5"P x 19.25"L x 33.63"A |
| Refrigerante | La 410A |
| Max. Exhaust Hose Length | 5 piedi |
| Lunghezza del cavo di alimentazione | 6 piedi |
| Tipo di controllo | Elettronica con telecomando |
| Velocità di raffreddamento | 3 |
| Fan-Only Speeds | 3 |
| Campo operativo ambientale | 63 a 95 gradi F |
| Supply CFM | 255 |
| Standard | UL/Cul |
Garanzia e supporto
For warranty information and customer support, please refer to the warranty card included with your product or visit the official Friedrich websito. Conservare la ricevuta d'acquisto come prova d'acquisto per eventuali reclami in garanzia.
If you encounter issues not covered in the troubleshooting section, please contact Friedrich customer service for assistance.
Ask a question about this manual
Ask about setup, troubleshooting, compatibility, parts, safety, or missing instructions. Manuals+ will review the question and use this page’s manual context to help answer it.