
1. Introduzione
This manual provides detailed instructions for the safe and efficient use of your Vivitar VIVICAM-7340RED 7.0MP Digital Camera. Please read this manual thoroughly before operating the camera and keep it for future reference. Your camera is designed for capturing high-quality still images and video recordings with ease.
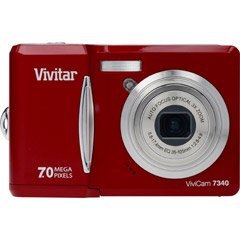
Figura 1: Fronte view of the Vivitar VIVICAM-7340RED Digital Camera. This image shows the lens, flash, and the overall compact design of the camera.
2. Impostazione
2.1. Inserimento delle batterie
- Individuare il coperchio del vano batteria nella parte inferiore o laterale della fotocamera.
- Far scorrere il fermo per aprire il coperchio.
- Insert the required batteries (typically AA or AAA, refer to packaging) according to the polarity indicators (+ and -) inside the compartment.
- Chiudere saldamente il coperchio del vano batteria finché non scatta in posizione.
Note: Ensure batteries are inserted with correct polarity as indicated inside the compartment.
2.2. Inserimento di una scheda di memoria
Your camera requires a compatible memory card (e.g., SD card) to store photos and videos. The memory card slot is usually located near the battery compartment or on the side of the camera.
- Aprire il coperchio dello slot della scheda di memoria.
- Insert the memory card with the metal contacts facing the correct direction (refer to the diagram near the slot). Push gently until it clicks into place.
- Chiudere il coperchio dello slot della scheda di memoria.
Note: Do not force the memory card. If it does not insert easily, check its orientation.
2.3. Accensione/Spegnimento
- Per accendere la fotocamera, premere il tasto ENERGIA button. The LCD screen will illuminate.
- Per spegnere la fotocamera, tenere premuto il tasto ENERGIA button again until the LCD screen turns off.
2.4. Initial Settings (Date & Time)
Upon first use or after battery replacement, you may need to set the date and time. Follow the on-screen prompts or navigate to the MENU > IMPOSTARE > DATA/ORA option to adjust these settings.
3. Utilizzo della fotocamera
3.1. Scattare foto
- Turn on the camera. Ensure it is in photo capture mode (usually indicated by a camera icon on the LCD).
- Inquadra il tuo scatto utilizzando lo schermo LCD da 2.4 pollici.
- Press the shutter button halfway down to allow the camera to focus. A green frame or beep typically indicates focus lock.
- Premere completamente il pulsante di scatto per catturare l'immagine.
3.2. Utilizzo dello zoom ottico
Your camera features a 3x optical zoom. Use the zoom lever (often located around the shutter button) to zoom in or out. Optical zoom adjusts the lens elements to magnify the subject without losing image quality.
- Push the zoom lever towards T (Teleobiettivo) per ingrandire.
- Push the zoom lever towards W (Ampio) per ridurre lo zoom.
The camera also has a 5x digital zoom, which can be accessed after reaching the maximum optical zoom. Digital zoom digitally enlarges the image, which may result in reduced image quality.
3.3. Registrazione di video
- Switch the camera to video recording mode (usually via a mode dial or menu option).
- Press the shutter button to start recording. A red dot or timer on the LCD indicates recording is in progress.
- Premere di nuovo il pulsante di scatto per interrompere la registrazione.
3.4. Viewing Foto e video
- Premere il tasto RIPRODUZIONE pulsante (spesso indicato da un'icona di riproduzione).
- Use the directional buttons to navigate through your captured images and videos.
- Per riprodurre un video, selezionarlo e premere il tasto OK or GIOCARE pulsante.
3.5. Trasferimento Files to a Computer (PictBridge)
Your camera is PictBridge compatible, allowing direct printing to compatible printers. For transferring files a un computer:
- Collega la fotocamera al computer utilizzando il cavo USB in dotazione.
- Turn on the camera. It should appear as a removable disk or device on your computer.
- Open the camera's folder and copy the desired photos and videos to your computer.
- Prima di scollegare il cavo USB, estrarre in modo sicuro la fotocamera dal computer.
4. Manutenzione
4.1. Pulizia della fotocamera
- Lente: Utilizzare un panno morbido e privo di lanugine, specificamente progettato per gli obiettivi delle fotocamere. Pulire delicatamente con movimenti circolari. Evitare l'uso di prodotti chimici aggressivi.
- Schermo LCD: Wipe with a soft, dry cloth. For stubborn smudges, a slightly damp cloth (water only) can be used, followed by a dry wipe.
- Corpo macchina fotografica: Utilizzare un panno morbido e asciutto per rimuovere polvere e impronte digitali.
Do not use solvents, alcohol, or abrasive cleaners on any part of the camera.
4.2. Cura della batteria
- Se si prevede di non utilizzare la fotocamera per un periodo prolungato, rimuovere le batterie per evitare perdite.
- Utilizzare solo i tipi di batteria consigliati.
- Smaltire le vecchie batterie in modo responsabile secondo le normative locali.
4.3. Conservazione
Store the camera in a cool, dry place away from direct sunlight, extreme temperatures, and high humidity. Use the included case for protection during transport.
5. Risoluzione Dei Problemi
| Problema | Possibile causa | Soluzione |
|---|---|---|
| La fotocamera non si accende. | Batterie scariche o inserite in modo errato. | Sostituire le batterie o assicurarsi che siano inserite con la polarità corretta. |
| Le foto sono sfocate. | Fotocamera mossa, fuori fuoco o obiettivo sporco. | Hold camera steady, ensure focus is achieved before shooting, clean the lens. |
| Messaggio "Errore della scheda di memoria". | Card not inserted correctly, damaged, or full. | Reinsert card, try a different card, or delete fileper liberare spazio. |
| Il flash non funziona. | Flash mode set to OFF, or batteries low. | Controllare le impostazioni del flash nel menu, sostituire le batterie. |
6. Specifiche
| Caratteristica | Dettaglio |
|---|---|
| Marca | Vivitar |
| Numero di modello | VIVICAM-7340RED |
| Risoluzione fissa efficace | 7 MP |
| Zoom ottico | 3x |
| Digital Zoom | 5x |
| Dimensioni dello schermo LCD | 2.4 pollici |
| Registrazione video | Up to 640 x 480 at 30fps |
| Risoluzione dell'immagine | Fino a 3072 x 2304 |
| Messa a fuoco automatica | SÌ |
| PictBridge Compatible | SÌ |
| Fonte di alimentazione | Batterie (incluse) |
| Colore | Rosso |


