
KLH KL-300i
KLH AUDIO KL-300i Nostalgia 5-n-1 System
Model: KL-300i
Introduzione
Grazie per l'acquistoasing the KLH AUDIO KL-300i Nostalgia 5-n-1 System. This integrated audio system combines classic and modern audio playback capabilities, including a turntable, CD player, cassette player, AM/FM radio, and an iPod dock. This manual provides essential information for setting up, operating, and maintaining your system to ensure optimal performance and longevity.
Informazioni sulla sicurezza
Please read all safety instructions carefully before operating this product. Keep this manual for future reference.
- Fonte di energia: Collegare l'unità solo a una presa di corrente CA con la tensione specificatatage.
- Ventilazione: Assicurare una ventilazione adeguata. Non ostruire le aperture di ventilazione.
- Acqua e umidità: Non esporre l'unità a pioggia o umidità. Non posizionare oggetti contenenti liquidi, come vasi, sull'unità.
- Calore: Non posizionare l'unità vicino a fonti di calore quali radiatori, bocchette di riscaldamento, stufe o altri apparecchi (inclusi amplificatori) che producono calore.
- Pulizia: Scollegare l'unità dalla presa a muro prima di pulirla. Utilizzare solo un panno asciutto.
- Manutenzione: Non tentare di riparare questo prodotto da soli. Affidare tutte le operazioni di manutenzione a personale di assistenza qualificato.
Contenuto della confezione
Verificare che tutti gli articoli elencati di seguito siano inclusi nella confezione:
- KLH AUDIO KL-300i Main Unit
- Telecomando
- Cavo di ingresso ausiliario
- AM/FM Antenna Wire
- Manuale di istruzioni (questo documento)
Prodotto finitoview
Familiarize yourself with the various components and controls of your KLH AUDIO KL-300i system.
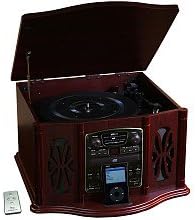
This image displays the KLH AUDIO KL-300i Nostalgia 5-n-1 System. The unit features a dark wood finish. The top lid is open, revealing a turntable. Below the turntable, the front panel includes controls for the CD player, AM/FM radio tuner, and an iPod dock. A small remote control is visible to the left of the main unit.
Controlli del pannello frontale:
- Pulsante di accensione: Accende o spegne l'unità.
- Selettore di funzioni: Switches between Phono, CD, Radio, iPod, and Aux modes.
- Manopola del volume: Regola il livello del volume principale.
- CD Player Controls: Riproduci/Pausa, Interrompi, Salta avanti/indietro.
- Sintonizzatore radio: AM/FM band selector, Tuning knob.
- Dock per iPod: Connector for iPod devices.
- Jack Aux-In: Ingresso da 3.5 mm per dispositivi audio esterni.
- Jack per cuffie: Uscita da 3.5 mm per l'ascolto privato.
Pannello superiore:
- giradischi: Per riprodurre dischi in vinile.
- Coperchio: Protects the turntable when not in use.
Pannello laterale:
- Registratore a cassette: Per riprodurre audiocassette.
Impostare
Follow these steps for initial setup of your audio system.
- Posizionamento: Place the unit on a stable, flat surface away from direct sunlight, heat sources, and excessive dust or moisture. Ensure there is adequate space around the unit for ventilation.
- Collegare l'antenna: For optimal AM/FM radio reception, connect the supplied antenna wire to the antenna terminal on the rear of the unit. Extend the wire fully for better reception.
- Collegamento elettrico: Collegare il cavo di alimentazione CA a una presa a muro standard.
- Accensione iniziale: Press the Power button on the front panel to turn on the unit.
Istruzioni per l'uso
Funzionamento generale:
- Accensione/spegnimento: Premere il pulsante di accensione per accendere o spegnere l'unità.
- Selezione della funzione: Use the Function Selector knob or buttons to choose your desired audio source (Phono, CD, Radio, iPod, Aux).
- Regolazione del volume: Ruotare la manopola del volume per aumentare o diminuire il livello del suono.
Funzionamento del giradischi:
- Lift the lid of the unit.
- Posiziona un disco in vinile sul piatto del giradischi.
- Select the appropriate speed (33 1/3, 45, or 78 RPM) using the speed selector switch. For 45 RPM records, place the included adapter on the spindle if needed.
- Gently lift the tonearm and position the stylus over the desired starting groove of the record.
- Lower the tonearm slowly onto the record. Playback will begin automatically.
- To stop playback, gently lift the tonearm and return it to its rest.
Funzionamento del lettore CD:
- Press the Function Selector to CD mode.
- Premere il pulsante di espulsione per aprire il vassoio del CD.
- Inserire un CD nel vassoio con l'etichetta rivolta verso l'alto.
- Press the Eject button again to close the tray. The CD will begin playing automatically or display the track count.
- Utilizzare i pulsanti Riproduci/Pausa, Interrompi e Salta per controllare la riproduzione.
Cassette Player Operation:
- Inserire una cassetta nell'apposito alloggiamento sul lato dell'unità.
- Premere il pulsante Riproduci per avviare la riproduzione.
- Use the Fast Forward (FF) button to advance the tape quickly.
- To stop playback, press the Stop/Eject button. Pressing it halfway will eject the tape.
Funzionamento della radio AM/FM:
- Press the Function Selector to Radio mode.
- Select either AM or FM band using the band selector switch.
- Rotate the Tuning knob to search for radio stations.
- Adjust the antenna wire for best reception.
iPod Dock Operation:
- Press the Function Selector to iPod mode.
- Carefully place your compatible iPod device onto the iPod dock connector.
- Use your iPod's controls to select and play music. Audio will be routed through the KLH AUDIO system's speakers.
Aux-In Operation:
- Press the Function Selector to Aux mode.
- Connect an external audio device (e.g., MP3 player, smartphone) to the Aux-In jack on the front panel using the supplied 3.5mm auxiliary cable.
- Play audio from your external device. The sound will be played through the KLH AUDIO system's speakers.
Utilizzo del telecomando:
The remote control primarily operates the CD player functions (Play, Pause, Stop, Skip). Note that the remote cannot turn the unit on or off.
Manutenzione
Proper care will ensure the longevity of your system.
- Pulizia dell'unità: Pulire l'esterno dell'unità con un panno morbido e asciutto. Non utilizzare detergenti abrasivi, cere o solventi.
- Cura dello stilo: Handle the turntable stylus with extreme care. Clean the stylus periodically with a soft brush, brushing from back to front.
- Cura dei CD/cassette: Keep CDs and cassette tapes clean and free of dust. Store them in their cases when not in use.
Risoluzione dei problemi
If you experience issues with your system, refer to the following common problems and solutions.
| Problema | Possibile causa | Soluzione |
|---|---|---|
| Nessun potere | Cavo di alimentazione non collegato correttamente. | Controllare il collegamento del cavo di alimentazione all'unità e alla presa a muro. |
| Nessun suono | Volume troppo basso; Funzione selezionata non corretta; Cuffie collegate. | Increase volume; Select correct function; Disconnect headphones. |
| Il giradischi non gira | Unit not powered on; Belt dislodged. | Ensure unit is on; Contact service if belt issue suspected. |
| Scarsa ricezione radio | Antenna non estesa o posizionata correttamente. | Extend and adjust the antenna wire for better signal. |
| Il CD non viene riprodotto | CD inserted incorrectly; CD is scratched or dirty. | Ensure CD is label-side up; Clean or replace CD. |
Specifiche
| Caratteristica | Specificazione |
|---|---|
| Fonte di alimentazione | CA 120 V ~ 60 Hz |
| Dimensioni (L x P x A) | Approx. 17" x 17" x 10.5" (43.2 cm x 43.2 cm x 26.7 cm) |
| Velocità del giradischi | 33 1/3, 45, 78 giri al minuto |
| Gamma di frequenze radio | AM: 530-1710 kHz, FM: 88-108 MHz |
| Compatibilità CD | CD, CD-R/RW |
| iPod Dock | Compatible with older generation iPods (30-pin connector) |
Garanzia e supporto
This product is covered by a limited manufacturer's warranty. For specific warranty terms and conditions, please refer to the warranty card included with your purchase or contact KLH customer support. If you require technical assistance or have questions not covered in this manual, please contact KLH customer service through their official websito o le informazioni di contatto fornite con il prodotto.
Ask a question about this manual
Ask about setup, troubleshooting, compatibility, parts, safety, or missing instructions. Manuals+ will review the question and use this page’s manual context to help answer it.