1. Prodotto finitoview
The HP ProCurve 3500-24-PoE Ethernet Switch is an intelligent edge switch designed for demanding network environments. It features a programmable ProVision ASIC, enabling advanced networking capabilities such as Quality of Service (QoS) and security. This switch offers a variety of Gigabit and 10/100 interfaces with integrated Power over Ethernet (PoE) functionality, providing flexibility and scalability for network deployments.
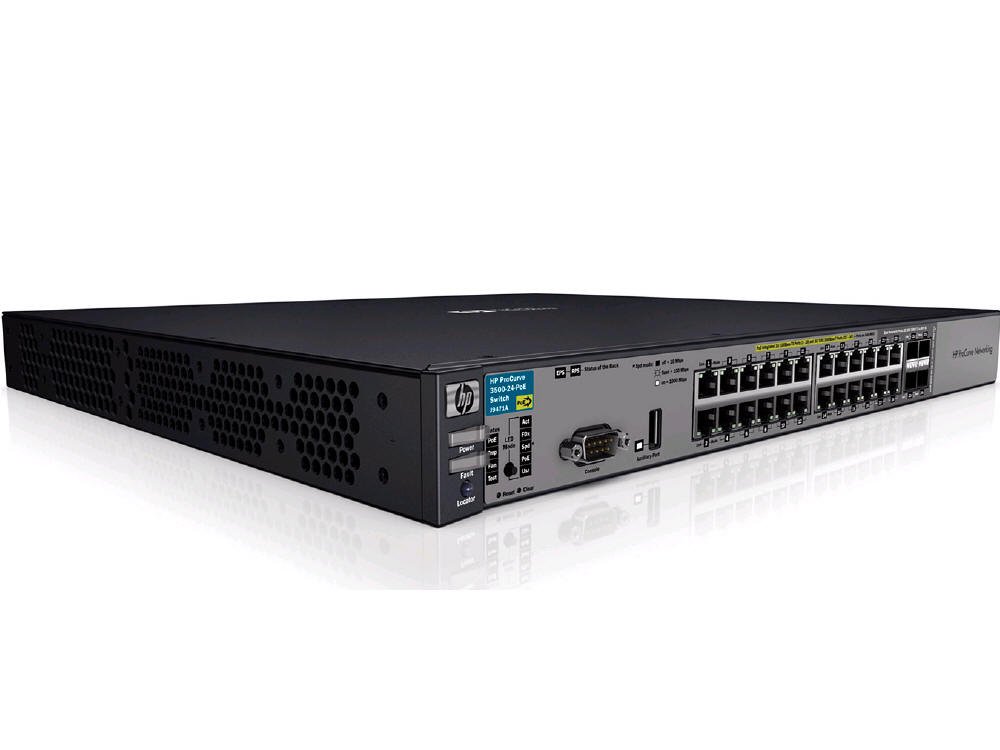
Figura 1: Fronte view of the HP ProCurve 3500-24-PoE Ethernet Switch, showing its network ports and status indicators.
2. Contenuto della confezione
Verificare che tutti gli articoli siano presenti nel pacco:
- HP ProCurve 3500-24-PoE Ethernet Switch
- Accessori (ad esempio, cavo di alimentazione, kit di montaggio su rack, cavo della console)
3. Impostazione
3.1 Installazione fisica
- Montaggio su rack: Securely mount the switch in a standard 19-inch equipment rack using the provided rack-mount kit. Ensure adequate ventilation around the switch.
- Collegamento elettrico: Connect the power cord to the switch's power inlet and then to a grounded AC power outlet.
3.2 Connessioni di rete
- Porte di collegamento: Connect the switch's uplink ports (Gigabit or SFP) to your core network or other switches using appropriate Ethernet cables or SFP transceivers.
- Porte dispositivo: Connect network devices (computers, IP phones, wireless access points) to the 10/100 or Gigabit Ethernet ports. For PoE-enabled devices, ensure they are connected to PoE-capable ports.
3.3 Configurazione iniziale
The switch can be configured via a console port, web interface, or Telnet/SSH. Refer to the HP ProCurve documentation for detailed configuration steps.
- Accesso alla console: Connect a console cable from your computer to the switch's console port. Use a terminal emulation program (e.g., PuTTY) with settings: 9600 baud, 8 data bits, no parity, 1 stop bit, no flow control.
- Web Interfaccia: If the switch has a default IP address, connect your computer to a switch port and configure your computer's IP address to be in the same subnet. Access the web interfaccia tramite a web browser.
4. Istruzioni per l'uso
4.1 Accensione
After connecting the power cord, the switch will automatically power on. Observe the system LED indicators for boot-up status.
4.2 Indicatori LED
Monitorare i LED del pannello frontale per comprendere lo stato operativo dello switch:
- LED di sistema: Indicates overall switch health (e.g., green for normal operation, amber for issues).
- LED delle porte: Indicate link status and activity for each port (e.g., solid green for link, flashing green for activity).
- LED PoE: Indicate PoE status for ports providing power.
4.3 Accesso alla gestione
Access the switch's management interface (web GUI or Command Line Interface) to configure VLANs, QoS, security settings, and monitor network traffic.
4.4 Funzionalità PoE
The switch provides Power over Ethernet on designated ports. Connect PoE-compatible devices (e.g., IP cameras, VoIP phones, wireless access points) to these ports to supply both data and power over a single Ethernet cable.
5. Manutenzione
5.1 Pulizia
Periodically clean the exterior of the switch with a soft, dry cloth. Ensure ventilation openings are free from dust and obstructions to prevent overheating.
5.2 Aggiornamenti firmware
Controllare regolarmente le istruzioni del produttore website for firmware updates. Applying updates can improve performance, add new features, and address security vulnerabilities. Follow the provided instructions carefully when performing firmware upgrades.
5.3 Considerazioni ambientali
Ensure the switch operates within its specified temperature and humidity ranges. Avoid placing the switch in direct sunlight or near heat sources.
6. Risoluzione Dei Problemi
6.1 Nessun potere
- Verificare che il cavo di alimentazione sia collegato saldamente sia all'interruttore che alla presa di corrente.
- Verificare che la presa di corrente funzioni collegandovi un altro dispositivo.
- Assicurarsi che l'alimentatore (se esterno) funzioni correttamente.
6.2 Nessuna connettività di rete
- Check the link/activity LEDs on the switch port and the connected device.
- Ensure Ethernet cables are properly connected and not damaged.
- Verify network configuration (IP addresses, VLANs) on the switch and connected devices.
6.3 Problemi PoE
- Confirm the device connected is PoE-compatible and within the switch's PoE power budget.
- Check the PoE status LEDs for the specific port.
- Ensure PoE is enabled on the port via the switch's management interface.
6.4 Problemi di prestazioni
- Check for high CPU utilization or memory usage on the switch.
- Inspect for network loops or broadcast storms.
- Verify duplex settings on connected devices match the switch ports.
7. Specifiche
| Caratteristica | Descrizione |
|---|---|
| Marca | Azienda |
| Numero di modello | Modello J9471A |
| Numero di porte | 20 |
| Interfaccia | PoE |
| Dispositivi compatibili | Scrivania |
| Peso dell'articolo | 13 libbre |
| UPC / GTIN | 884962106013, 884962105979, 884962106006 |
8. Garanzia e supporto
8.1 Informazioni sulla garanzia
This product typically comes with a 30-day warranty. Please refer to your purchase documentation or contact your vendor for specific warranty terms and conditions.
8.2 Supporto tecnico
For technical assistance, troubleshooting beyond this manual, or to report issues, please contact HP customer support or your authorized reseller. Have your product model number (J9471A) and serial number ready when contacting support.