
Mount-It! MI-305L
Mount-It! Low-Profile Large TV Mount MI-305L Instruction Manual
1. Introduzione
This manual provides detailed instructions for the safe and proper installation and use of the Mount-It! Low-Profile Large TV Mount, model MI-305L. This fixed wall bracket is designed to securely hold large screen displays ranging from 43 to 90 inches, with a maximum weight capacity of 220 lbs. Please read all instructions carefully before beginning installation.
2. Informazioni sulla sicurezza
- Capacità di peso: Non superare la capacità di peso massima di 100 kg (220 libbre). Il superamento di questo limite può causare gravi lesioni o danni materiali.
- Dimensioni dello schermo: This mount is designed for TVs between 43 and 90 inches. Ensure your TV falls within this range.
- Compatibilità VESA: Verify your TV's VESA mounting pattern is compatible with the mount's supported patterns (100x100mm to 800x600mm).
- Struttura della parete: The mount must be installed into solid wood studs, concrete, or brick walls. Do not install into drywall alone. If unsure about your wall type, consult a qualified professional.
- Utensili: Utilizzare strumenti adeguati per l'installazione. Indossare sempre occhiali protettivi.
- Assistenza: Due to the size and weight of large TVs, it is highly recommended to have at least two people for installation.
- Gestione dei cavi: Ensure all cables are routed safely and are not pinched or strained.
3. Contenuto della confezione
Please verify that all components are present and undamaged before installation. If any parts are missing or defective, contact Mount-It! customer support.
- Piastra da muro (1)
- Staffe TV (2)
- Mounting Hardware Kit (various screws, washers, spacers, lag bolts, concrete anchors)
- Livella a bolla integrata
- Manuale di istruzioni
4. Specifiche
| Caratteristica | Specificazione |
|---|---|
| Numero di modello | MI-305L |
| Compatibilità con le dimensioni della TV | 43 - 90 pollici |
| Capacità di peso | 220 libbre (100 kg) |
| Compatibilità VESA | 100x100, 200x100, 200x200, 300x200, 300x300, 400x200, 400x300, 400x400, 600x200, 600x300, 600x400, 700x400, 750x450, 800x400, 850x450, 800x600 |
| Professionistafile dal Muro | Approximately 0.9 inches (Ultra-Slim) |
| Tipo di movimento | Fisso |
| Materiale | Acciaio legato |
| Dimensioni del prodotto | 37 x 2 x 10 inches (Wall Plate) |
| Distanza tra i montanti della parete | 8, 16, or 24 inches |
5. Configurazione e installazione
Follow these steps carefully for a secure installation. Ensure you have all necessary tools and assistance.
5.1. Preparare la TV
- Posizionare con cautela il televisore a faccia in giù su una superficie morbida e pulita per evitare di danneggiare lo schermo.
- Identifica i fori di montaggio VESA sul retro del televisore.
- Attach the two TV brackets to the back of your TV using the appropriate screws, washers, and spacers from the hardware kit. Ensure the brackets are centered and securely fastened. The brackets should be positioned so the hooks face downwards when the TV is upright.
5.2. Preparare il muro
- Individuare i perni: For wood stud installation, use a stud finder to locate the edges and center of at least two adjacent wood studs. Mark the center of the studs at your desired TV height. The wall plate is designed to accommodate 8, 16, or 24-inch stud spacing.
- Segnare i punti di foratura: Hold the wall plate against the wall at the marked height, ensuring it is level using the integrated bubble level. Mark the drilling points for the lag bolts.
- Praticare i fori pilota: Drill pilot holes at the marked locations. For wood studs, use a 7/32 inch (5.5mm) drill bit. For concrete/brick walls, use a 3/8 inch (10mm) masonry drill bit and insert the concrete anchors.
5.3. Montare la piastra a parete
- Align the wall plate with the pilot holes.
- Secure the wall plate to the wall using the lag bolts and washers. Tighten the bolts firmly, but do not overtighten.

Image: The extra-wide wall plate designed for easy installation on 16-inch or 24-inch wood studs, with pre-drilled holes for secure attachment.
5.4. Appendere la TV
- Con l'aiuto di qualcuno, sollevare con cautela il televisore e agganciare le staffe al bordo superiore della piastra a muro.
- Gently lower the TV until the brackets engage with the wall plate. Ensure both brackets are securely seated.

Image: The main components of the Mount-It! MI-305L TV mount, including the wall plate with an integrated level and the two vertical TV brackets.
5.5. Adjust TV Height (Optional)
The TV brackets allow for a maximum of 4 inches of vertical height adjustment after the TV is mounted. This is achieved by selecting different hook positions on the TV brackets before hanging the TV.
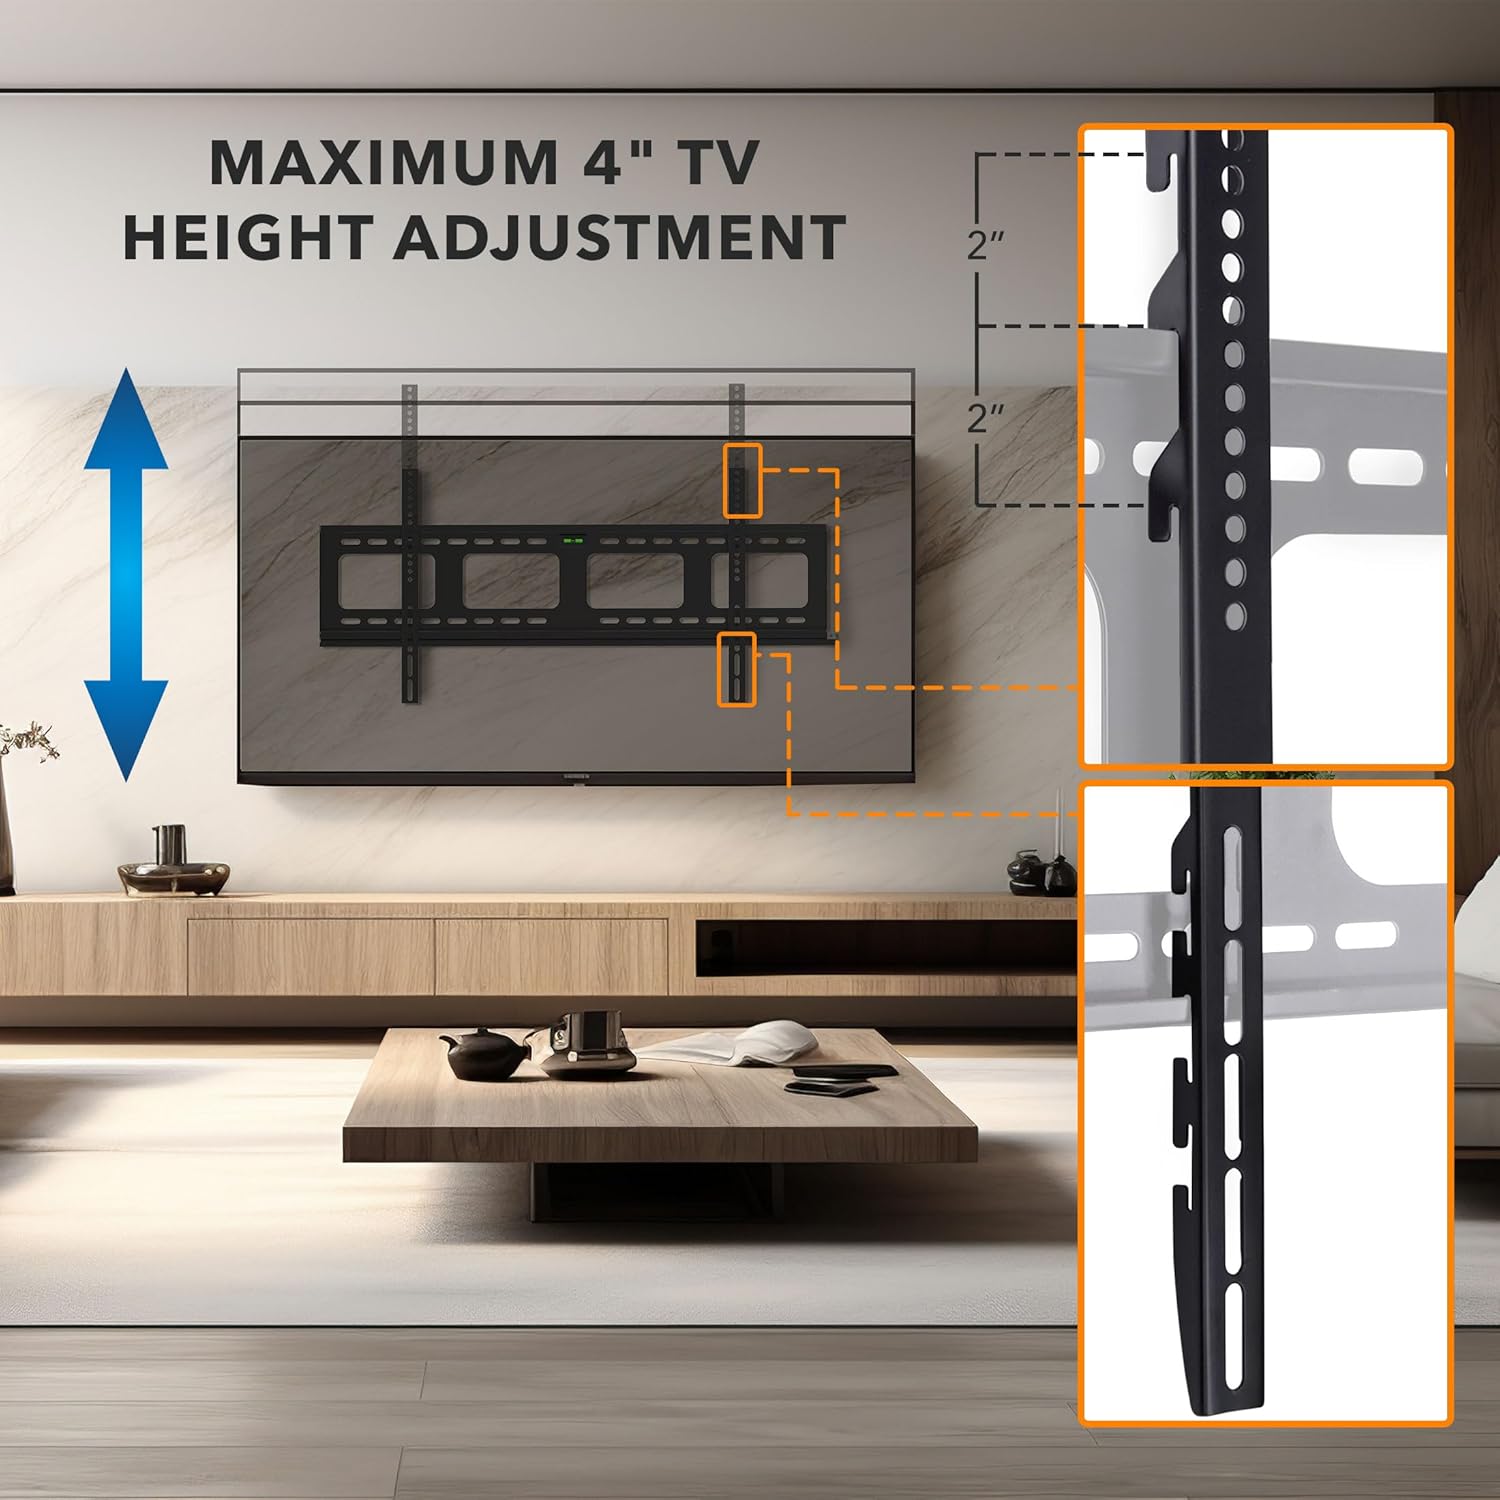
Image: A visual representation of how the TV height can be adjusted by up to 4 inches using the multiple mounting holes on the TV brackets.
5.6. Gestione dei cavi
The wall plate features large openings to facilitate cable routing. After mounting the TV, carefully route all necessary cables through these openings to maintain a clean and organized appearance. Ensure cables are not kinked or under tension.

Image: The wall plate with large cutouts designed for effortless cable routing, contributing to a clean and neat installation.
6. Funzionamento del supporto
The MI-305L is a fixed TV mount, meaning it holds your TV in a stationary position close to the wall. There are no moving parts for tilt or swivel once installed.
6.1. Anti-Theft Locking Feature
For added security, especially in public or high-traffic areas, the mount includes a provision for an anti-theft locking bar. A padlock (not included) can be used to secure the TV to the wall plate, preventing it from being lifted off the mount.
- Once the TV is mounted and centered, locate the locking bar slot at the bottom of the wall plate.
- Slide the locking bar through the designated holes on the TV brackets and the wall plate.
- Insert a padlock through the hole in the locking bar to secure it in place.

Image: The anti-theft locking feature, showing a sliding bar that can be secured with a padlock (not included) to prevent unauthorized removal of the TV.
7. Manutenzione
- Pulizia: Pulire il supporto con un panno morbido e asciutto. Evitare detergenti abrasivi o solventi.
- Ispezione periodica: Periodically check all screws and bolts to ensure they remain tight and secure. Over time, vibrations or environmental changes can cause fasteners to loosen.
- Danno: If any part of the mount appears damaged or worn, discontinue use and contact Mount-It! customer support for assistance.
8. Risoluzione Dei Problemi
- Problema: la TV non è in piano dopo l'installazione.
- Soluzione: While the mount includes an integrated bubble level, it is recommended to use a separate, more accurate level during wall plate installation. If the TV is not level, carefully remove the TV, adjust the wall plate, and re-mount the TV.
- Problem: Difficulty attaching TV brackets to the TV.
- Soluzione: Ensure you are using the correct size and length of screws for your TV's VESA mounting holes. Refer to your TV's manual for specific screw requirements. Use appropriate spacers if the TV back is uneven or if screws are too long.
- Problem: TV feels unstable on the mount.
- Soluzione: Immediately remove the TV. Re-check all wall plate and TV bracket connections. Ensure lag bolts are securely fastened into studs or concrete anchors. Verify that the TV's weight and VESA pattern are within the mount's specifications. If the issue persists, contact customer support.
9. Garanzia e supporto
The Mount-It! MI-305L TV Mount is backed by a multi-year warranty. For warranty claims, technical assistance, or any questions regarding your product, please contact our expert, US-based customer satisfaction team. Contact information can be found on the official Mount-It! websito o sulla confezione del prodotto.
Ask a question about this manual
Ask about setup, troubleshooting, compatibility, parts, safety, or missing instructions. Manuals+ will review the question and use this page’s manual context to help answer it.