
STOVES Universal Fit Fan Oven Heating Element (B004L02ZA8)
STOVES Replacement Fan Oven Heating Element Instruction Manual
1. Introduzione
This instruction manual provides essential information for the safe and correct installation, operation, and maintenance of your replacement fan oven heating element. This component is designed to restore the heating function of compatible electric fan ovens. Please read this manual thoroughly before attempting any installation or repair.
2. Informazioni sulla sicurezza
AVVERTIMENTO: Electrical work can be hazardous. Always ensure the appliance is completely disconnected from the main power supply before commencing any installation, maintenance, or repair work. Failure to do so can result in electric shock, serious injury, or death.
- Only qualified personnel or competent individuals should attempt to install or replace this heating element.
- Wear appropriate personal protective equipment, including insulated gloves, if necessary.
- Verify that the replacement element matches the specifications of the original part.
- Ensure all connections are secure and correctly insulated after installation.
- Do not operate the oven if the element appears damaged or improperly installed.
3. Prodotto finitoview
This product is a circular fan oven heating element, an essential component for electric fan ovens. It is responsible for generating the heat required for cooking. The element is typically located at the rear of the oven cavity, surrounding the fan motor.
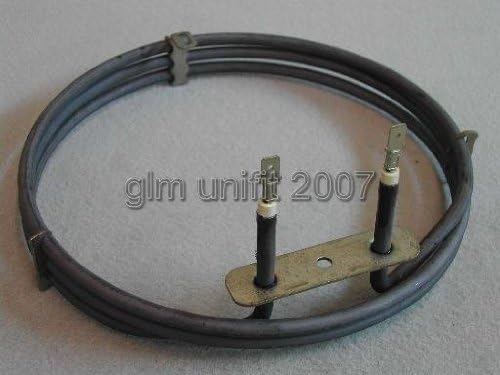
Figura 1: Circular fan oven heating element. This image displays the circular fan oven heating element. It features a coiled metal tube forming a circle, with two electrical terminals extending from a central mounting bracket. This component is designed to generate heat within the oven cavity.
4. Compatibilità
This replacement fan oven heating element is compatible with a wide range of models from various brands, including Hygena, Belling, Stoves, Diplomat, New World, and Whirlpool cookers. Please verify your appliance's model number against the list below to ensure compatibility. This list is not exhaustive, and cross-referencing with your original part or appliance manual is recommended.
Marche e modelli compatibili:
- Belling: 427 Wh, 654 ST, D841 ST, D854 ST, E641 ST, E649 Wh, E650 SI, XOU483 ST, XOU594 ST
- CDA: 720 EF BL, 720 EF ST, CD 708BL BL, CD 708SS ST, CD 708W WH
- Diplomat: 600EA (ADP3200) ST, 620EMST, 720EA (ADP4540) ST, 720EFST, 900EA (ADP4200) ST, C90E, ADP3110, ADP3112, ADP3114, ADP3120, ADP3702, ADP3722, ADP3742, ADP4220, ADP4230, ADP4500, ADP4501, ADP4502, ADP4504, ADP4505, APL3401, APL3491, APL4301, APL4318, APL4328, APL4391, APL4406, APL4416, APL4426, APL4446, APL4456, APL4466, APL4476, APL5210, APL5220, APL5511, APL5521, APL5811, APL5813, APL5821, APL5823, APL5844, APL5854, APL5893
- Hygena: AHY4132, AHY4134, AHY4144, AHY4501, AHY4502, APL3318, APL3328, APL3413, APL3391, APL3418, APL3423, APL3428, APL3443, APL4212, APL4215, APL4222, APL4225, APL4245, APL4311, APL4313, APL4316, APL4317, APL4321, APL4326, APL4327
- Ignis: AKF506AV, AKF506WH
- IKEA: 44541610, 64541685
- New World: 110DF CA, 110DF GR, 110DF ST, 55EDMG SVG, 60 DFDOM ST, 60EDOM ST, DF90 ST, E60FA ST, E70DOA GR, E70DOA ST, E70DOA WH, E90DOA GR, E90DOA ST, E90DOA WH, TCEOA70 ST, 208520082, 208520083, 208520084, 208520085, 208520086, 208520087, 208552095, 208585056, 208585057, 208585059, 208585060, 208585061, 208585062, 208585063, 208585065, 208585066, 208585067, 208585092, 208585093, 208585094, 208587029, 208587030, 208587032, 208587033, 208587034, 208587042, 208587045, 208587046, 208587047, 208587048, 208587049, 208587080, 208587081, 208587082, 208587110, 208588021, 208588022, 208588024, 208588025, 208588026, 208588030, 208588031, 208588032, 208588034, 208588051, 208588052, 208588053, 208590050, 208590051, 208590052, 208590053, 208590054
5. Istruzioni per l'installazione
The following steps provide a general guide for replacing a fan oven heating element. Specific procedures may vary depending on your oven model. Always refer to your appliance's service manual if available.
- Scollegare l'alimentazione: Crucially, turn off the electricity supply to your oven at the main circuit breaker or fuse box. Confirm power is off using a voltagetester.
- Accedi all'interno del forno: Open the oven door. You may need to remove oven shelves and side racks to gain clear access to the rear panel.
- Rimuovere il pannello posteriore: Locate the rear panel inside the oven cavity, which typically covers the fan and heating element. Unscrew the retaining screws and carefully remove the panel.
- Disconnetti il vecchio elemento: Identify the old heating element. Note the position of the electrical connections (usually two terminals). Take a photograph for reference if unsure. Carefully disconnect the wires from the terminals.
- Rimuovi vecchio elemento: Unscrew any mounting brackets or nuts holding the old element in place. Gently pull the element forward and out of the oven cavity.
- Installa nuovo elemento: Insert the new heating element into the oven, ensuring it sits correctly in its mounting points. Secure it with the screws or nuts previously removed.
- Collegare il cablaggio: Reconnect the electrical wires to the terminals of the new element, referring to your photograph if necessary. Ensure connections are tight and secure.
- Rimontare il forno: Replace the interior rear panel and secure it with its screws. Reinstall oven shelves and side racks.
- Ripristinare l'alimentazione e testare: Restore power to the oven at the main circuit breaker. Set the oven to a fan-assisted heating mode and observe if the element heats up correctly. Monitor for any unusual smells or sounds during the initial test.
6. Istruzioni per l'uso
Once the new heating element is installed and tested, the oven should operate as designed. Refer to your oven's original user manual for specific operating instructions, temperature settings, and cooking functions.
7. Manutenzione
The heating element itself requires minimal maintenance. However, regular cleaning of your oven can help prolong the life of all components, including the element.
- Ensure the oven is cool and disconnected from power before cleaning.
- Avoid direct contact of harsh chemical cleaners with the heating element.
- Wipe away any food spills promptly to prevent carbon buildup, which can affect element efficiency.
8. Risoluzione Dei Problemi
If your oven is not heating correctly after replacing the element, consider the following:
- Nessun calore:
- Check if the oven is receiving power from the main supply.
- Verify that the element's electrical connections are secure and correctly attached.
- Ensure the oven's thermostat or selector switch is set correctly.
- Riscaldamento non uniforme:
- Confirm the element is fully seated and not obstructed.
- This issue might indicate a problem with other oven components (e.g., fan motor, thermostat) rather than the element itself.
- Interruttore automatico di sgancio:
- Immediately disconnect power. This could indicate a short circuit. Recheck wiring for any exposed conductors or incorrect connections.
- Ensure the element is compatible and rated correctly for your oven's electrical system.
Se le procedure di risoluzione dei problemi non risolvono il problema, si consiglia di consultare un tecnico qualificato.
9. Specifiche
| Marca | STOVES (Compatible with multiple brands) |
| Potenza nominale | 2.5 kW |
| Dimensioni (circa) | 21.4 x 21.4 x 6.6 cm (Dimensioni della confezione) |
| Peso (circa) | 220 grammi (peso della confezione) |
| ASIN | B004L02ZA8 |
10. Garanzia e supporto
Specific warranty information for this replacement part is not provided in the product details. For warranty claims or technical support, please contact the seller or manufacturer directly with your purchase details.
Ask a question about this manual
Ask about setup, troubleshooting, compatibility, parts, safety, or missing instructions. Manuals+ will review the question and use this page’s manual context to help answer it.