1. Introduzione
Grazie per l'acquistoasing the Caliber RMD 068-2 Car Radio USB/SD Player. This manual provides detailed instructions for the installation, operation, and maintenance of your new car radio. Please read this manual thoroughly before using the product to ensure proper functionality and safety. Keep this manual for future reference.
2. Informazioni sulla sicurezza
- Installazione: Ensure the unit is installed by a qualified technician to prevent damage to the vehicle's electrical system. Incorrect wiring can cause fire or electrical shock.
- Alimentazione elettrica: Collegare l'unità solo a una batteria per auto da 12 V CC con messa a terra negativa.
- Fusibili: Always replace fuses with new ones of the specified rating. Using an incorrect fuse can cause damage to the unit or vehicle.
- Livello del volume: Do not operate the unit at excessively high volume levels, as this may impair your ability to hear external traffic sounds and could be dangerous.
- Pulizia: Per la pulizia, utilizzare un panno morbido e asciutto. Non utilizzare detergenti abrasivi o solventi.
- Umidità: Non esporre l'unità a umidità o acqua.
3. Contenuto della confezione
Si prega di verificare che tutti gli elementi siano presenti:
- Caliber RMD 068-2 Car Radio Unit
- Pannello frontale staccabile
- Cablaggio ISO
- Telaio di montaggio
- Chiavi di smontaggio (2 pezzi)
- Manuale dell'utente (questo documento)
4. Prodotto finitoview
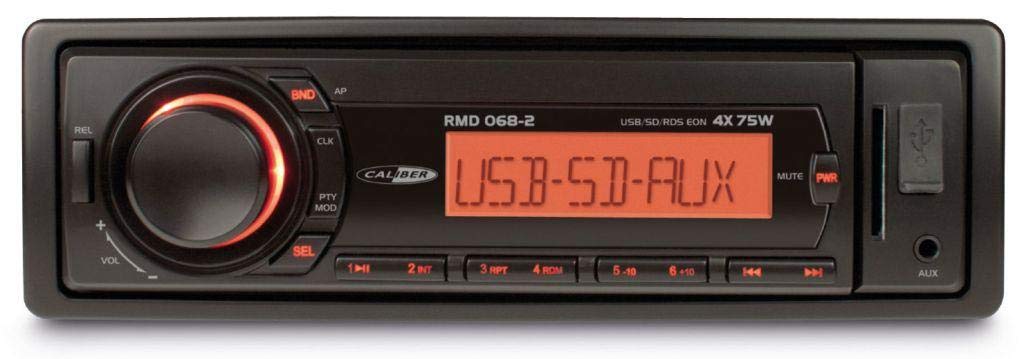
Figura 1: Fronte view of the Caliber RMD 068-2 Car Radio. This image shows the main unit with its detachable front panel, including the display, control buttons, USB port, and SD card slot.
4.1 Controlli del pannello frontale
- POWER/MODE Button: Press to turn on/off. Short press to switch between Radio, USB, SD, AUX modes.
- Manopola VOLUME: Rotate to adjust volume. Press to access audio settings (Bass, Treble, Balance, Fader).
- DISPLAY: Shows current time, radio frequency, track information, etc.
- Porta USB: Collegare unità flash USB per la riproduzione multimediale.
- Slot per scheda SD: Inserire schede SD per la riproduzione multimediale.
- Ingresso AUX (jack da 3.5 mm): Collegare dispositivi audio esterni.
- Pulsante BAND/AMS: In modalità radio, premere per selezionare la banda radio (FM1, FM2, FM3). Premere a lungo per la memorizzazione automatica.
- Pulsanti PRESET (1-6): Store and recall radio stations. In USB/SD mode, use for direct track selection.
- Pulsante RIPRODUCI/PAUSA: Riproduci o metti in pausa la riproduzione multimediale.
- FORWARD/BACKWARD Buttons: Skip tracks or tune radio frequency.
- EJECT Button: Release the detachable front panel.
4.2 Collegamenti posteriori
The rear of the unit features standard ISO connectors for power and speakers, along with an antenna input.
- ISO Power Connector: For connecting to the vehicle's power supply (constant 12V, ignition 12V, ground).
- ISO Speaker Connector: For connecting to the vehicle's speakers (Front Left, Front Right, Rear Left, Rear Right).
- Ingresso antenna: Per collegare l'antenna radio dell'auto.
5. Impostazione
5.1 Installazione
- Scollegare la batteria: Before starting, disconnect the negative terminal of your car battery to prevent short circuits.
- Rimuovere la vecchia unità: Rimuovere con cautela l'autoradio dal cruscotto.
- Installare il telaio di montaggio: Insert the supplied mounting frame into the dashboard opening and bend the tabs to secure it.
- Collegare il cablaggio: Refer to the wiring diagram in section 5.2. Connect the ISO wiring harness to the car's wiring and then to the Caliber RMD 068-2 unit. Connect the antenna cable.
- Slide Unit In: Carefully slide the Caliber RMD 068-2 unit into the mounting frame until it clicks into place.
- Ricollegare la batteria: Ricollegare il terminale negativo della batteria dell'auto.
- Collegare il pannello frontale: Attach the detachable front panel to the main unit.
5.2 Schema elettrico
The Caliber RMD 068-2 uses standard ISO connectors. Ensure correct connections as shown below. If your vehicle does not have ISO connectors, an adapter may be required.
| Pin No. | Colore del filo (tipico) | Funzione |
|---|---|---|
| 4 | Giallo | 12V costanti (batteria) |
| 7 | Rosso | 12V commutato (accensione) |
| 8 | Nero | Terra |
| 5 | Blu | Antenna Remote Out |
| Pin No. | Colore del filo (tipico) | Funzione |
|---|---|---|
| 1 | Viola | Posteriore Destro (+) |
| 2 | Viola/Nero | Posteriore destro (-) |
| 3 | Verde | Posteriore sinistro (+) |
| 4 | Verde/Nero | Posteriore sinistro (-) |
| 5 | Grigio | Anteriore Destro (+) |
| 6 | Grigio/Nero | Anteriore destro (-) |
| 7 | Bianco | Anteriore Sinistro (+) |
| 8 | Bianco/Nero | Anteriore sinistro (-) |
Note: Wire colors may vary depending on vehicle manufacturer. Always consult your vehicle's wiring diagram.
6. Istruzioni per l'uso
6.1 Funzioni di base
- Accensione/spegnimento: Premere il tasto POTENZA/MODALITÀ pulsante per accendere o spegnere l'unità.
- Controllo del volume: Ruotare il VOLUME manopola in senso orario per aumentare il volume, in senso antiorario per diminuirlo.
- Selezione della modalità: Premere brevemente il tasto POTENZA/MODALITÀ button to cycle through available modes: Radio (FM), USB, SD, AUX.
- Impostazioni audio: Premere il tasto VOLUME knob to enter audio settings. Rotate the knob to select settings like BASS, TREBLE, BALANCE, FADER. Press the knob again to confirm or move to the next setting.
6.2 Funzionamento della radio
- Selezione della banda: In modalità Radio, premere il tasto BANDA/AMS pulsante per passare tra le bande FM1, FM2 e FM3.
- Sintonizzazione manuale: Premere brevemente il tasto AVANTI INDIETRO pulsanti per la regolazione fine della frequenza.
- Ricerca automatica: Premere a lungo il tasto AVANTI INDIETRO pulsanti per cercare automaticamente la prossima stazione con segnale forte.
- Memorizza le preimpostazioni: Tune to your desired station. Long press one of the PREIMPOSTATO (1-6) buttons until you hear a beep. The station is now stored.
- Richiama i preset: Short press one of the PREIMPOSTATO (1-6) buttons to recall a stored station.
- Memorizzazione automatica della memoria (AMS): Premere a lungo il tasto BANDA/AMS pulsante per eseguire automaticamente la scansione e memorizzare le stazioni più forti nelle preimpostazioni della banda corrente.
6.3 Riproduzione USB/SD
- Inserisci supporto: Inserire una chiavetta USB nella porta USB o una scheda SD nell'apposito slot. L'unità passerà automaticamente alla modalità USB/SD e inizierà la riproduzione.
- Riproduci/Pausa: Premere il tasto RIPRODUCI/PAUSA per mettere in pausa o riprendere la riproduzione.
- Salta traccia: Premere brevemente il tasto AVANTI INDIETRO pulsanti per passare alla traccia successiva o precedente.
- Avanti veloce/Riavvolgimento: Premere a lungo il tasto AVANTI INDIETRO pulsanti per avanzare o riavvolgere rapidamente all'interno di una traccia.
- Navigazione cartelle: Utilizzare il PREIMPOSTAZIONE 5 E PREIMPOSTAZIONE 6 buttons to navigate between folders on your USB/SD media.
6.4 Ingresso AUX
- Connetti dispositivo: Connect your external audio device (e.g., smartphone, MP3 player) to the 3.5mm AUX input jack on the front panel using an audio cable.
- Seleziona la modalità AUX: Premere il tasto POTENZA/MODALITÀ button repeatedly until "AUX" is displayed.
- Controllo della riproduzione: Control playback (play, pause, skip) directly from your connected external device. The car radio will control the volume.
7. Manutenzione
- Pulizia dell'unità: Use a soft, dry cloth to wipe the front panel and display. Do not use harsh chemicals, cleaning sprays, or abrasive cloths, as these can damage the surface.
- Pannello frontale staccabile: When detaching the front panel, handle it carefully. Store it in a protective case (if supplied) to prevent scratches or damage.
- Porte USB/SD: Keep the USB port and SD card slot free from dust and debris.
8. Risoluzione Dei Problemi
| Problema | Possibile causa | Soluzione |
|---|---|---|
| Nessun potere | Fusibile bruciato; Cablaggio errato; Collegamento allentato | Check and replace fuse; Verify wiring connections (Yellow to constant 12V, Red to ignition 12V, Black to ground); Ensure front panel is securely attached. |
| Nessun suono | Volume too low; Mute activated; Incorrect speaker wiring; Damaged speakers | Increase volume; Check if mute is active; Verify speaker connections; Test with known good speakers. |
| Ricezione radio scarsa | Antenna non collegata; Antenna danneggiata; Area con segnale debole | Ensure antenna is securely connected; Check antenna for damage; Try tuning to a stronger station or move to a different location. |
| USB/SD non in riproduzione | Non supportato file format; Corrupted media; Incorrectly inserted media; Max capacity exceeded | Garantire files are MP3/WMA format; Try a different USB/SD card; Reinsert media correctly; Check media capacity (max 32GB recommended). |
| Front panel cannot be detached | Eject button not fully pressed; Mechanism jammed | Press the EJECT button firmly; Do not force the panel. |
If the problem persists after trying these solutions, please contact your dealer or a qualified service center.
9. Specifiche
- Modello: Caliber RMD 068-2
- Potenza in uscita: 4 x 75 Watts Max
- Alimentazione elettrica: 12V DC (10.8V-15.6V), Negative Ground
- Fuse: 10A
- Formati audio supportati: MP3, WMA (via USB/SD)
- USB/SD Compatibility: Fino a 32 GB (formato FAT32)
- Sintonizzatore FM: RDS, 18 Presets
- Ingresso AUX: Presa stereo da 3.5 mm
- Pannello frontale staccabile: SÌ
- Peso: Circa 0.95 kg (2.09 libbre)
10. Garanzia e supporto
This Caliber product is covered by a warranty in accordance with applicable European laws. For detailed warranty terms and conditions, please refer to the warranty card included with your product or visit the official Caliber website. For technical support, troubleshooting assistance, or service inquiries, please contact your authorized Caliber dealer or the customer service department in your region. Please have your product model number (RMD 068-2) and proof of purchase ready when contacting support.
Note: Specifications and design are subject to change without notice for improvement.