
1. Introduzione
The AAXA P300 Pico Projector is a compact, high-definition projector designed for portability and versatility. It features a native 1280x800 HD resolution, 500 LED lumens, and a rechargeable battery, making it suitable for various applications including business presentations, home entertainment, and travel. This manual provides essential information for the proper setup, operation, and maintenance of your P300 projector.
2. Contenuto della confezione
Si prega di verificare che tutti gli articoli elencati di seguito siano inclusi nel pacchetto:
- AAXA P300 Pico Projector
- Adattatore di alimentazione
- Telecomando
- Mini treppiede
- Manuale d'uso
3. Prodotto finitoview
Familiarize yourself with the physical components and ports of your P300 projector.

Figura 3.1: Davanti e in alto view of the AAXA P300 Pico Projector, illustrating its compact size and dimensions (5.9 x 3.8 x 1.5 inches).
3.1 Pannelli posteriori e laterali
The projector features various input and output ports for connectivity.

Figura 3.2: Retro view of the projector, showing the USB port for media playback and the Mini VGA port for computer connections.
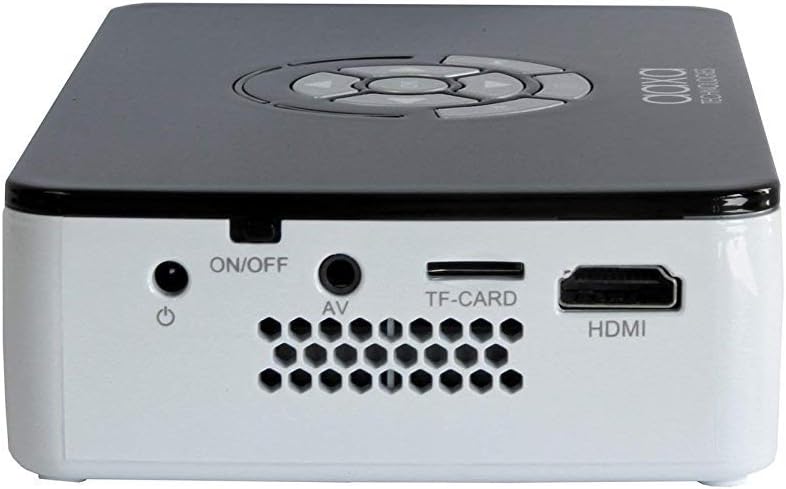
Figura 3.3: Right side panel, featuring the HDMI input, AV (composite) input, TF-CARD slot, and the power ON/OFF button.

Figura 3.4: Left side panel, highlighting the focus adjustment wheel for image clarity.
4. Impostazione
4.1 Accensione/Spegnimento
- Connect the power adapter to the projector's DC input and then to a power outlet.
- Premere e tenere premuto il tasto ACCESO/SPENTO button located on the side panel until the projector powers on.
- Per spegnere, tenere premuto il pulsante ACCESO/SPENTO button again until the projector shuts down.
4.2 Collegamento dei dispositivi
The P300 supports multiple input sources:
- HDMI: Connect an HDMI cable from your device (laptop, gaming console, streaming stick) to the projector's HDMI port.
- Mini VGA: Use a Mini VGA to VGA cable (sold separately) to connect to a computer's VGA output.
- Composite A/V: Use a 3.5mm to RCA composite A/V cable (sold separately) to connect to devices with RCA outputs.
- USB: Inserire una chiavetta USB nella porta USB per la riproduzione diretta dei contenuti multimediali.
- TF-CARD: Insert a MicroSD card into the TF-CARD slot for direct media playback.
4.3 Regolazione della messa a fuoco
To achieve a clear image, adjust the focus wheel on the side of the projector until the projected image is sharp.
4.4 Positioning and Projection Size
Place the projector on a stable, flat surface. The included mini tripod can be used for angle adjustments. The P300 can project an image up to 120 inches diagonally in low-light conditions.

Figura 4.1: The AAXA P300 projector mounted on its mini tripod, demonstrating flexible positioning options.
5. Istruzioni per l'uso
5.1 Navigazione nel menu
Use the directional buttons on the projector or the remote control to navigate through the on-screen menu. Press the OK/Invio pulsante per selezionare le opzioni.
5.2 Riproduzione multimediale
When a USB drive or TF-CARD is inserted, the projector's onboard media player can be accessed through the main menu. Select the desired file type (video, photo, music, text) and navigate to your content for playback.
5.3 Utilizzo della batteria
The P300 features a built-in rechargeable lithium-ion battery providing approximately 60 minutes of operation. The battery charges automatically when the projector is connected to the power adapter. For optimal battery life, fully charge the projector before first use and avoid completely draining the battery frequently.
6. Manutenzione
6.1 Pulizia
- Lente: Use a soft, lint-free cloth or lens cleaning wipes specifically designed for optical surfaces. Avoid abrasive materials.
- Casing: Pulire l'esterno del proiettore con un panno morbido e asciutto. Non utilizzare detergenti liquidi o solventi.
- Vents: Ensure the ventilation openings are clear of dust and debris to prevent overheating. Use compressed air if necessary.
6.2 Cura della batteria
- Quando non lo si utilizza, conservare il proiettore in un luogo fresco e asciutto.
- Se si conserva la batteria per periodi prolungati, caricarla a circa il 50% ogni pochi mesi per mantenerla in buone condizioni.
7. Risoluzione Dei Problemi
-
Nessuna immagine/segnale:
Ensure the correct input source is selected in the projector's menu. Verify all cables are securely connected. Test with a different source device or cable if possible. -
Immagine sfocata:
Adjust the focus wheel on the side of the projector. Ensure the projection surface is flat and the projector is at an appropriate distance. -
Nessun suono:
Check the volume settings on both the projector and the source device. Ensure external speakers are connected correctly if used. The internal speaker may have limited output. -
Surriscaldamento del proiettore:
Ensure ventilation vents are not blocked. Operate the projector in a well-ventilated area. -
Batteria non in carica:
Verificare che l'adattatore di alimentazione sia collegato correttamente e che la presa di corrente sia funzionante.
8. Specifiche
| Caratteristica | Specificazione |
|---|---|
| Risoluzione dello schermo | 1280 x 800 (nativo) |
| Luminosità | 500 lumen LED |
| Tecnologia di connettività | HDMI, Mini VGA, Composite A/V (3.5mm Jack), 5 Pin Mini USB 2.0 |
| Dimensioni del prodotto | 5.9 x 3.8 x 1.5 pollici |
| Peso dell'articolo | 15.5 once |
| Batterie | 2 Lithium Ion batteries (included, internal) |
| Produttore | AAXA |
| Numero di modello | KP-600-01 |
9. Garanzia e supporto
For warranty information, technical support, or service inquiries, please refer to the official AAXA Technologies webo contattare direttamente l'assistenza clienti. Conservare la ricevuta d'acquisto come prova d'acquisto per eventuali reclami in garanzia.
AAXA Technologies Contact Information:
Per favore visita www.aaxatech.com per le risorse di supporto e i recapiti più aggiornati.