Introduzione
This manual provides essential instructions for the safe and effective use of your Canon PowerShot A4000 IS 16.0 MP Digital Camera. It covers basic setup, operation, maintenance, and troubleshooting to help you capture high-quality photos and 720p HD videos. The camera features an 8x optical zoom, a 28mm wide-angle lens, and optical image stabilization for clear images.
Cosa c'è nella scatola
Verifica che tutti gli elementi siano presenti nella confezione della tua fotocamera:
- Canon PowerShot A4000 IS Digital Camera
- Pacco batteria
- Caricabatterie
- Cavo USB
- Cinturino da polso
- Digital Camera Solution Disk (CD-ROM)

Figura 1: Included accessories with the Canon PowerShot A4000 IS camera.
Camera Parts and Functions
Davanti View

Figura 2: Davanti view della macchina fotografica.
- Lente: Cattura immagini.
- Flash: Fornisce illuminazione in condizioni di scarsa illuminazione.
- Pulsante dell'otturatore: Premere a metà per mettere a fuoco, completamente per scattare una foto.
- Leva dello zoom: Controlla lo zoom ottico (W per grandangolo, T per teleobiettivo).
- Pulsante di accensione: Accende o spegne la fotocamera.
Posteriore View
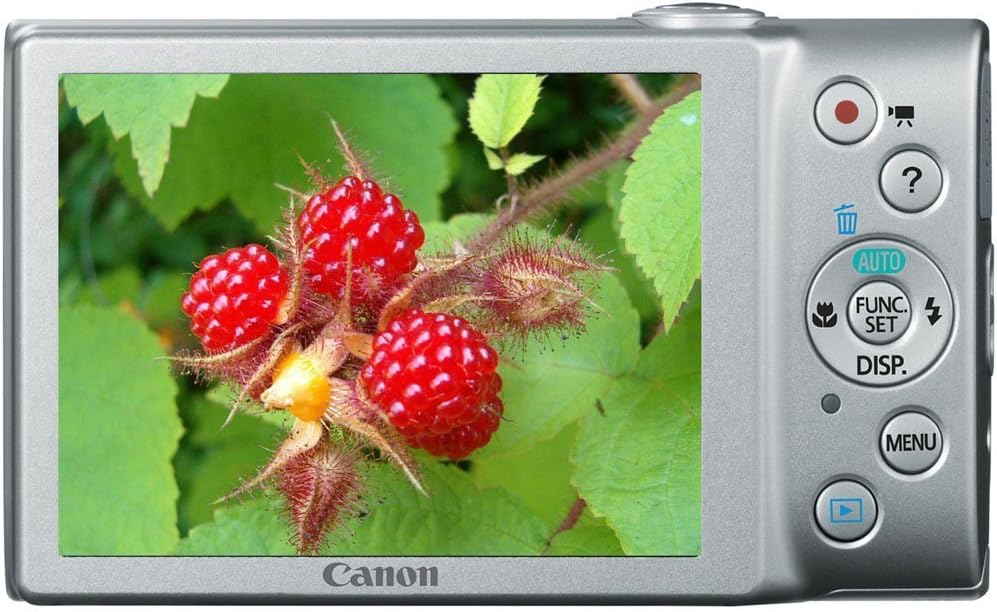
Figura 3: Posteriore view of the camera with LCD screen.
- Monitor LCD: Displays images, menus, and camera settings.
- Pulsante Film: Avvia e interrompe la registrazione video.
- Pulsante di riproduzione: Passa alla modalità di riproduzione per view foto e video.
- Pulsante MENU: Accede alle impostazioni e alle opzioni della fotocamera.
- Pulsante FUNC./SET: Confirms selections and accesses shooting function menus.
- Pulsanti direzionali (su, giù, sinistra, destra): Navigare nei menu e regolare le impostazioni.
Impostare
1. Inserting the Battery Pack
- Open the battery cover on the bottom of the camera.
- Insert the battery pack with the contacts facing the correct direction, as indicated by the diagram inside the compartment.
- Chiudere bene il coperchio della batteria finché non scatta in posizione.
2. Inserimento di una scheda di memoria
- Aprire il coperchio della batteria/scheda.
- Insert an SD, SDHC, or SDXC memory card into the card slot until it clicks into place. Ensure the card is oriented correctly.
- Chiudere bene il coperchio.
3. Impostazione della data e dell'ora
- Accendi la telecamera.
- If prompted, follow the on-screen instructions to set the date, time, and time zone. Use the directional buttons to navigate and the FUNC./SET button to confirm.
Utilizzo della fotocamera
1. Accensione/spegnimento della fotocamera
- Premere il tasto ENERGIA button to turn the camera on.
- Premere il tasto ENERGIA button again to turn the camera off.
2. Taking Still Photos (Smart AUTO Mode)
- Turn on the camera. The camera will typically start in Smart AUTO mode.
- Frame your subject on the LCD monitor.
- Premere il tasto Pulsante dell'otturatore halfway down to focus. The focus frame will appear green when focus is achieved.
- Premere il tasto Pulsante dell'otturatore completamente verso il basso per scattare la foto.
3. Registrazione di filmati
- With the camera on, press the dedicated Pulsante Film (red dot icon). Recording will begin immediately.
- Premere il tasto Pulsante Film di nuovo per interrompere la registrazione.
4. Viewing Images (Playback Mode)
- Premere il tasto Pulsante di riproduzione (blue arrow icon).
- Use the directional buttons to scroll through your photos and videos.
- Per tornare alla modalità di scatto, premere il pulsante Pulsante di riproduzione di nuovo o premere il Pulsante dell'otturatore a metà.
Funzionalità avanzate
1. Utilizzo dello zoom ottico
While in shooting mode, push the Leva dello zoom in direzione T (Telephoto) to zoom in on your subject, or towards W (Grandangolo) per ridurre lo zoom.
2. Modalità flash
In modalità di scatto, premere il tasto Up Directional Button to cycle through flash modes:
- Auto: Il flash si attiva automaticamente quando necessario.
- SU: Il flash scatta a ogni scatto.
- Spento: Il flash non si attiva.
3. Modalità di scatto
Premere il tasto FUNC./SET Button to access various shooting modes, including:
- AUTOMATICO intelligente: La fotocamera seleziona automaticamente le impostazioni ottimali.
- Programma (P): Consente il controllo manuale di alcune impostazioni mentre la fotocamera imposta l'esposizione.
- Modalità scena: Pre-set modes for specific situations (e.g., Portrait, Landscape, Night Snapshot).
Manutenzione
1. Pulizia della fotocamera
- Per pulire il corpo della fotocamera, utilizzare un panno morbido e asciutto.
- For the lens, use a lens brush or a soft, lint-free cloth specifically designed for optical surfaces. Avoid touching the lens directly with your fingers.
- Pulire lo schermo LCD con un panno morbido e asciutto.
2. Cura della batteria
- Caricare completamente la batteria prima del primo utilizzo e dopo lunghi periodi di inutilizzo.
- Conservare la batteria in un luogo fresco e asciutto quando non viene utilizzata.
- Non esporre la batteria a temperature estreme.
3. Conservazione
Quando si ripone la fotocamera per un periodo prolungato, rimuovere la batteria e la scheda di memoria. Conservare la fotocamera in un luogo asciutto e ben ventilato, lontano dalla luce solare diretta e da temperature estreme.
Risoluzione dei problemi
| Problema | Soluzione |
|---|---|
| La fotocamera non si accende. | Ensure the battery is charged and inserted correctly. Try recharging the battery. |
| Le immagini sono sfocate. | Check if the lens is clean. Ensure the camera is held steady. Use the flash in low light. Allow the camera to focus before fully pressing the shutter button. |
| Il flash non si attiva. | Check the flash mode setting. Ensure it is not set to 'Off'. The flash may not fire if the ambient light is sufficient. |
| Errore della scheda di memoria. | Ensure the memory card is inserted correctly. Try formatting the card (this will erase all data). Use a different memory card. |
| Impossibile registrare il video. | Check if the memory card has sufficient free space. Ensure the battery has enough charge. |
Specifiche
| Caratteristica | Dettaglio |
|---|---|
| Risoluzione fissa efficace | 16.0 Megapixel |
| Zoom ottico | 8x |
| Lente | 28mm Wide-Angle |
| Stabilizzazione dell'immagine | Ottico |
| Risoluzione video | Risoluzione 720p |
| Dimensioni dello schermo LCD | 3.0 pollici |
| Tecnologia del sensore fotografico | CMOS |
| Supportato File Formato | JPEG (Exif 2.3) |
| Tipo di scheda di memoria | Scheda SD |
| Connettività | USB |
| Numero di modello | Numero di modello: 6148B001 |
Garanzia e supporto
Informazioni sulla garanzia
This Canon PowerShot A4000 IS Digital Camera comes with a Garanzia limitata di 1 anno dalla data di acquisto. Si prega di conservare la prova d'acquisto per eventuali reclami in garanzia. La garanzia copre i difetti di fabbricazione, ma in genere esclude i danni causati da uso improprio, incidenti o riparazioni non autorizzate.
Assistenza clienti
For technical assistance, service, or further information, please refer to the official Canon support website or contact their customer service. Contact details can usually be found on the manufacturer's websito o nella documentazione fornita con il prodotto.