
1. Introduzione
Thank you for choosing the Fonestar AS-24U Hi-Fi USB/SD/MP3 Amplificatore. Questo manuale fornisce informazioni essenziali per il funzionamento sicuro ed efficiente del dispositivo. Si prega di leggerlo attentamente prima dell'uso e di conservarlo per riferimento futuro.
2. Istruzioni di sicurezza
- Alimentazione elettrica: Assicurare il amplifier è collegato a una fonte di alimentazione corrispondente al volume specificatotage (230 V).
- Ventilazione: Non ostruire le aperture di ventilazione. Lasciare spazio sufficiente attorno all'unità per garantire un corretto flusso d'aria ed evitare il surriscaldamento.
- Umidità: Mantieni il amplifier away from water, moisture, and high humidity environments. Do not expose it to dripping or splashing.
- Fonti di calore: Evitare di posizionare l'unità vicino a fonti di calore quali termosifoni, bocchette di ventilazione, stufe o altri apparecchi che producono calore.
- Pulizia: Scollegare il cavo di alimentazione prima della pulizia. Utilizzare un panno asciutto e morbido. Non utilizzare detergenti liquidi o spray.
- Manutenzione: Non tentare di riparare questo prodotto da soli. Affidare tutte le operazioni di manutenzione a personale di assistenza qualificato.
- Ingresso oggetto/liquido: Non spingere mai oggetti di alcun tipo in questo prodotto attraverso le aperture poiché potrebbero entrare in contatto con liquidi pericolosi.tage punti o parti in cortocircuito che potrebbero causare incendi o scosse elettriche.
3. Prodotto finitoview
3.1 Pannello frontale
The front panel features controls for power, input selection, volume adjustment, and USB/SD media playback. It also includes a display for media information.
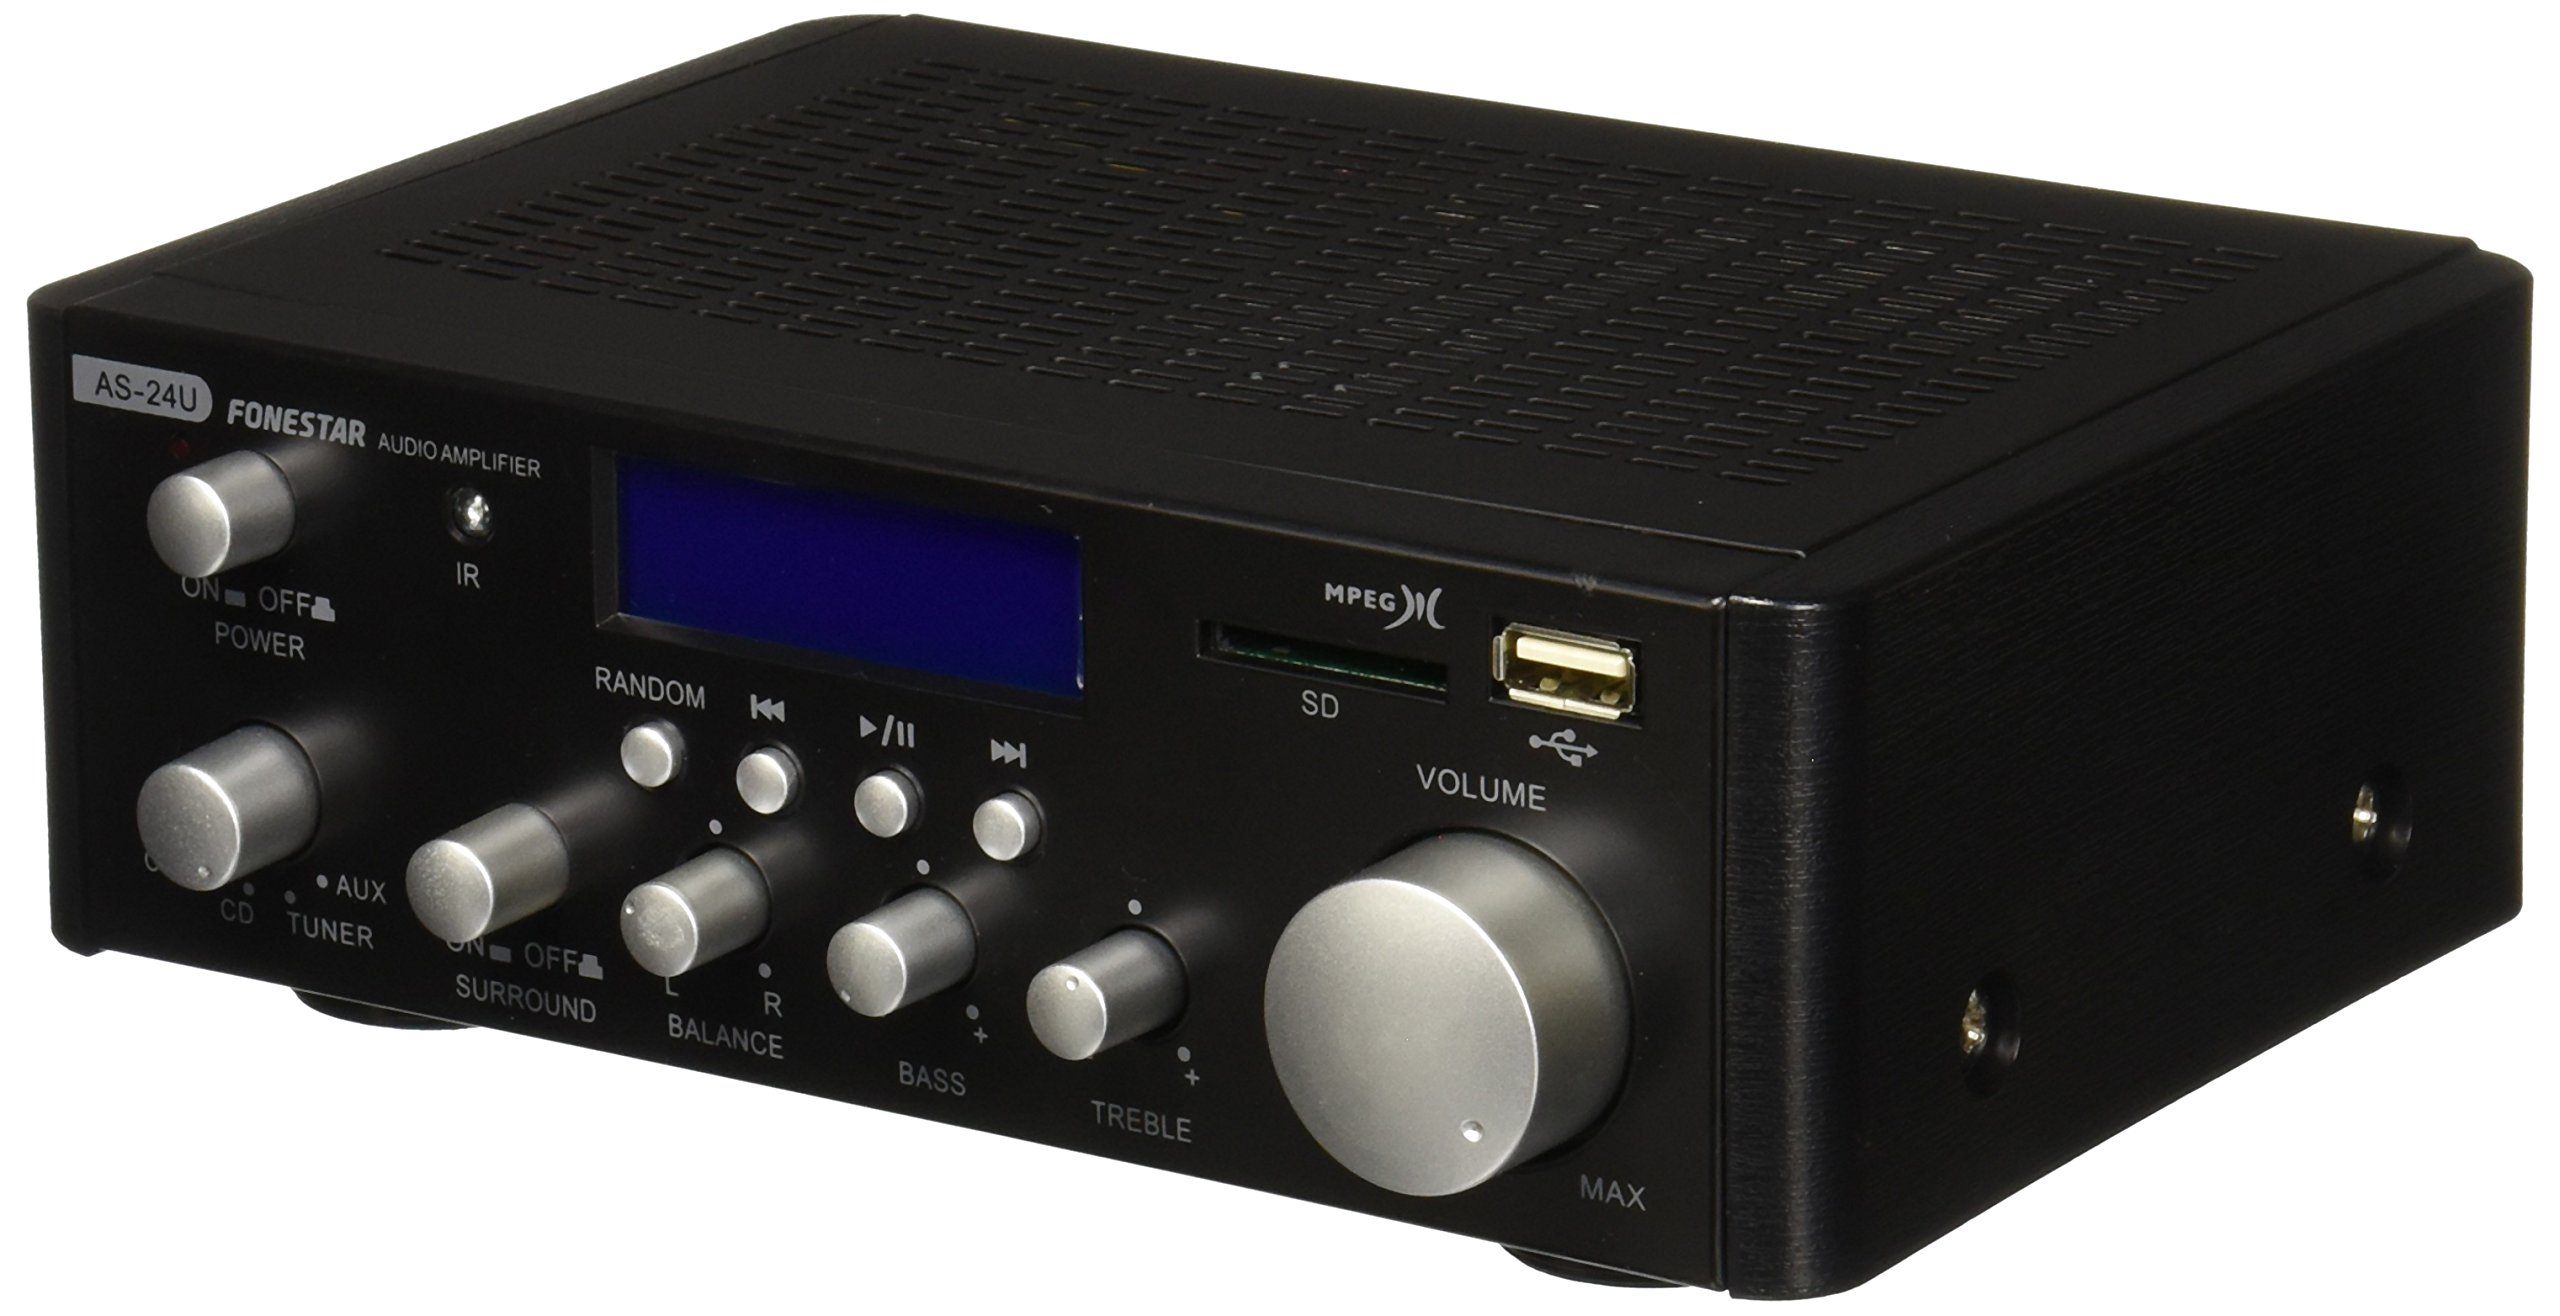
Immagine 1: anteriore view of the Fonestar AS-24U amplifier, showing the main controls and display.
3.2 Pannello posteriore
The rear panel provides all necessary connections for audio input sources, speaker outputs, and power.

Immagine 2: posteriore view of the Fonestar AS-24U amplifier, detailing input/output ports and power connection.
- INPUT (AUX, TUNER, CD): RCA stereo inputs for connecting external audio sources.
- SPEAKER OUT (STEREO): Spring clip terminals for connecting passive speakers (4-8 Ω).
- SPEAKER OUT (SURROUND): Additional spring clip terminals for surround speakers (8 Ω).
- ALIMENTAZIONE: AC power input for the main power cable.
- VOLTAGSELETTORE E: Switch for selecting between 115V and 230V power input. Ensure this is set correctly for your region.
3.3 telecomando
Il telecomando incluso consente un comodo utilizzo del amplifier's media playback functions.
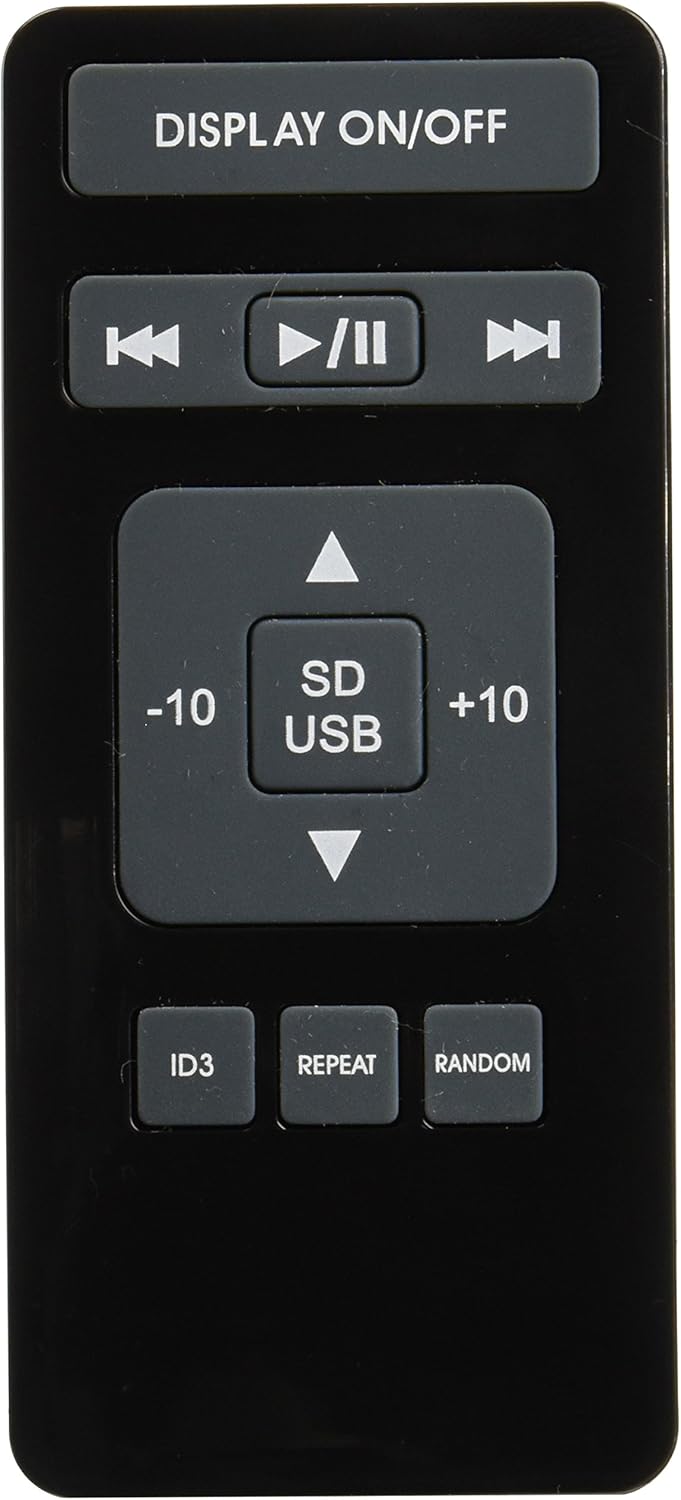
Image 3: Remote control for the Fonestar AS-24U amplifier, showing buttons for media playback and display control.
- VISUALIZZAZIONE ON/OFF: Toggles the front panel display.
- PLAY/PAUSE, PREVIOUS/NEXT: Controlli per la riproduzione multimediale.
- Scheda SD/USB: Selects between SD card and USB drive as the media source.
- -10/+10: Skips tracks by 10.
- ID3: Visualizza ID3 tag informazioni per MP3 files.
- RIPETERE: Toggles repeat modes (e.g., repeat one, repeat all).
- CASUALE: Toggles random playback.
4. Impostazione
4.1 Collegamento degli altoparlanti
- Assicurare il amplifier è spento e scollegato.
- Connect your passive speakers to the SPEAKER OUT terminals on the rear panel.
- Abbinare il terminale positivo (+) sul amplifier al terminale positivo (+) dell'altoparlante e quello negativo (-) al terminale negativo (-).
- For stereo speakers, use the 4-8 Ω terminals. For surround speakers, use the 8 Ω terminals. Ensure your speakers' impedance matches the ampspecifiche di lifier.
4.2 Collegamento delle sorgenti audio
- Connect your audio devices (e.g., CD player, tuner, auxiliary device) to the corresponding RCA INPUT jacks (CD, TUNER, AUX) on the rear panel.
- Ensure left and right channels are correctly matched (red for right, white for left).
4.3 Collegamento di alimentazione
- Verificare il VOLTAGE SELECTOR switch on the rear panel is set to the correct voltage for your region (e.g., 230V).
- Connect the power cable to the POWER IN socket on the rear panel and then to a suitable wall outlet.
5. Istruzioni per l'uso
5.1 Accensione/Spegnimento
Premere il pulsante di accensione sul pannello frontale per accendere il amplifier on or off. A soft start protection circuit is integrated.
5.2 Selezione della sorgente di input
Use the input selector knob or buttons on the front panel to choose between CD, TUNER, AUX, USB, or SD inputs.
5.3 Regolazione del volume
Rotate the main volume knob on the front panel to adjust the overall sound level. Start with a low volume and gradually increase it to a comfortable listening level.
5.4 Riproduzione USB/SD
- Inserire una chiavetta USB o una scheda SD contenente audio MP3 files nell'apposito slot sul pannello frontale.
- Select the USB or SD input using the input selector.
- Use the playback controls (Play/Pause, Previous/Next) on the front panel or remote control to manage your music.
- The remote control allows for additional functions like skipping 10 tracks (+10/-10), displaying ID3 tags, repeating tracks, and random playback.
6. Manutenzione
6.1 Pulizia
Per pulire il amplifier, first unplug it from the power outlet. Use a soft, dry cloth to wipe down the exterior surfaces. Do not use abrasive cleaners, waxes, or solvents as they may damage the finish.
6.2 Conservazione
Se si memorizza il amplifier for an extended period, ensure it is unplugged, clean, and stored in a cool, dry place away from direct sunlight and extreme temperatures.
7. Risoluzione Dei Problemi
- Nessun potere:
- Controllare se il cavo di alimentazione è collegato saldamente a entrambi i amplificatore e la presa a muro.
- Assicurarsi che la presa a muro sia funzionante.
- Verificare il VOLTAGE SELECTOR switch is set correctly.
- Nessun suono:
- Verificare che sia selezionata la sorgente di input corretta.
- Controllare che tutti i collegamenti degli altoparlanti siano correttamente collegati e che la polarità sia corretta.
- Assicuratevi che il volume sia alto e non disattivato.
- Prova con una sorgente audio diversa.
- Suono distorto:
- Ridurre il volume.
- Verificare la compatibilità dell'impedenza degli altoparlanti.
- Ensure audio cables are not damaged and are securely connected.
- Problemi di riproduzione USB/SD:
- Ensure the USB drive or SD card is formatted to a compatible file sistema (ad esempio, FAT32).
- Verificare che l'audio filesono in formato MP3.
- Prova un'altra unità USB o una scheda SD.
8. Specifiche
| Marca | FONESTAR |
| Modello | AS-24U |
| Stereo Power Output | 25 + 25 W max, 15 + 15 W RMS (4 Ω), 12 + 12 W RMS (8 Ω) |
| Surround Power Output | 10 + 10 W max, 6 + 6 W RMS (8 Ω) |
| Ingressi | 3 stereo (CD, Tuner, AUX), 2 x RCA 400 mV |
| Protezioni | Avviamento graduale, cortocircuito, sovraccarico |
| Voltage | 230 Volt |
| Dimensioni (L x P x A) | 5 x 5 x 10 cm (circa 50 x 50 x 100 mm) |
| Peso | 1.9 kg |
| Connettività degli altoparlanti | Cablato |
9. Garanzia e supporto
This Fonestar AS-24U amplifier comes with a standard manufacturer's warranty. Please refer to the warranty card included with your purchase for specific terms and conditions. For technical support, service, or warranty claims, please contact your retailer or the official Fonestar customer service.