
1. Introduzione
Grazie per l'acquistoasing the Fonestar AS-170RU Hi-Fi Amplifier. This device is designed to provide high-fidelity stereo audio amplification, featuring a built-in USB/MP3 player, AM/FM digital tuner, and multiple audio inputs. This manual provides detailed instructions for safe installation, operation, and maintenance of your amplificatore. Leggere attentamente il presente manuale prima dell'uso e conservarlo per riferimento futuro.
2. Istruzioni di sicurezza
- Alimentazione elettrica: Assicurare il amplifier è collegato a un alimentatore corrispondente al volumetage specified on the unit. Disconnect the power cord from the outlet if the unit will not be used for an extended period.
- Ventilazione: Non ostruire le aperture di ventilazione. Lasciare spazio sufficiente attorno all'unità per garantire un corretto flusso d'aria ed evitare il surriscaldamento.
- Acqua e umidità: Non esporre l'unità a pioggia, umidità o liquidi che gocciolano/spruzzano. Non posizionare oggetti contenenti liquidi, come vasi, sull'unità.
- Fonti di calore: Tenere l'unità lontana da fonti di calore quali radiatori, bocchette di riscaldamento, stufe o altri apparecchi (inclusi amplificatori) che producono calore.
- Pulizia: Pulire solo con un panno asciutto. Non usare detergenti liquidi o spray.
- Manutenzione: Non tentare di riparare questo prodotto da soli. Affidare tutte le operazioni di manutenzione a personale di assistenza qualificato.
- Posizionamento: Posizionare l'unità su una superficie stabile e piana. Evitare di esporla alla luce diretta del sole o in prossimità di forti campi magnetici.
3. Contenuto della confezione
Si prega di verificare che i seguenti articoli siano inclusi nel pacchetto:
- Fonestar AS-170RU Hi-Fi Amppiù vivace
- Telecomando
- Antenna AM
- Antenna FM
- Manuale dell'utente (questo documento)
4. Prodotto finitoview
4.1 Pannello frontale
The front panel provides access to essential controls and the display.
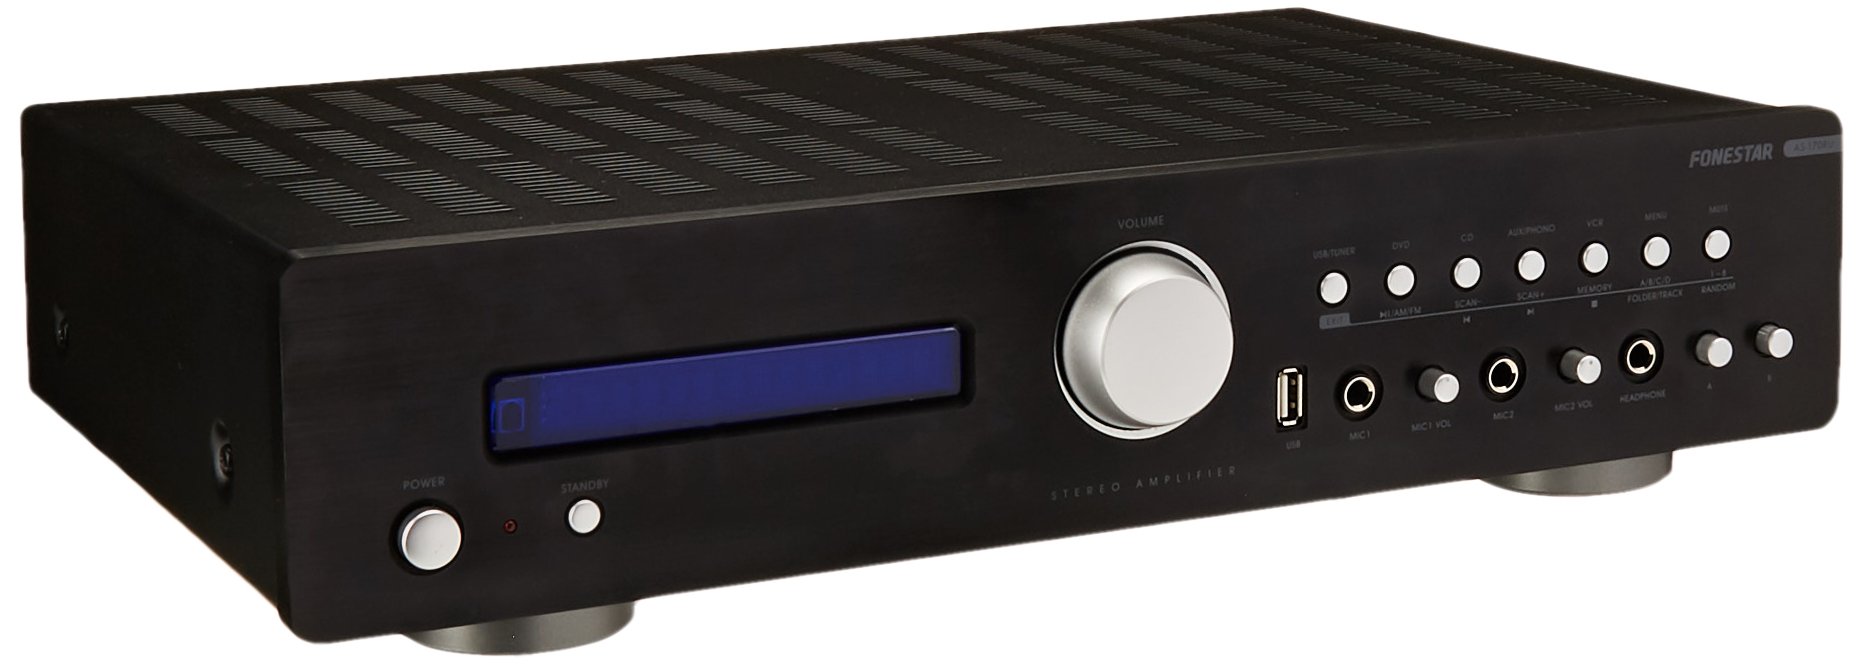
Image: Fonestar AS-170RU Front Panel. Questa immagine mostra la parte anteriore view del amplifier, showing the VFD display, USB port, headphone output, input selectors, volume knob, and other control buttons.
- Pulsante di accensione: Gira il amplificatore acceso o spento.
- Display VFD: Shows current input, volume level, tuner information (frequency, RDS), and USB/MP3 track details (ID3 tag).
- Porta USB: For connecting USB storage devices to play MP3 files.
- Uscita cuffie: Jack da 6.3 mm per il collegamento delle cuffie.
- Selettori di ingresso: Buttons for choosing audio sources (CD, DVD, VCR, AUX/Phono, USB/Tuner).
- Controllo del volume: Rotary knob to adjust the master volume level.
- Ingressi microfono: Two 6.3mm microphone jacks with independent volume control.
- Controlli di tono: Buttons or menu options for adjusting Bass, Treble, and Balance.
4.2 Pannello posteriore
The rear panel contains all the necessary connections for your audio sources, speakers, and antennas.

Image: Fonestar AS-170RU Rear Panel. This image illustrates the rear connections of the amplifier, including speaker terminals (A/B), various RCA input jacks (CD, DVD, VCR, AUX/Phono), REC OUT, PRE OUT, AMP IN, and antenna connections (FM COAX, AM LOOP ANT).
- Speaker Outputs (A/B): Terminals for connecting two pairs of speakers. Supports 4-16 ohms for A or B, or 8-16 ohms for A+B.
- Ingressi audio (RCA):
- Ingresso CD: Per collegare un lettore CD.
- Ingresso DVD: For connecting a DVD player or other audio source.
- VCR Input: For connecting a VCR or other audio source.
- AUX/PHONO Input: For connecting auxiliary devices or a turntable (Phono input may require a pre-amplifier if your turntable does not have one built-in).
- USCITA REGISTRAZIONE: Uscita RCA per il collegamento a un dispositivo di registrazione.
- PRE USCITA: Uscita RCA per il collegamento a un alimentatore esterno amppiù vivace.
- AMP IN: RCA input for connecting an external pre-amppiù vivace.
- Collegamenti dell'antenna:
- FM COAX 75Ω: For connecting an FM antenna.
- AM LOOP ANT: For connecting the supplied AM loop antenna.
4.3 telecomando
The included remote control allows convenient operation of the amplifier da lontano.

Image: Fonestar AS-170RU Remote Control. This image shows the remote control unit with various buttons for power, input selection, volume, mute, tuner functions, USB playback controls, and tone adjustments.
- PAUSA: Accensione/spegnimento.
- Selettori di ingresso: Buttons for CD, DVD, VCR, AUX/PHONO, USB/TUNER.
- Volume su/giù (VOL +/-): Regola il volume principale.
- MUTO: Disattiva l'uscita audio.
- AM/FM: Switches between AM and FM tuner modes.
- SCANSIONE: Esegue la scansione delle stazioni radio.
- MEMORIA: Memorizza le stazioni radio preimpostate.
- USB Playback Controls: Play/Pause, Stop, Skip Track, Folder/Track navigation.
- EQ OFF / BASS / TREBLE: Access tone controls.
- RDS / ID3: Displays RDS information for radio or ID3 tag per MP3 files.
5. Impostazione
5.1 Collegamento degli altoparlanti
- Assicurare il amplifier è spento e scollegato dalla presa di corrente.
- Connect your speakers to the "SPEAKERS OUTPUT" terminals on the rear panel.
- Abbinare il terminale positivo (+) del amplifier (red) to the positive (+) terminal of your speaker, and the negative (-) terminal (black) to the negative (-) terminal.
- The AS-170RU supports two groups of speakers (A and B). You can connect one pair to "SPEAKERS A" and another to "SPEAKERS B".
- Assicurati che l'impedenza dei tuoi altoparlanti corrisponda a amplifier's specifications: 4-16 ohms for A or B, or 8-16 ohms for A+B.
5.2 Collegamento delle sorgenti audio
Use RCA cables to connect your audio components to the corresponding input jacks on the rear panel.
- Lettore CD: Collegare all'ingresso "CD".
- Lettore DVD: Connect to the "DVD" input.
- Videoregistratore: Connect to the "VCR" input.
- Auxiliary Device (e.g., smartphone, tablet): Connect to the "AUX/PHONO" input.
- giradischi: Connect to the "AUX/PHONO" input. If your turntable does not have a built-in pre-amplifier, you may need an external phono pre-amppiù vivace.
5.3 Collegamento delle antenne
- Antenna FM: Connect the supplied FM wire antenna to the "FM COAX 75Ω" terminal. Extend the wire for optimal reception.
- Antenna AM: Connect the supplied AM loop antenna to the "AM LOOP ANT" terminals. Position the loop for best reception.
5.4 Collegamento di alimentazione
Una volta effettuati tutti i collegamenti audio e degli altoparlanti, collegare il amplifier's power cord into a suitable AC power outlet.
6. Istruzioni per l'uso
6.1 Funzionamento di base
- Accensione/spegnimento: Press the Power button on the front panel or the STANDBY button on the remote control to turn the amplificatore acceso o spento.
- Seleziona sorgente di ingresso: Press the desired input selector button on the front panel (CD, DVD, VCR, AUX/PHONO) or the remote control (CD, DVD, VCR, AUX/PHONO, USB/TUNER).
- Regola volume: Rotate the Volume knob on the front panel or use the VOL +/- buttons on the remote control to adjust the sound level.
- Disattiva audio: Press the MUTE button on the remote control to temporarily silence the audio. Press it again to restore sound.
6.2 Riproduzione USB/MP3
- Insert a USB storage device (flash drive) into the USB port on the front panel.
- Select "USB/TUNER" as the input source. The amplifier will automatically detect and begin playing MP3 files.
- Use the playback controls on the remote control (Play/Pause, Stop, Skip Track, Folder/Track) to navigate and control your music.
- The VFD display will show track information, including ID3 tags se disponibile.
- IL amplifier supports up to 65,000 indexable folders and files, with a maximum of 8 folder levels.
6.3 AM/FM Tuner Operation
- Select "USB/TUNER" as the input source, then press the AM/FM button on the remote control to switch between AM and FM bands.
- Scansione automatica: Press the SCAN button on the remote control to automatically search for and store available radio stations.
- Sintonizzazione manuale: Use the tuning buttons (usually arrow keys) on the remote control to manually adjust the frequency.
- Stazioni preimpostate: IL amplifier supports 64 presets. Use the MEMORY button to store and recall your favorite stations.
- Funzione RDS: If available, press the RDS button on the remote control to display Radio Data System information (e.g., station name, program type).
6.4 ingressi microfono
- Connect microphones to the 6.3mm MIC 1 and MIC 2 jacks on the front panel.
- Adjust the independent volume controls for each microphone to achieve the desired level.
6.5 Controllo del tono e del bilanciamento
IL amplifier allows adjustment of bass, treble, and balance through its menu system or dedicated buttons on the remote control. Refer to the remote control section for specific buttons like EQ OFF, BASS, TREBLE.
7. Manutenzione
- Pulizia: Disconnect the power before cleaning. Use a soft, dry cloth to wipe the exterior surfaces. Do not use abrasive cleaners, waxes, or solvents.
- Ventilazione: Controllare periodicamente che le aperture di ventilazione siano libere da polvere e detriti.
- Magazzinaggio: Se si conserva l'unità per un periodo prolungato, scollegarla dalla presa di corrente e conservarla in un luogo fresco e asciutto, lontano dalla luce solare diretta e da temperature estreme.
8. Risoluzione Dei Problemi
If you encounter problems with your amplifier, refer to the following table for possible solutions.
| Problema | Possibile causa | Soluzione |
|---|---|---|
| Nessun potere | Cavo di alimentazione non collegato; Presa di corrente difettosa; Amplificatore in modalità standby. | Ensure power cord is securely plugged in. Test the outlet with another device. Press the Power/STANDBY button. |
| Nessun suono | Ingresso selezionato errato; Volume troppo basso; Altoparlanti non collegati correttamente; Funzione mute attiva. | Select the correct input source. Increase volume. Check speaker connections. Deactivate MUTE. |
| Scarsa ricezione radio | Antenna not connected or poorly positioned; Interference. | Connect and adjust the position of the AM/FM antennas. Move the amplifier lontano da altri dispositivi elettronici. |
| La riproduzione USB non funziona | Dispositivo USB non inserito correttamente; Incompatibile file formato; dispositivo USB difettoso. | Assicurarsi che il dispositivo USB sia completamente inserito. Controllare se filesono in formato MP3. Prova un altro dispositivo USB. |
| Amplifier turns off unexpectedly or cycles power | Overheating; Short circuit in speaker wiring; Internal fault. | Ensure adequate ventilation. Check speaker wires for frayed strands causing short circuits. If the problem persists, disconnect power and contact qualified service personnel. |
9. Specifiche
- Modello: AS-170RU
- Potenza in uscita: 80 + 80 W RMS at 4 Ω
- Impedenza dell'altoparlante: 4-16 Ω (A or B), 8-16 Ω (A+B)
- Protezione: 3 circuits (short circuits, overload, overvoltage)
- Lettore USB: MP3 file riproduzione, ID3 tag support. Max 65,000 indexable folders/files, max 8 folder levels.
- Sintonizzatore: Digital AM/FM, 64 presets, RDS.
- Ingressi: 2 x Microphone (6.3mm), 4 x RCA (CD, DVD, VCR, AUX/Phono), 1 x RCA (AMP IN).
- Risultati: 1 x RCA (REC OUT), 1 x RCA (PRE OUT), Headphone (6.3mm).
- Display: Blue VFD.
- Controllo dei toni: Bass, Treble, Balance (via menu/remote).
- Dimensioni: 40 x 40 x 60 cm (circa 15.7 x 15.7 x 23.6 pollici)
- Peso: 7.2 kg (circa 15.87 libbre)
10. Garanzia e supporto
For warranty information and technical support, please refer to the warranty card included with your product or contact your authorized Fonestar dealer. Do not attempt to repair the unit yourself, as this may void your warranty.