Behringer NOX101
Behringer Pro Mixer NOX101 2-Channel DJ Mixer User Manual
Model: NOX101 | Brand: Behringer
Introduzione
The Behringer Pro Mixer NOX101 is a premium 2-channel DJ mixer designed for demanding turntablists, remixers, and digital DJs. This manual provides comprehensive instructions for setting up, operating, and maintaining your NOX101 mixer to ensure optimal performance and longevity.

Figura 1: in alto view of the Behringer Pro Mixer NOX101, showing main controls and layout.
Informazioni sulla sicurezza
Please read and follow all safety instructions carefully before operating the device. Retain this manual for future reference.
- Fonte di energia: Connect the mixer only to the specified power supply. Ensure the voltage corrisponde ai requisiti.
- Ventilazione: Non ostruire le aperture di ventilazione. Installare secondo le istruzioni del produttore.
- Acqua e umidità: Non utilizzare questo apparecchio vicino all'acqua né esporlo a gocce o schizzi.
- Pulizia: Pulire solo con un panno asciutto.
- Manutenzione: Affidare tutti gli interventi di assistenza a personale di assistenza qualificato. L'assistenza è richiesta quando l'apparecchio è stato danneggiato in qualsiasi modo, ad esempio se il cavo di alimentazione o la spina sono danneggiati, se è stato versato del liquido o sono caduti degli oggetti nell'apparecchio, se l'apparecchio è stato esposto a pioggia o umidità, se non funziona normalmente o se è caduto.
Impostare
Follow these steps to set up your Behringer NOX101 mixer:
- Disimballaggio: Carefully remove the mixer from its packaging. Verify that all components listed in the "What's in the Box" section are present.
- Posizionamento: Place the mixer on a stable, flat surface. Ensure adequate ventilation around the unit.
- Collegamento elettrico: Connect the provided power cord to the mixer's power input and then to a suitable electrical outlet.
- Connessioni ingresso audio:
- Connect your turntables to the PHONO inputs using RCA cables. Ensure the PHONO/LINE switch is set to PHONO.
- Connect CD players, media players, or other line-level devices to the LINE inputs using RCA cables. Ensure the PHONO/LINE switch is set to LINE.
- Connect a microphone to the MIC input (XLR or 1/4" TRS).
- Collegamenti di uscita audio:
- Connect the MAIN OUTPUTS (RCA or 1/4" TRS) to your ampdiffusori acustici, altoparlanti amplificati o sistemi PA.
- Connect headphones to the HEADPHONE output for monitoring.

Figura 2: Posteriore view of the Behringer Pro Mixer NOX101, showing the crossfader curve adjustment and headphone jack.

Figura 3: dettagliata view of the input and output connections on the Behringer NOX101 mixer, including RCA and TRS options.
Istruzioni per l'uso
This section details the functions of the Behringer NOX101 mixer's controls.
Channel Controls (Channels 1 & 2)
- Manopola GAIN: Adjusts the input level for the respective channel. Set to an appropriate level to avoid clipping (indicated by the PEAK LED).
- EQ Knobs (HIGH, MID, LOW): These are 3-band EQs with "full-kill" filters, allowing you to completely remove specific frequency ranges.
- ALTO: Regola le frequenze alte.
- CENTRO: Regola le frequenze medie.
- BASSO: Regola le frequenze dei bassi.
- Interruttore PHONO/LINE: Selects between PHONO (for turntables) and LINE (for CD players/other line-level devices) input for the channel.
- Fader di canale: Controls the volume level of the individual channel.
- PFL/CUE Button: Sends the channel's audio to the headphone output for pre-fader listening.
- CURVE Knob: Adjusts the curve of the channel fader, from a smooth fade to a sharp cut.
Sezione microfono
- Manopola MIC GAIN: Regola il livello di ingresso del microfono.
- Manopola LIVELLO MICROFONO: Controls the overall volume of the microphone output.
Sezione Master
- Manopola MAESTRO: Controlla il volume di uscita complessivo del mixer.
- CUE GAIN Knob: Regola il volume dell'uscita cuffie.
- CUE MIX Slider: Blends between the PFL (Pre-Fader Listen) signal and the Master output in your headphones.
- Metri VU: Displays the output level of the main mix and PFL signal. Aim for levels that are strong but do not consistently peak into the red.
crossfader
- Crossfader: Blends between Channel 1 and Channel 2.
- XFADE CURVE Knob: Located on the rear panel, this knob adjusts the curve of the crossfader, from a smooth blend to a sharp cut for scratching.
- Pulsante REV: Reverses the direction of the crossfader.
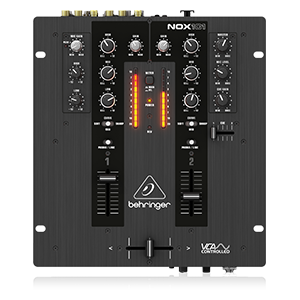
Figure 4: Simplified diagram of the Behringer NOX101 mixer's control layout.
Manutenzione
Proper maintenance ensures the longevity and optimal performance of your NOX101 mixer.
- Pulizia: Regularly wipe the mixer's surface with a soft, dry, lint-free cloth. Avoid using abrasive cleaners, solvents, or waxes.
- Protezione dalla polvere: Quando non è in uso, coprire il mixer per proteggerlo da polvere e detriti.
- Cura del fader: While the faders are designed for durability, excessive force or exposure to liquids can cause damage. Keep them clean and free of foreign particles.
- Magazzinaggio: Conservare il mixer in un luogo fresco e asciutto, lontano dalla luce solare diretta e da temperature estreme.
Risoluzione dei problemi
If you encounter issues with your Behringer NOX101 mixer, refer to the following common problems and solutions:
| Problema | Possibile causa | Soluzione |
|---|---|---|
| Nessuna uscita audio |
|
|
| Suono distorto |
|
|
| Crossfader not working smoothly |
|
|
Specifiche
| Caratteristica | Dettaglio |
|---|---|
| Modello | NOX101 |
| Marca | Marchio |
| Numero di canali | 2 |
| EQ | 3-band EQs with "Full-kill" Filters |
| crossfader | VCA-controlled Ultraglide Crossfader with adjustable curve |
| Tecnologia di connettività | XLR, TRS, RCA |
| Fonte di alimentazione | Elettrico con cavo |
| Colore | Nero |
| Peso dell'articolo | 4.63 libbre (2.1 kg) |
| Dimensioni del prodotto (L x P x A) | 10.04 x 10.79 x 3.94 pollici (25.5 x 27.4 x 10 cm) |
| Prima data disponibile | 1 maggio 2013 |
Garanzia e supporto
For warranty information and technical support, please refer to the official Behringer webo contattare direttamente il servizio clienti. Conservare la ricevuta d'acquisto come prova d'acquisto per eventuali reclami in garanzia.
Non erano disponibili video ufficiali del prodotto del venditore da incorporare in questo manuale.
Ask a question about this manual
Ask about setup, troubleshooting, compatibility, parts, safety, or missing instructions. Manuals+ will review the question and use this page’s manual context to help answer it.