
1. Importanti misure di sicurezza
Quando si utilizzano apparecchiature elettriche, è necessario seguire sempre le precauzioni di sicurezza di base, tra cui le seguenti:
- Non lasciare che i cavi di alimentazione tocchino superfici calde.
- Non montare vicino a stufe a gas o elettriche.
- L'attrezzatura deve essere montata in luoghi e ad altezze in cui non sarà prontamente soggetta a tamputilizzo da parte di personale non autorizzato.
- L'uso di apparecchiature accessorie non autorizzate dal produttore può causare una condizione di non sicurezza.
- Non utilizzare questa apparecchiatura per scopi diversi da quelli previsti.
- La manutenzione di questa apparecchiatura deve essere eseguita da personale di assistenza qualificato.
WARNING: This product contains chemicals known to the State of California to cause cancer, birth defects and/or other reproductive harm. Thoroughly wash hands after installing, handling, cleaning, or otherwise touching this product.
WARNING: Make sure that power is OFF before making any Electrical Connections.
I fili non utilizzati devono essere chiusi con i morsetti in dotazione.

Image: Important Safeguards and Installer Information. This image displays critical safety warnings and installation guidelines for the emergency light, emphasizing the need for qualified personnel for servicing.
2. Prodotto finitoview
The Hubbell Compass CU2RC is a dual-head LED emergency light designed for commercial applications. It features a durable thermoplastic housing and adjustable lamp heads for versatile lighting direction.
Caratteristiche principali:
- Illuminazione affidabile: Suitable for emergency or security backup in commercial areas such as pool areas, parking decks, hallways, offices. NFPA 101, NFPA 70, and OSHA certified.
- Efficienza energetica: LED system with a 10-year lifespan.
- Extended Use Battery: Nickel-cadmium battery provides 90 minutes of emergency power during outages.
- Materiale durevole: White high-impact flame-rated thermoplastic housing.
- Versatilità di montaggio: Can be mounted on walls or ceilings.
- Doppio volumetage Ingresso: Supports 120/277 AC input.
- Capacità remota: Ability to power up to two external indoor or outdoor remote lamps.
- Interruttore di prova: Water-proof self-test switch for battery/charger monitoring.

Image: Hubbell Compass CU2RC Emergency Light Features. This image highlights the white thermoplastic housing, remote capacity, fully adjustable lamp-heads, and the test button/AC-ON indicator.

Image: Emergency Light Usage Locations. This image indicates that the product is suitable for use in conditioned spaces, damp locations, stairwells, hallways, offices, retail, or commercial settings.
3. Specifiche
| Caratteristica | Dettaglio |
|---|---|
| Numero di modello | CU2RC |
| Produttore | Compass (Hubbell) |
| Peso dell'articolo | 1 libbra |
| Dimensioni del prodotto | 3 x 9 x 4 pollici (profondità x larghezza x altezza) |
| Colore | Bianco |
| Materiale | Plastica (termoplastica) |
| Fonte di alimentazione | Corrente alternata/corrente continua |
| Voltage | 120/277 Volts (AC) |
| Cosatage | 1 watt |
| Tipo di lampadina | GUIDATO |
| Tipo di montaggio | Montaggio a soffitto, montaggio a parete |
| Tipo di batteria | Nickel Oxyhydroxide (Product Specific, included) |
| Tempo di esecuzione di emergenza | 90 minuti |
| Certificazioni | NFPA 101, NFPA 70, OSHA, UL924, Title 20 |

Image: Product Dimensions Diagram. This diagram illustrates the unit's dimensions: 9 inches in width, 4 inches in height, and 2.75 inches in depth.

Image: Key Specifications of Emergency Light. This graphic highlights the LED life-cycle of more than 10 years, dual-voltage 120/277 AC input, and the Nickel Cadmium battery for UL recognized 90-minute emergency lighting.

Image: Emergency Light Material and Finish. This image shows the product and specifies its material as thermoplastic and its finish as white.
4. Installazione
The unit is designed for quick and easy installation. Ensure power is OFF before beginning any electrical connections.
4.1 J-Box Mounting
- Feed fixture leads through main bottom case and connect AC power supply.
- Collegare i cavi tramite J-Box. Fissare la piastra posteriore alla J-Box con le viti.
- Connect battery only after AC power can be provided to the unit.
- Align snaps and push housing directly onto back plate. Supply AC power and press "TEST" button to check light.
4.2 Conduit Mounting
- Fissare la piastra posteriore alla superficie della parete. Far passare i cavi attraverso il foro nella flangia del condotto ed effettuare il collegamento del condotto.
- Connect battery only after AC power can be provided to the unit.
- Align snaps and push housing directly onto back plate. Supply AC power and press "TEST" button to check light.
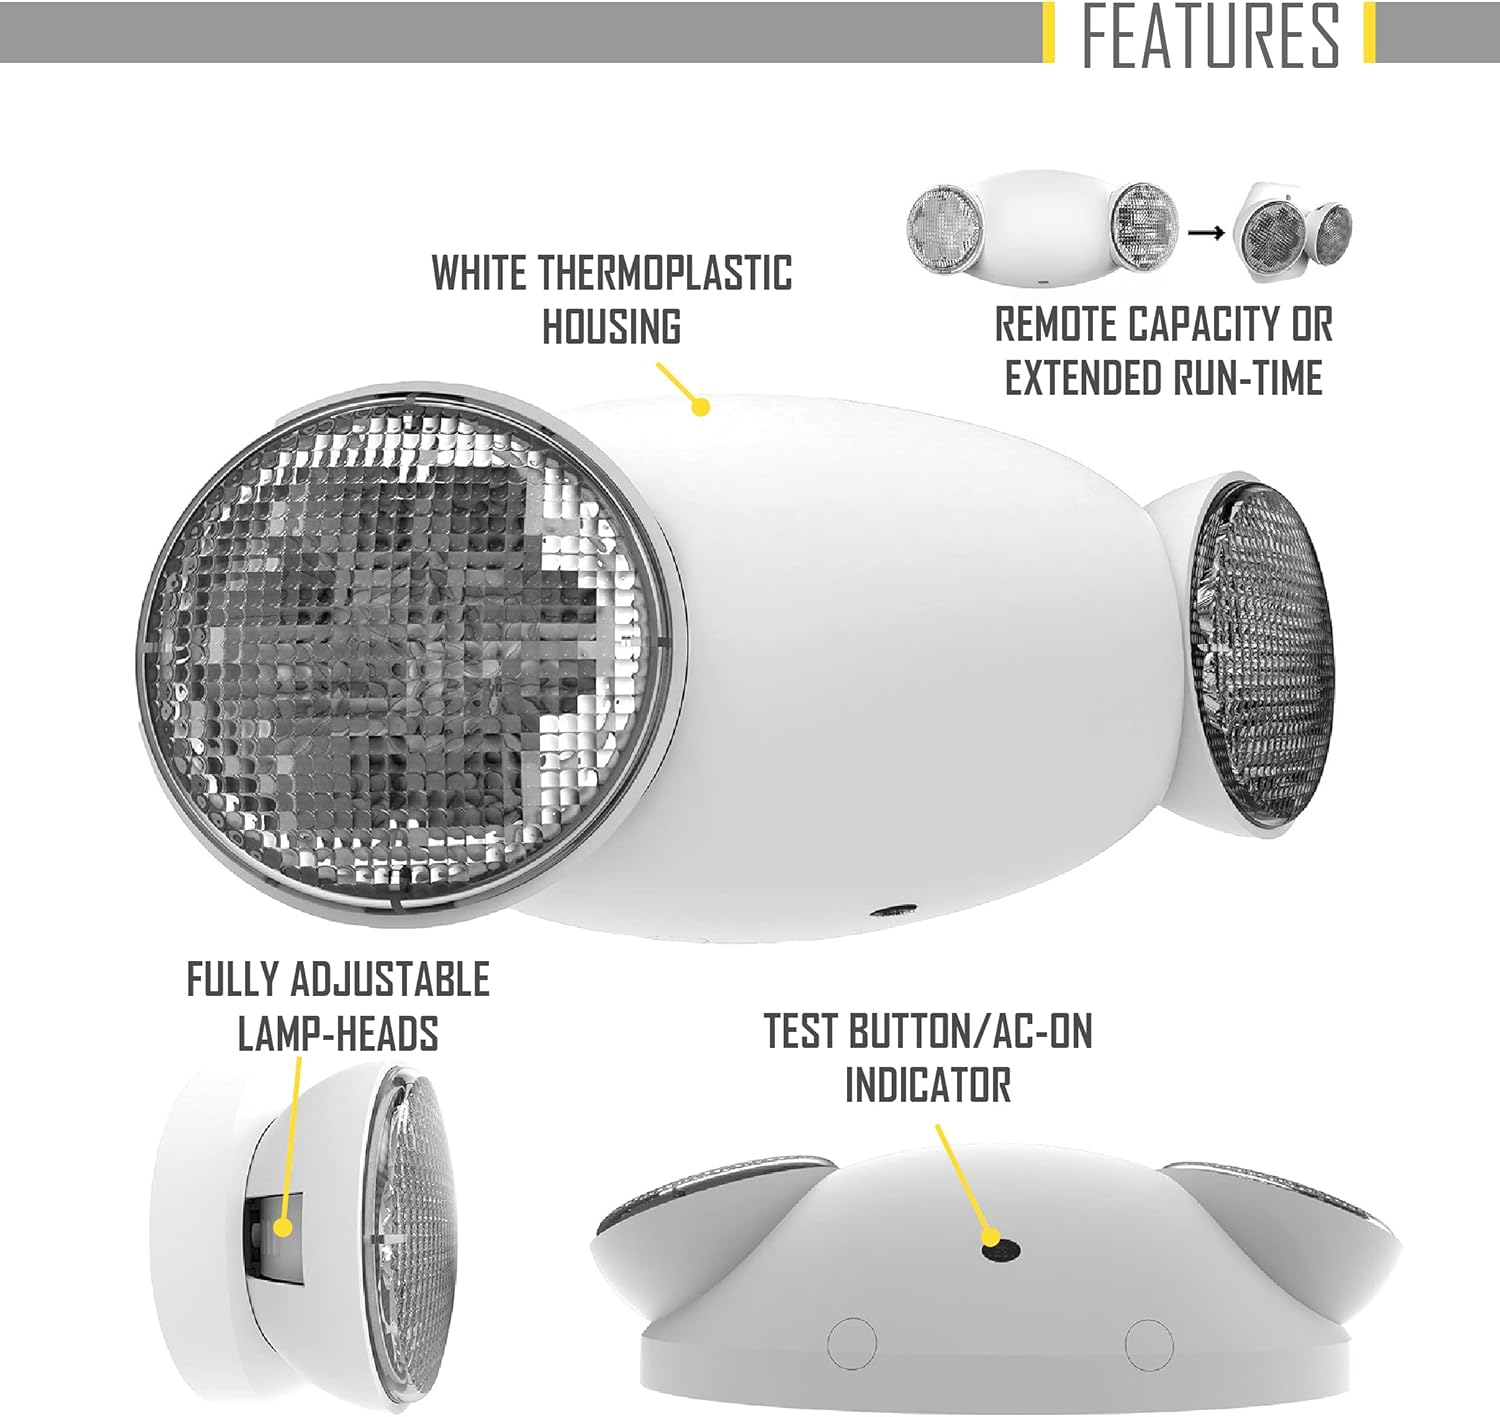
Image: Installation Figure A: J-Box Mounting. This diagram shows the initial wiring connections for J-Box mounting.

Image: Installation Figure B: Battery Connection. This diagram illustrates how to connect the battery within the unit.

Image: Installation Figure C: Housing Assembly. This diagram shows the final step of aligning and pushing the housing onto the back plate.
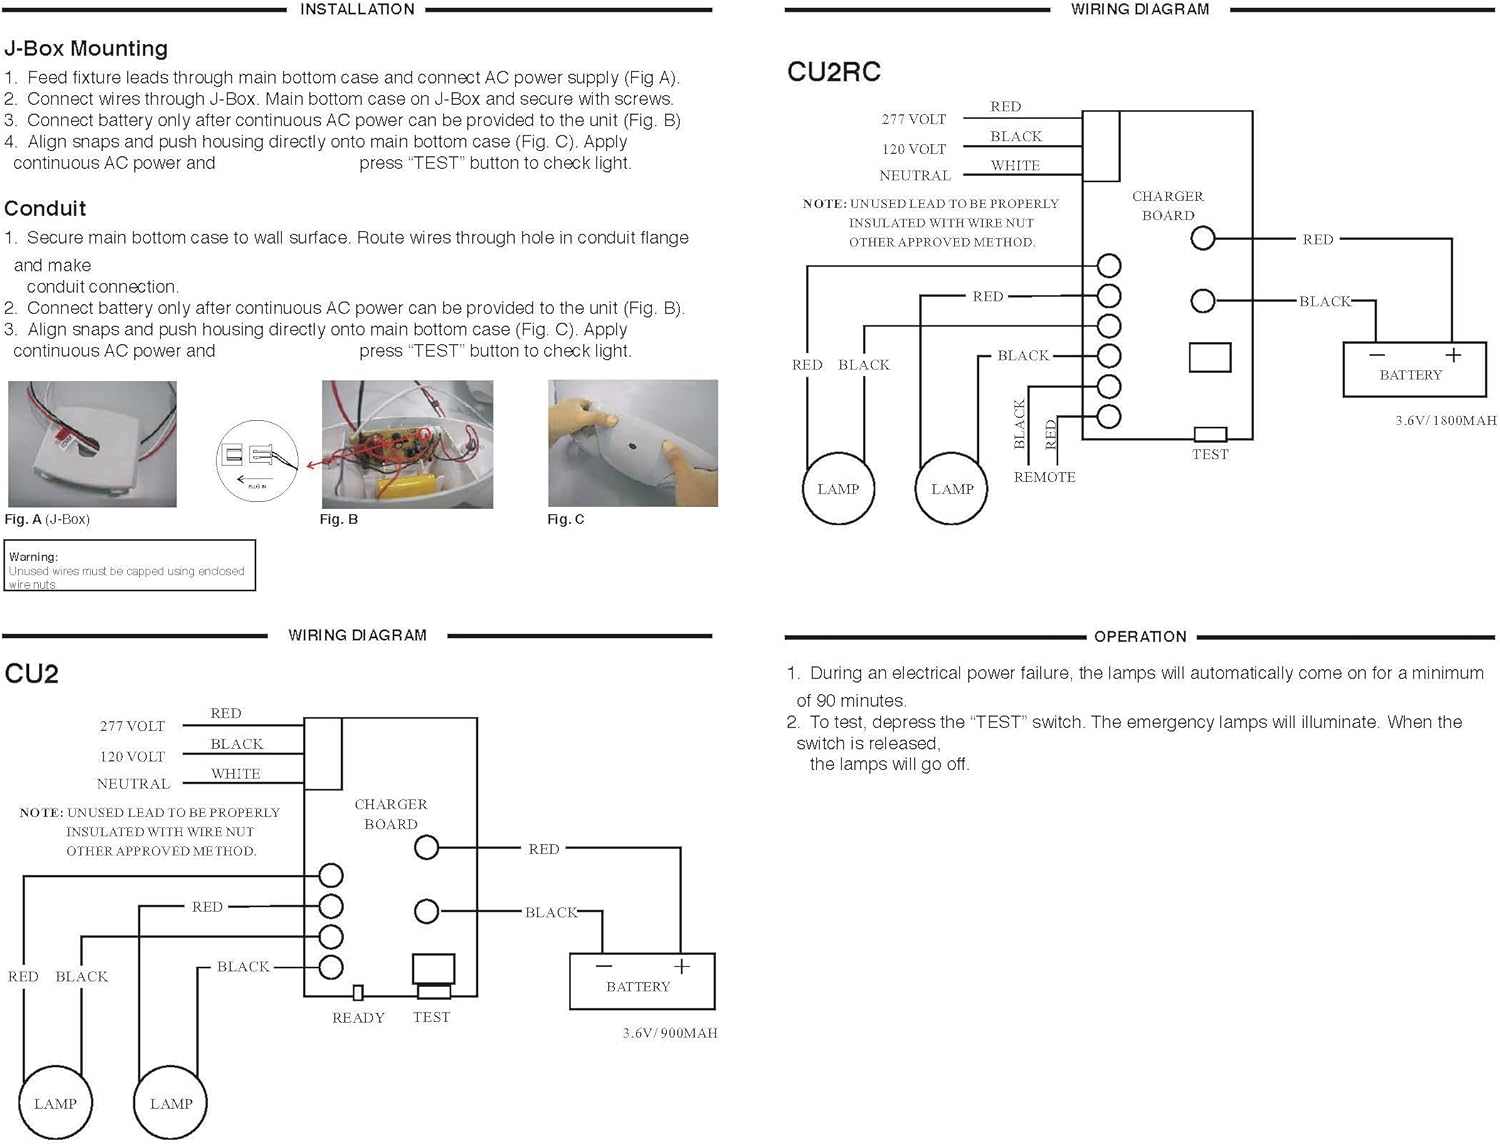
Image: Wiring Diagram for CU2RC. This diagram illustrates the electrical connections for the CU2RC model, including the charger board, battery, and lamp connections for both 120V and 277V inputs.
5. Funzionamento
Once the unit is properly installed according to the installation instruction sheet and AC power supplied, it will come ON. The dual color LED indicator will also come ON and the self-diagnostic test function will automatically initiate.
5.1 Operazione iniziale
- Durante un'interruzione di corrente elettrica, la lamps sull'unità si accenderà automaticamente per un minimo di 90 minuti.
- To test this unit, let it charge correctly with AC power supply for a minimum of 24 hours after its first installation and then depress the "TEST" switch; the emergency lamps si illuminerà. Quando l'interruttore viene rilasciato, la lamps si spegnerà.
- For the unit with Self-Diagnostic, connect as below:
- When customer doesn't need remote lamp, please insert terminal to N.
- When customer needs remote lamp, please insert terminal to Y.
5.2 Self-Diagnostic Service
The self-diagnostic function is factory preset without any allowable field adjustment. The automatic self-diagnostic feature serves the following tests:
- On-line real time monitoring of battery and lamps (both local and remote) indicates battery charging, disconnection and failure along with local and remote lamp fallimenti.
- Autotest e scarica di 15 minuti una volta ogni 30 giorni, dopo che l'alimentazione CA è stata fornita per un minimo di 24 ore.
- Self-testing and a 90-minute discharge once every year, after AC power has been supplied for a minimum of 24 hours.
5.3 Manual Testing
The unit also provides for manual testing by pushing the test button in a specific pattern. The different patterns and the resulting tests are listed in the table below:
| Azione | Reazione e indicazione LED |
|---|---|
| Premere il pulsante di prova una volta (entro 2 secondi) | Test di 30 secondi: Verde LAMPEGGIANTE |
| Premere il pulsante di prova due volte (entro 2 secondi) | 15-minute test: Green BLINKING twice |
| Premere il pulsante di prova tre volte (entro 2 secondi) | 90-minute test: Green Blinking three times |

Image: Self-Diagnostic and Manual Testing Instructions. This image details the self-diagnostic service features, fault indications with corresponding LED signals, and a table for manual testing procedures and their outcomes.
6. Manutenzione
The emergency light unit requires minimal maintenance. Regular testing ensures the battery and lamps are functioning correctly.
6.1 Manutenzione della batteria
The unit is equipped with a long-life nickel-cadmium battery. The self-diagnostic feature automatically performs monthly 15-minute tests and annual 90-minute tests to ensure battery health. If a battery failure is indicated (Red BLINKING '2' TIMES), the battery may need replacement.
6.2 Pulizia
Pulire l'esterno dell'unità con un panno morbido, damp panno. Non usare detergenti abrasivi o solventi.
7. Risoluzione Dei Problemi
The self-diagnostic system provides fault indications via the LED. Refer to the table below for common fault descriptions and their corresponding LED indications.
| Descrizione del guasto | Indicazione LED |
|---|---|
| Disconnessione della batteria | Rosso FISSO |
| Battery Recharge Failure | Rosso LAMPEGGIANTE |
| Guasto della batteria | Red BLINKING '2' TIMES |
| LED Failure (Exits Only) | Red BLINKING '3' TIMES |
| Telecomando Lamp Failure (Emergency Lights Only) | Red BLINKING '4' TIMES |
If a fault persists after attempting basic troubleshooting, contact qualified service personnel.
8. Informazioni sulla garanzia
Hubbell Lighting, Inc. ("Hubbell") warrants to the original end user that its products will be free from defects in material and workmanship for the periods specified below.
- Garanzia completa dell'unità: 2 years from the date of shipment.
- LED Fixtures and LED Drivers: 5 years from the date of shipment.
- Batterie: 90 days from the date of shipment.
This warranty is subject to certain exclusions and limitations. For complete warranty details, refer to the full unit warranty document provided with the product or available from Hubbell Lighting, Inc.
Limitazione di responsabilità: In no event shall Hubbell be liable for any indirect, special, incidental, consequential, exemplary, punitive or multiple damages, even if informed of the possibility of such damages.

Image: Product Certifications and Hubbell Warranty. This image displays various certifications such as UL924, Title 20, NFPA 70, NFPA 101, and the Hubbell Warranty shield, indicating compliance and product assurance.
9. Assistenza clienti
For technical assistance, warranty claims, or additional information, please contact Hubbell Lighting customer service.
Visit the official Hubbell Lighting website for more resources: www.hubbell.com/hubbelllighting/en


