
1. Introduzione
Thank you for choosing the Chieftec Libra Series LG-01B Mid-Tower ATX PC Case. This manual provides essential information for the proper installation, operation, and maintenance of your new computer chassis. Please read this manual thoroughly before beginning installation to ensure optimal performance and safety.
2. Informazioni sulla sicurezza
Osservare sempre le seguenti precauzioni di sicurezza:
- Ensure the power supply is disconnected from the mains before opening the case or installing components.
- Maneggiare i componenti con cura per evitare danni causati da scariche elettrostatiche (ESD). Si consiglia di utilizzare un braccialetto antistatico.
- Tenere le parti piccole e gli strumenti lontano dalla portata dei bambini.
- Do not operate the case in environments with excessive dust, moisture, or extreme temperatures.
- Refer to the manuals of your individual components (motherboard, power supply, etc.) for specific installation instructions.
3. Contenuto della confezione
Verificare che tutti gli articoli siano presenti nel pacco:
- Chieftec Libra Series LG-01B PC Case
- Accessory kit (screws, motherboard standoffs, thumb screws)
Note: Power supply unit (PSU) is not included and must be purchased separately.
4. Caratteristiche principali
- Modern and ergonomic design
- Support for mATX and ATX motherboards
- Front panel connectivity: 1x USB 3.0, 2x USB 2.0, Mic-in, Audio-out (HD Audio)
- Tool-less installation for 5.25" optical drives and 3.5" hard drives
- Drive Bays: 2x 5.25" external, 1x 3.5" external, 2x 3.5" internal, 1x 2.5" internal
- Fan preparations: 1x 80/90/120mm (front), 2x 80mm (rear), 2x 120mm (left side panel)
- Altezza massima del dispositivo di raffreddamento della CPU: 140 mm
- Maximum VGA card length: 380mm
5. Configurazione e installazione
5.1. Apertura della custodia
To access the interior, remove the side panel. Typically, this involves unscrewing two thumb screws at the rear of the case and sliding the panel backward.
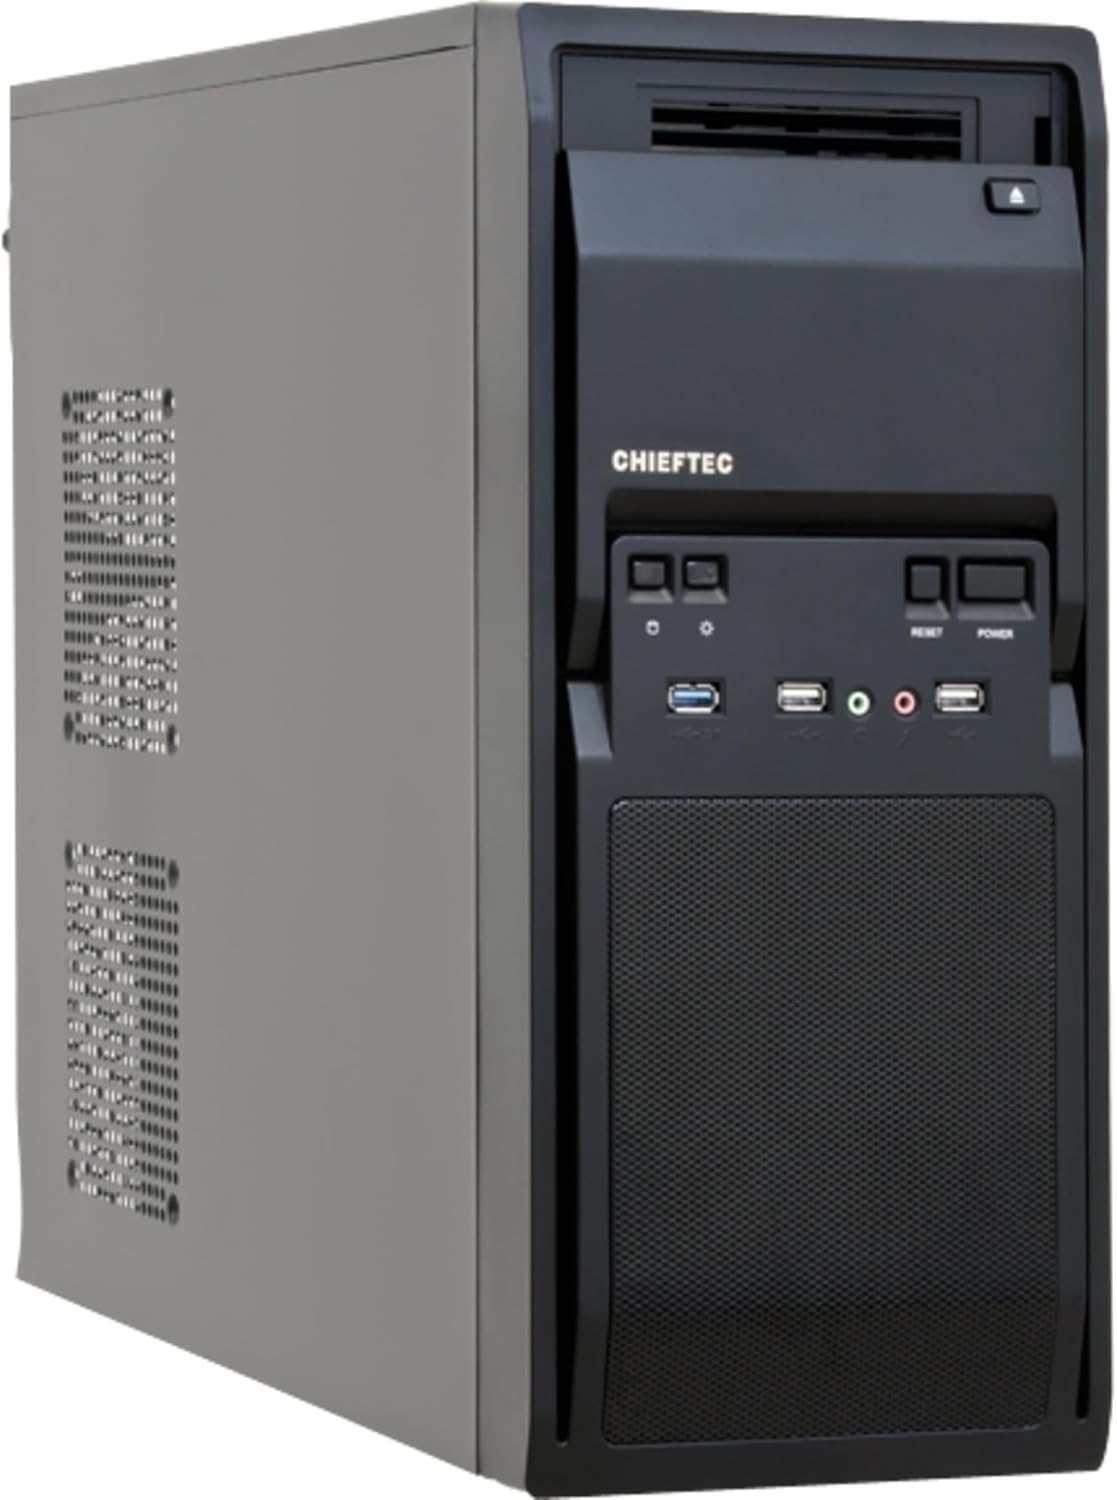
Figura 1: Anteriore sinistro view of the Chieftec LG-01B PC case, showing the main chassis and front panel design. The side panel is secured by screws at the rear.
5.2. Installazione della scheda madre
- Install the necessary motherboard standoffs into the motherboard tray according to your motherboard's form factor (ATX or mATX).
- Place the I/O shield into the opening at the rear of the case.
- Allineare con attenzione la scheda madre con i distanziatori e la schermatura I/O, quindi fissarla con le viti.

Figura 2: Interno view of the Chieftec LG-01B PC case, showing the motherboard tray, drive bays with tool-less clips, and cable management cutouts. The rear I/O shield opening is visible.
5.3. Installazione dell'unità di alimentazione (PSU)
Install your ATX power supply into the designated bay at the top rear of the case and secure it with screws from the exterior.

Figura 3: Posteriore view of the Chieftec LG-01B PC case, highlighting the power supply mounting area at the top, expansion slots, and fan mounting points.
5.4. Drive Installation (ODD/HDD/SSD)
- Unità ottiche da 5.25": Remove the front panel bay cover, slide the optical drive into the bay, and secure it using the tool-less clips.
- Dischi rigidi da 3.5": Slide the 3.5" HDD into an internal bay and secure it with the tool-less clips.
- SSD da 2.5": Install 2.5" SSDs into the dedicated internal 2.5" bay, typically requiring screws.

Figura 4: Fronte view of the Chieftec LG-01B PC case with the front panel cover for the I/O ports opened, revealing the 5.25" and 3.5" external drive bays. The USB and audio ports are also visible.
5.5. Collegamenti del pannello frontale
Connect the front panel cables (USB 3.0, USB 2.0, HD Audio, Power, Reset, HDD LED, Power LED) to the corresponding headers on your motherboard. Refer to your motherboard manual for header locations.
5.6. Expansion Cards (GPU, etc.)
Remove the necessary expansion slot covers at the rear of the case. Insert your expansion card into the PCIe slot on the motherboard and secure it with a screw.
5.7. Gestione dei cavi
Utilizzare i ritagli per il passaggio dei cavi e i punti di fissaggio dietro il vassoio della scheda madre per gestire i cavi e migliorare il flusso d'aria e l'estetica.
6. Istruzioni per l'uso
Once all components are installed and connected, close the side panel. Connect your monitor, keyboard, mouse, and power cable to the system. Press the power button on the front panel to start your computer.
6.1. Front Panel Ports
- Porta USB 3.0: Per il trasferimento dati ad alta velocità con dispositivi compatibili.
- Porte USB: 2.0 Per collegare dispositivi USB standard.
- Mic-in Jack: Per collegare un microfono.
- Audio-out Jack: Per collegare cuffie o altoparlanti.
- Pulsante di accensione: Per accendere/spegnere il sistema.
- Pulsante di reset: Per riavviare il sistema.
7. Manutenzione
Una manutenzione regolare contribuisce a garantire la longevità e le prestazioni ottimali dei componenti del PC.
- Pulizia della polvere: Periodically clean dust from inside the case, especially from fan filters and heatsinks, using compressed air or a soft brush. Ensure the system is powered off and unplugged before cleaning.
- Gestione dei cavi: Assicurarsi che i cavi siano disposti in modo ordinato per evitare ostruzioni al flusso d'aria.
- Ventilazione: Ensure the case has adequate clearance around its ventilation openings for proper airflow.
8. Risoluzione Dei Problemi
In caso di problemi, prendere in considerazione i seguenti passaggi comuni per la risoluzione dei problemi:
- Il sistema non si accende:
- Check if the power cable is securely connected to the PSU and the wall outlet.
- Assicurarsi che l'interruttore dell'alimentatore sia in posizione "ON".
- Verificare che il cavo del pulsante di accensione del pannello frontale sia collegato correttamente al connettore della scheda madre.
- Nessuna uscita di visualizzazione:
- Ensure the monitor cable is securely connected to the graphics card or motherboard (if using integrated graphics).
- Reinstallare la scheda grafica e i moduli RAM.
- Porte USB non funzionanti:
- Check if the front panel USB cables are correctly connected to the motherboard headers.
- Ensure necessary drivers are installed for your motherboard.
Per problemi più complessi, consultare i manuali dei componenti o rivolgersi a un professionista.
9. Specifiche
| Modello | LG-01B |
| Fattore di forma | Mid Tower |
| Compatibilità della scheda madre | ATX, mATX |
| Dimensioni (LxWxH) | 484mm x 180mm x 404mm (with feet +3mm) / 19.06 x 7.09 x 15.91 inches |
| Peso | 4.5 kg / 9.9 lbs (without PSU) |
| External Drive Bays | 2x 5.25", 1x 3.5" |
| Alloggiamenti per unità interne | 2x 3.5", 1x 2.5" |
| Porte del pannello frontale | 1x USB 3.0, 2x USB 2.0, Mic-in, Audio-out (HD Audio) |
| Fan Preparations | Front: 1x 80/90/120mm; Rear: 2x 80mm; Left Side: 2x 120mm |
| Altezza massima del dissipatore della CPU | 140mm |
| Lunghezza massima della scheda VGA | 380mm |
| Spessore del materiale | 0.6mm |
10. Garanzia e supporto
The Chieftec Libra Series LG-01B PC case comes with a 24-month warranty from the date of purchase. This warranty covers manufacturing defects. It does not cover damage caused by improper installation, misuse, accidents, modifications, or unauthorized repairs.
For technical support or warranty claims, please contact your retailer or visit the official Chieftec websito per le informazioni di contatto.