
1. Introduzione
This manual provides essential information for the safe and effective installation, operation, and maintenance of your Intertherm OEM Upgraded Replacement Furnace Control Circuit Board, model 624564-0. This control board serves as the central processing unit for your furnace, managing various functions to ensure proper heating operation. Please read this manual thoroughly before attempting any installation or service.
2. Informazioni sulla sicurezza
WARNING: Improper installation, adjustment, alteration, service, or maintenance can cause property damage, personal injury, or loss of life. Consult a qualified installer, service agency, or the gas supplier for information or assistance.
- Always disconnect electrical power to the furnace before installing or servicing the control board. Failure to do so can result in electrical shock or death.
- Assicurarsi che tutti i collegamenti elettrici siano sicuri e conformi alle normative elettriche locali e nazionali.
- This control board should only be installed by a qualified HVAC technician.
- Wear appropriate personal protective equipment (PPE), such as gloves and safety glasses, during installation and service.
- Do not operate the furnace with damaged components. Replace any faulty parts immediately.
3. Configurazione e installazione
3.1. Prima di iniziare
- Verify that the replacement control board (model 624564-0) is compatible with your specific Intertherm furnace model.
- Gather necessary tools: screwdriver set, wire strippers, multimeter, and safety glasses.
- Take clear photographs of the existing wiring connections on the old control board for reference.
- Disconnect all electrical power to the furnace at the main breaker.
3.2. Fasi di installazione
- Disconnessione dell'alimentazione: Ensure the furnace's power supply is completely off. Confirm with a multimeter.
- Accedi alla vecchia bacheca: Aprire il pannello di accesso alla fornace per individuare la scheda di controllo esistente.
- Scollegare il cablaggio: Carefully disconnect all wires from the old control board, labeling them if necessary to match your reference photos.
- Rimuovere la vecchia scheda: Svitare o sganciare la vecchia scheda di controllo dal suo supporto.
- Installa la nuova scheda: Mount the new Intertherm 624564-0 control board in the same location. Ensure it is securely fastened.
- Collegare il cablaggio: Reconnect all wires to the new control board according to your labels and reference photos. Double-check each connection for tightness and correct placement.
- Chiudi pannello: Chiudere bene il pannello di accesso alla fornace.
- Ripristina alimentazione: Restore electrical power to the furnace at the main breaker.
- Operazione di prova: Avviare un ciclo di riscaldamento per verificare il corretto funzionamento della caldaia. Osservare eventuali codici di errore o comportamenti insoliti.
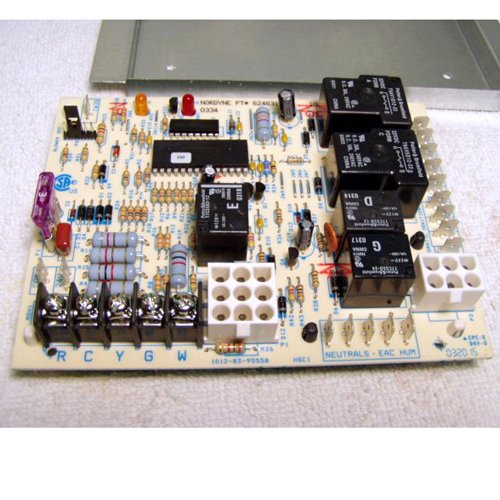
Figure 1: The Intertherm Furnace Control Circuit Board 624564-0. This image shows the front view of the circuit board with various terminals and components visible, illustrating its compact design and typical layout for furnace control.
4. Funzionamento
Once installed, the Intertherm 624564-0 control board operates automatically to manage the furnace's heating cycles. It receives signals from the thermostat, controls the igniter, gas valve, and blower motor, and monitors safety limits. The board typically features diagnostic LED lights that provide status indications and error codes to assist in troubleshooting.
4.1. Normal Operation Indicators
- LED verde fisso: Indicates normal operation and standby mode.
- LED verde lampeggiante: May indicate a call for heat or a specific operational stage (refer to furnace-specific documentation for exact flash codes).
- LED rosso fisso: Typically indicates a lockout condition or a fault.
- LED rosso lampeggiante: Indicates a specific error code. Count the flashes and refer to the troubleshooting section or your furnace manual.
5. Manutenzione
The Intertherm 624564-0 control board is designed for reliable, long-term operation with minimal maintenance. However, periodic inspection of the furnace system, including the control board, is recommended.
- Ispezione annuale: Have a qualified technician inspect the furnace annually. This includes checking electrical connections, cleaning dust from components, and verifying proper operation of the control board.
- Mantenere pulito: Ensure the area around the control board is free from dust and debris, which can impede airflow and lead to overheating of components.
- Controllare il cablaggio: Periodically check for any loose or corroded wiring connections to the control board.
6. Risoluzione Dei Problemi
This section provides guidance for common issues. For complex problems, always consult a qualified HVAC technician.
| Problema | Possibile causa | Soluzione |
|---|---|---|
| Furnace not starting | No power to furnace; thermostat issue; safety limit tripped; faulty igniter. | Check circuit breaker; verify thermostat settings; reset furnace power; inspect igniter. |
| Il motore del ventilatore non funziona | Faulty blower motor; capacitor issue; control board fault; thermostat wiring. | Check blower motor connections; test capacitor; consult technician for board diagnosis. |
| La fornace si accende e si spegne rapidamente (cicli brevi) | Dirty air filter; restricted airflow; oversized furnace; faulty thermostat. | Replace air filter; check ducts for obstructions; consult technician. |
| Diagnostic LED flashing red | Specific fault code (e.g., pressure switch, flame sensor, limit switch). | Count flashes and refer to your furnace's specific diagnostic chart for the corresponding error. Address the indicated component. |
7. Specifiche
- Numero modello: 624564-0 (OEM Upgraded Replacement)
- Marca: Interterm
- Produttore: Nordyne
- Peso dell'articolo: 20 once
- Numero parte: OEM Upgraded Repl for 624564-0
- Funzione: Scheda di controllo della fornace
8. Garanzia e supporto
This Intertherm OEM Upgraded Replacement Furnace Control Circuit Board 624564-0 is typically covered by a manufacturer's warranty against defects in materials and workmanship. Specific warranty terms and duration may vary. Please retain your proof of purchase for warranty claims.
For technical support, warranty inquiries, or service, please contact your authorized Intertherm dealer or a qualified HVAC professional. Always provide the model number (624564-0) and your purchase date when seeking assistance.