
1. Introduzione
This manual provides detailed instructions for the safe installation, operation, and maintenance of your Hunter Builder Plus 53236 52-inch Indoor Ceiling Fan. Please read all instructions carefully before beginning installation and save this manual for future reference. This traditional ceiling fan is designed to provide optimal airflow and lighting for large indoor spaces such as bedrooms, living rooms, kitchens, and home offices.
2. Informazioni sulla sicurezza
AVVERTIMENTO: To reduce the risk of fire, electric shock, or personal injury, always turn off power at the main circuit breaker or fuse box before beginning installation. Ensure all electrical connections are in accordance with local codes, ordinances, and the National Electrical Code. If you are unfamiliar with electrical wiring, consult a qualified electrician.
- Mounting must be securely fastened to the building structure and capable of supporting a minimum of 35 lbs (15.9 kg).
- Non utilizzare il ventilatore con pale danneggiate. Sostituire tutte le pale se qualcuna è danneggiata.
- Evitare di posizionare oggetti sul percorso delle pale del ventilatore.
- Assicurarsi che il ventilatore sia installato a un'altezza tale che le pale siano ad almeno 7 piedi (2.13 metri) dal pavimento.
3. Contenuto della confezione
Verify that all components listed below are included in your package. If any parts are missing or damaged, contact Hunter customer service.

Image: Components included with the Hunter Builder Plus 52-inch Ceiling Fan, featuring 3 LED bulbs, 5 reversible blades, and a 3-inch downrod.
- Alloggiamento del motore del ventilatore da soffitto
- 5 Fan Blades (52-inch)
- Staffe per lame
- Kit luci con 3 lampadine LED
- Asta di prolunga da 3 pollici
- Staffa di fissaggio
- Pacchetto hardware (viti, dadi, rondelle)
- Pull Chains for Fan Speed and Light Control
4. Specifiche
| Caratteristica | Dettaglio |
|---|---|
| Numero di modello | 53236 |
| Marca | Cacciatore |
| Misurare | 52 pollici |
| Colore | Bianco come la neve |
| Numero di lame | 5 |
| Materiale della lama | Plastica |
| Tipo di luce | GUIDATO |
| Metodo di controllo | Tirare la catena |
| Numero di velocità | 3 |
| Tipo di motore | Motore CA (WhisperWind) |
| Capacità del flusso d'aria | 5049 piedi cubi al minuto |
| Uso interno/esterno | Al chiuso |
| Tipo di montaggio | Downrod (3-inch included) |
| Dimensioni del prodotto | 52"P x 52"L x 18.06"A |
| Cosatage | 39 watt |
| Voltage | 120 Volt |
| Caratteristica speciale | Dust Armor Nanotechnology on Blades |
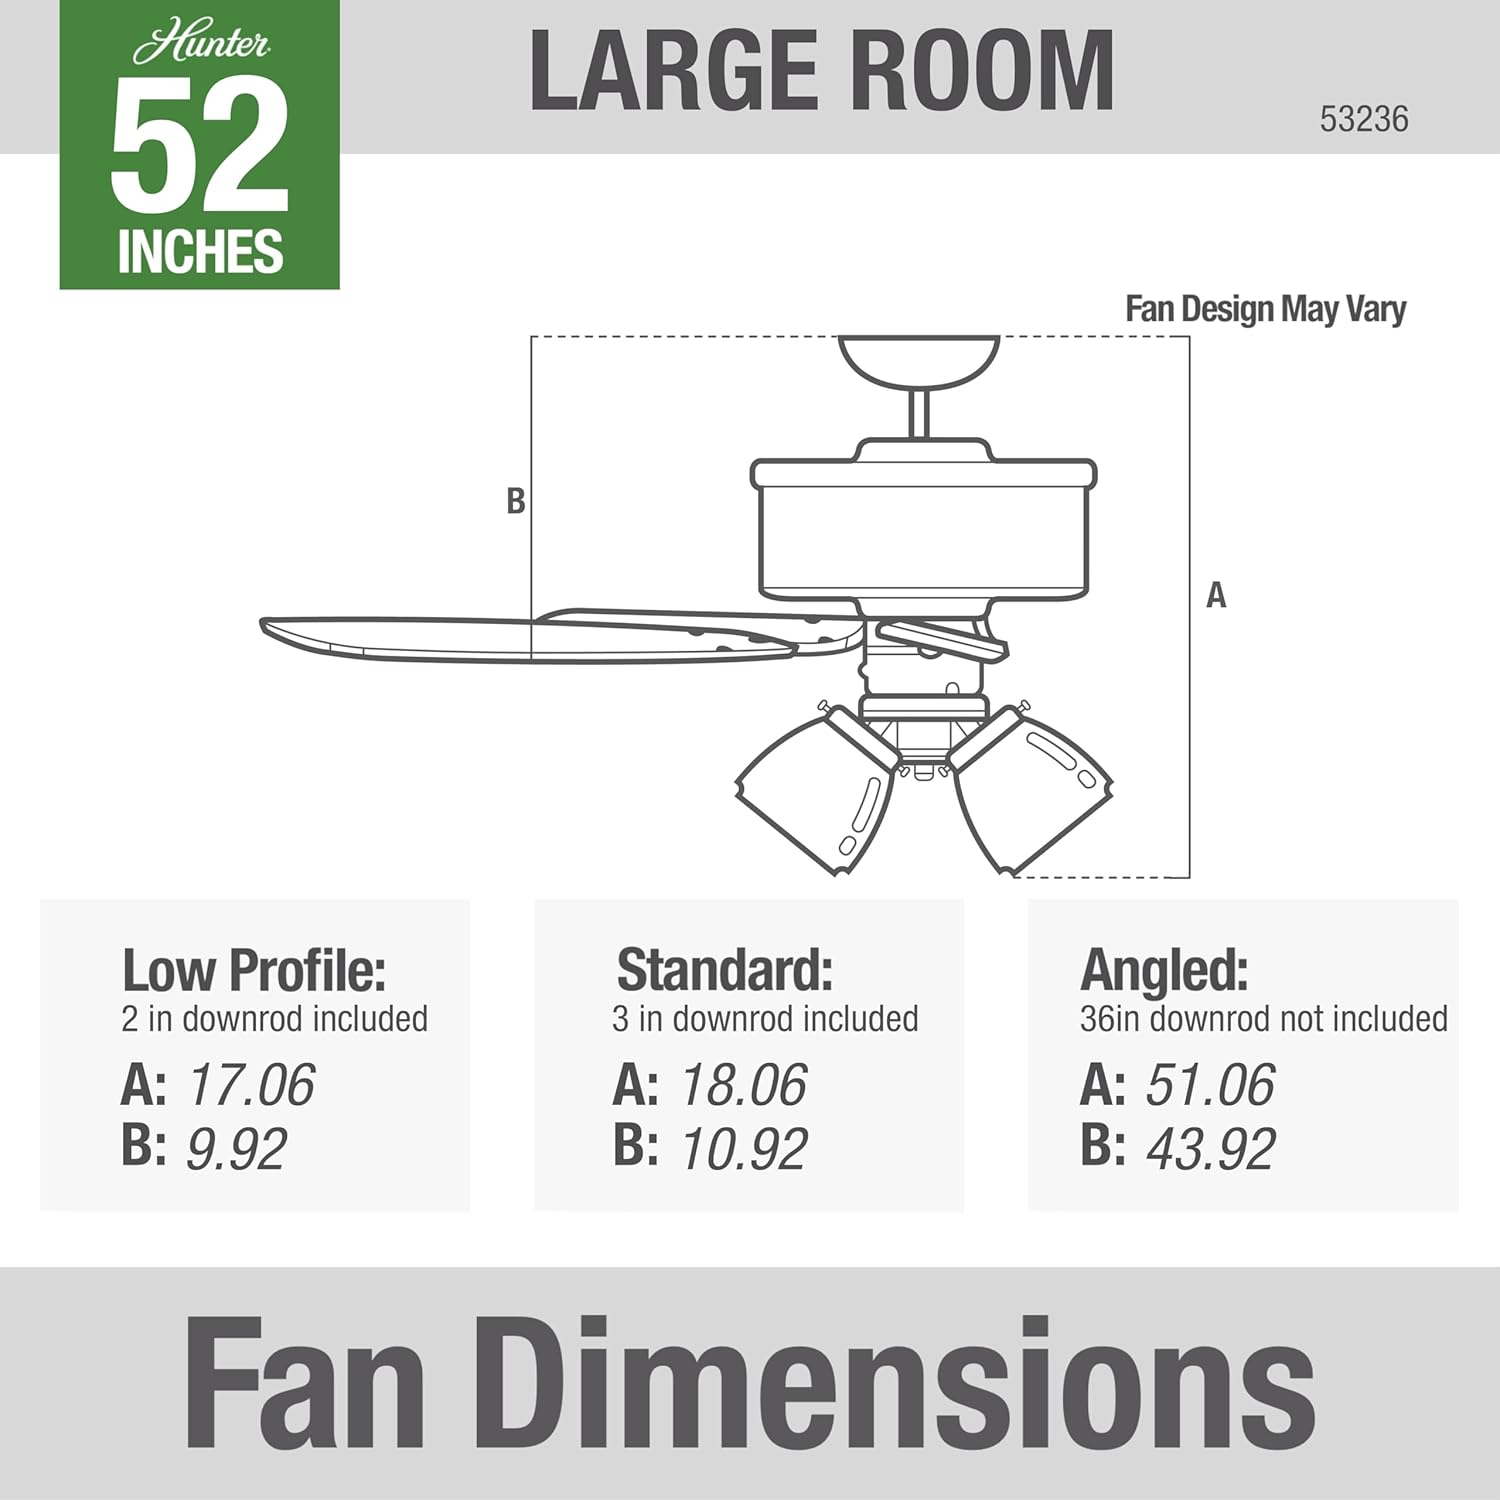
Image: Detailed fan dimensions for various mounting options (Low Profile, Standard, Angled) for the 52-inch Hunter Builder Plus fan, Model 53236.
5. Configurazione e installazione
Before installation, ensure the power is OFF at the circuit breaker. Follow these general steps. For detailed electrical wiring, consult a professional.
5.1 Preparazione per l'installazione
- Spegni l'alimentazione: Locate the circuit breaker that supplies power to the fan location and turn it off.
- Rimuovere il vecchio apparecchio (se applicabile): Carefully remove any existing light fixture or ceiling fan.
- Staffa di fissaggio: Secure the mounting bracket to the ceiling junction box. Ensure the junction box is rated for ceiling fan support.
5.2 Montaggio del ventilatore
- Collegare il Downrod: Inserire l'asta di supporto attraverso la calotta e collegarla all'alloggiamento del motore della ventola.
- Ventilatore sospeso: Sollevare con cautela il gruppo ventola e appenderlo alla staffa di montaggio.
- Cablaggio: Connect the electrical wires according to the wiring diagram provided in the full installation guide (typically black to black, white to white, and ground to ground). Use wire nuts to secure connections.
- Tettoia sicura: Slide the canopy up and secure it to the mounting bracket with screws.
- Fissare le lame: Attach the fan blades to the blade brackets, then attach the blade brackets to the motor housing. Ensure all screws are tightened securely.
- Installa il kit luci: Connect the light kit wiring to the fan motor wiring and secure the light kit to the bottom of the fan.
- Installare lampadine a LED: Screw the included LED bulbs into the light kit sockets.
6. Istruzioni per l'uso
Your Hunter Builder Plus ceiling fan is controlled by two pull chains.
6.1 controllo della velocità della ventola
One pull chain controls the fan speed. Pull the chain repeatedly to cycle through the available speeds:
- 1st Pull: Ad alta velocità
- 2nd Pull: Velocità media
- 3rd Pull: Bassa velocità
- 4th Pull: Spento
The fan features 3 distinct speeds for customized airflow.
6.2 Controllo della luce
The other pull chain controls the light kit. Pull the chain once to turn the lights ON, and pull it again to turn the lights OFF.

Simple pull chain operation for the integrated LED light kit.
6.3 Reversible Motor Function (Summer/Winter Mode)
Your fan features a reversible motor for year-round comfort. A small switch on the motor housing allows you to change the direction of the blades.
- Modalità estiva (in senso antiorario): Set blades to spin counter-clockwise to create a downdraft, providing a cooling effect.
- Modalità invernale (senso orario): Set blades to spin clockwise on low speed to create an updraft, circulating warm air near the ceiling.

Image: Diagram illustrating the reversible motor function for Summer Mode (cooling downdraft) and Winter Mode (warm air updraft).
7. Manutenzione
Una manutenzione regolare garantirà la longevità e le prestazioni ottimali del tuo ventilatore da soffitto.
- Pulizia: Pulire periodicamente la ventola con un panno morbido eamp panno. Non utilizzare detergenti abrasivi o solventi poiché potrebbero danneggiare la finitura o le lame.
- Cura della lama: The blades are specially coated with Hunter's patented Dust Armor nanotechnology to repel dust build-up, reducing the frequency of cleaning.
- Stringere le viti: Periodically check all screws for tightness, especially those on the blade attachments and mounting hardware.
- Lubrificazione: Il motore della ventola è lubrificato in modo permanente e non necessita di ulteriore lubrificazione.
8. Risoluzione Dei Problemi
If your fan is not operating correctly, refer to the following troubleshooting guide:
| Problema | Possibile causa | Soluzione |
|---|---|---|
| La ventola non si avvia | Nessuna alimentazione alla ventola. | Check circuit breakers or fuses. Ensure wall switch is ON. |
| La ventola traballa | Loose blade screws or mounting hardware. | Tighten all blade screws and mounting bracket screws. Ensure blades are balanced. |
| Funzionamento rumoroso | Loose screws, motor housing rubbing, or unbalanced blades. | Check and tighten all screws. Ensure no wires are rubbing against the canopy. Balance blades if necessary. |
| Le luci non funzionano | Loose wire connection, faulty bulb, or light kit switch is off. | Check wire connections in the light kit. Replace bulbs. Ensure light pull chain is ON. |
9. Garanzia e supporto
Your Hunter Builder Plus 53236 Ceiling Fan comes with a Garanzia limitata a vita. For detailed warranty information or technical support, please visit the official Hunter websito o contattare il loro servizio clienti.
Hunter Fan Company is committed to quality, with 140 years of experience and rigorous ETL/UL testing to ensure safety and durability.