
Introduzione
This manual provides detailed instructions for the safe installation, operation, and maintenance of your Satco 90-192 Brass Finish Ribbed Canopy Kit. Please read all instructions carefully before beginning installation and retain this manual for future reference. This canopy kit is designed to cover electrical connections at the ceiling or wall outlet box for various lighting fixtures.
Informazioni sulla sicurezza
ATTENZIONE: RISCHIO DI SCOSSA ELETTRICA. Scollegare l'alimentazione dalla scatola dei fusibili o dall'interruttore automatico prima dell'installazione o della manutenzione.
- Always turn off the main power supply at the circuit breaker or fuse box before performing any electrical work.
- Se non si è sicuri di una qualsiasi fase del processo di installazione, consultare un elettricista qualificato.
- Assicurarsi che tutti i collegamenti elettrici siano sicuri e conformi alle normative elettriche locali.
- Do not install this product in wet locations unless specifically rated for such use.
- Maneggiare tutti i componenti con cura per evitare danni.
Contenuto della confezione
Verificare che tutti i componenti siano presenti prima di iniziare l'installazione:
- 1x Brass Finish Ribbed Canopy (5" Diameter)
- 1x Mounting Strap/Crossbar
- 2x Mounting Screws (for outlet box)
- 2x Canopy Screws/Nuts (for securing canopy)
- 1x Ground Screw
- Wire Nuts (quantity may vary)
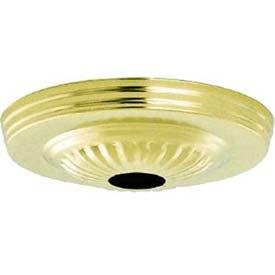
Image: The Satco 90-192 Brass Finish Ribbed Canopy Kit, showing the main canopy piece and associated hardware. This image illustrates the complete set of components included in the package, such as the canopy, mounting strap, and various screws.
Configurazione e installazione
Tools you may need (not included): Screwdriver (Phillips/Flathead), Wire Strippers, Pliers, Electrical Tape, VoltageTester.
- Spegnimento dell'alimentazione: Locate the circuit breaker or fuse box that controls the power to the fixture location. Turn off the power completely. Use a voltage tester to confirm that the power is off at the outlet box.
- Preparare la superficie di montaggio: If replacing an existing canopy, carefully remove the old fixture. Ensure the electrical outlet box is securely mounted to the ceiling or wall structure.
- Install Mounting Strap: Attach the provided mounting strap (crossbar) to the electrical outlet box using the two mounting screws. Ensure the strap is firmly secured and the threaded holes for the canopy screws are facing outwards.
- Effettuare i collegamenti elettrici:
- Connect the bare copper or green ground wire from the fixture (if applicable) to the ground screw on the mounting strap.
- Collegare il filo bianco (neutro) dell'apparecchio al filo bianco (neutro) della scatola di derivazione utilizzando un dado passacavo.
- Collegare il filo nero (fase) dell'apparecchio al filo nero (fase) della scatola di derivazione utilizzando un dado passacavo.
- Ensure all wire nuts are securely twisted and connections are tight. Wrap electrical tape around wire nuts for added security if desired.
- Posizione dei fili: Carefully tuck all connected wires into the outlet box, ensuring no wires are pinched.
- Fissare la tettoia: Align the center hole of the canopy over the fixture's wires and the two threaded holes on the mounting strap. Push the canopy flush against the ceiling or wall. Secure the canopy in place using the two canopy screws/nuts, tightening them evenly until the canopy is snug.
- Ripristina alimentazione: Once the canopy is securely installed, restore power at the circuit breaker or fuse box.
Image: A conceptual illustration of the canopy being installed onto a ceiling outlet box. This image demonstrates how the canopy covers the electrical connections and is secured by screws, providing a clean finish.
Funzione e scopo
The Satco 90-192 Brass Finish Ribbed Canopy Kit serves as a decorative and functional cover for the electrical wiring connections at the ceiling or wall outlet box. It provides a finished appearance to your lighting fixture installation while safely enclosing the electrical components. The 1-1/16" center hole accommodates the stem or chain of most standard lighting fixtures.
Manutenzione
To maintain the appearance and integrity of your brass finish ribbed canopy kit:
- Pulizia: Dust regularly with a soft, dry cloth. For more thorough cleaning, use a slightly damp cloth with mild soap and water. Avoid abrasive cleaners, solvents, or polishes that may damage the finish.
- Ispezione: Periodically check that the canopy remains securely fastened to the ceiling or wall. If any looseness is detected, turn off power and re-tighten the canopy screws.
Risoluzione dei problemi
| Problema | Possibile causa | Soluzione |
|---|---|---|
| Canopy is loose or wobbles. | Canopy screws are not tightened sufficiently. | Turn off power. Re-tighten the canopy screws evenly until snug. Do not overtighten. |
| Canopy does not sit flush against the ceiling/wall. | Wires are not properly tucked into the outlet box; mounting strap is not flush. | Turn off power. Carefully re-arrange wires inside the outlet box. Ensure the mounting strap is flush with the outlet box. |
| La finitura appare opaca o scolorita. | Accumulation of dust or residue; use of improper cleaning agents. | Pulisci con un panno morbido eamp panno e sapone neutro. Evitare prodotti chimici aggressivi. |
Specifiche
- Marca: Satco
- Modello: 90-192
- Materiale: Ottone
- Fine: Ribbed Brass
- Diametro: 5 pollici
- Foro centrale: 1-1/16 pollici
- Tipo di montaggio: Montaggio a soffitto
- Codice UPC: 045923901928
Garanzia e supporto
This product is covered by Satco's standard manufacturer's warranty. For specific warranty details, claims, or technical support, please contact Satco customer service directly. Keep your purchase receipt as proof of purchase.
For further assistance, please visit the official Satco websito o contattare la loro linea di assistenza clienti.