
NUUO NE-4160-US
NUUO NVRmini2 NE-4160 Network Video Recorder User Manual
Model: NE-4160-US
1. Introduzione
This manual provides comprehensive instructions for the installation, operation, maintenance, and troubleshooting of the NUUO NVRmini2 NE-4160 Network Video Recorder. The NE-4160 is a 16-channel NVR designed for robust surveillance systems, featuring 4 drive bays and a 4TB storage capacity, compatible with various IP cameras.
Per garantire una corretta configurazione e prestazioni ottimali, leggere attentamente il presente manuale prima di utilizzare il dispositivo.
2. Precauzioni di sicurezza
- Assicurarsi che il dispositivo sia posizionato su una superficie stabile e piana per evitare cadute accidentali.
- Do not expose the NVR to water or excessive humidity.
- Utilizzare solo l'alimentatore fornito con il dispositivo.
- Evitare di bloccare le aperture di ventilazione per evitare il surriscaldamento.
- Scollegare l'alimentazione prima di eseguire qualsiasi procedura di manutenzione o installazione.
- Affidare tutti gli interventi di assistenza a personale qualificato.
3. Contenuto della confezione
Verificare che tutti gli articoli siano presenti nel pacco:
- NUUO NVRmini2 NE-4160 Unit
- Adattatore di alimentazione
- Cavo Ethernet
- Guida di installazione rapida
- CD del software (se applicabile)
- Viti per l'installazione dell'HDD
4. Prodotto finitoview
The NUUO NVRmini2 NE-4160 is a robust network video recorder designed for professional surveillance applications. It supports up to 16 IP camera channels and features four hot-swappable drive bays for extensive storage, pre-installed with 4TB capacity.
Figura 4.1: Fronte view of the NUUO NVRmini2 NE-4160 NVR unit. This image shows the compact black chassis with the NUUO logo on the left side, status indicator lights, and a lockable front panel for drive bay access.
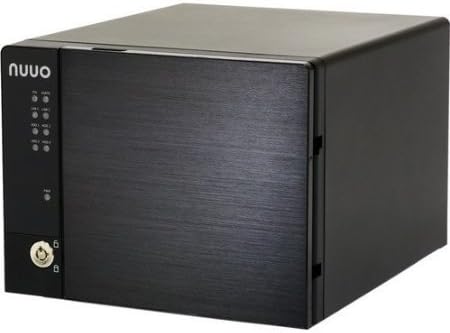
Figura 4.2: Angolato view of the NUUO NVRmini2 NE-4160 NVR unit. This perspective highlights the sleek design and the textured finish of the front panel, providing a better sense of the unit's dimensions.
Indicatori del pannello frontale:
- LED di potenza: Indica lo stato dell'alimentazione.
- HDD LEDs: Indicate hard drive activity for each bay.
- LED di rete: Indica la connettività di rete.
- LED di allarme: Indica allarmi o errori di sistema.
5. Configurazione e installazione
5.1 Installazione hardware
- Disimballaggio: Estrarre con cautela l'NVR dalla confezione.
- Installazione del disco rigido (se non preinstallato):
- Unlock the front panel and open the drive bay door.
- Slide the hard drive trays out.
- Secure 3.5-inch SATA hard drives into the trays using the provided screws.
- Slide the trays back into the bays until they click into place.
- Chiudere e bloccare il pannello frontale.
- Connessione di rete: Connect one end of the Ethernet cable to the NVR's LAN port and the other end to your network router or switch.
- Collegamento elettrico: Collegare l'adattatore di alimentazione all'ingresso di alimentazione dell'NVR e quindi collegarlo a una presa di corrente. L'NVR si accenderà automaticamente.
5.2 Configurazione iniziale del software
Upon first boot, the NVR will acquire an IP address via DHCP (if available). You can access the NVR's web interface using its IP address or by using the NUUO Finder utility.
- Discovering the NVR:
- Install the NUUO Finder utility from the provided CD or NUUO website on a computer connected to the same network.
- Run NUUO Finder to scan for the NVRmini2 NE-4160 on your network.
- Note down the NVR's IP address.
- Accesso Web Interfaccia:
- Aprire un web browser (e.g., Chrome, Firefox) and enter the NVR's IP address in the address bar.
- Log in using the default username (e.g., "admin") and password (e.g., "admin"). It is highly recommended to change the default password immediately after the first login.
- Inizializzazione del sistema: Follow the on-screen wizard for initial setup, which typically includes:
- Impostazione data e ora
- Network Settings (Static IP configuration, if desired)
- Hard Drive Formatting (if required)
- Aggiunta di telecamere IP
6. Funzionamento dell'NVR
6.1 Vivere View
Il vivo View interface allows you to monitor all connected cameras in real-time. You can customize the layout, view multiple cameras simultaneously, and access various controls.
- Selezione del layout: Choose from various grid layouts (e.g., 1x1, 2x2, 3x3, 4x4) to display cameras.
- Controllo PTZ: If your cameras support Pan/Tilt/Zoom, use the on-screen controls to adjust camera angles and zoom levels.
- Riproduzione istantanea: rapidamente riview recent recordings from the live view.
6.2 Gestione delle registrazioni
The NVRmini2 NE-4160 supports various recording modes:
- Registrazione continua: Registrazioni 24 ore su 24, 7 giorni su 7.
- Registrazione di rilevamento del movimento: Registra solo quando la telecamera rileva un movimento.
- Registrazione programmata: Records based on a predefined schedule.
- Registrazione allarmi: Registra quando viene attivato un ingresso di allarme esterno.
Configure recording settings for each camera in the "Recording" section of the web interfaccia.
6.3 Playback and Export
per riview registrato footage:
- Navigate to the "Playback" section.
- Selezionare la/le telecamera/e desiderata/e e l'intervallo di data/ora.
- Utilizza la cronologia per navigare tra le registrazioni.
- Per esportare footage, select the desired segment and choose the export format (e.g., AVI, MP4).
7. Manutenzione
7.1 Controlli regolari
- Stato del sistema: Periodically check the NVR's system status via the web interface to ensure all components are functioning correctly.
- Stato del disco rigido: Monitor hard drive health and capacity. Replace drives showing signs of failure promptly.
- Aggiornamenti del firmware: Check the NUUO website regularly for firmware updates. Applying updates can improve performance, add features, and fix bugs.
- Pulizia fisica: Mantenere l'unità NVR pulita e priva di polvere. Utilizzare un panno morbido e asciutto. Non utilizzare detergenti liquidi.
7.2 Backup dei dati
While the NVR records continuously, it is advisable to back up critical footage regularly to external storage or a network location.
8. Risoluzione Dei Problemi
| Problema | Possibile causa | Soluzione |
|---|---|---|
| NVR not powering on | Nessuna alimentazione, adattatore di alimentazione difettoso | Check power cable connection; try a different power outlet; test power adapter. |
| Impossibile accedere web interfaccia | Incorrect IP address, network issue, firewall | Verify NVR's IP address using NUUO Finder; check network cable; temporarily disable firewall on PC. |
| No video from cameras | Camera not connected, incorrect camera settings, network issue | Ensure cameras are powered and connected; verify camera IP addresses and credentials in NVR settings; check network connectivity. |
| Disco rigido non rilevato | Improper installation, faulty drive, incorrect format | Re-seat the hard drive; try a different drive bay; ensure drive is compatible and formatted correctly. |
If the problem persists after attempting the above solutions, please contact NUUO technical support.
9. Specifiche
| Caratteristica | Dettaglio |
|---|---|
| Numero di modello | NE-4160-US |
| Marca | NUOVO |
| Canali supportati | 16 |
| Alloggiamenti unità | 4 |
| Archiviazione preinstallata | 4 TB (4000 GB) |
| Connettività | Etereo |
| Dispositivi compatibili | Telecamere IP |
| Prima data disponibile | 9 dicembre 2013 |
10. Informazioni sulla garanzia
NUUO products typically come with a limited manufacturer's warranty. Please refer to the warranty card included with your product or visit the official NUUO website for detailed warranty terms and conditions specific to the NE-4160-US model. Keep your proof of purchase for warranty claims.
11. Supporto tecnico
For technical assistance, software updates, or further inquiries, please contact NUUO technical support through their official channels:
- Websito: Visit the official NUUO website for support resources, FAQs, and downloads.
- E-mail: Refer to the NUUO websito per gli indirizzi email di supporto regionale.
- Telefono: Refer to the NUUO websito per i numeri di telefono dell'assistenza regionale.
When contacting support, please have your product model number (NE-4160-US) and serial number ready.
Ask a question about this manual
Ask about setup, troubleshooting, compatibility, parts, safety, or missing instructions. Manuals+ will review the question and use this page’s manual context to help answer it.