1. Prodotto finitoview
The HP ProDisplay P17A is a 17-inch LED-backlit LCD monitor designed for general computing tasks. It features a 5:4 aspect ratio with a maximum resolution of 1280 x 1024 pixels, providing clear and consistent visuals. This monitor is equipped with both VGA and HDMI connectivity options, offering versatility for various system configurations. Its compact design and energy-efficient LED backlighting make it suitable for a range of environments.

Figura 1: Fronte view of the HP ProDisplay P17A monitor, showcasing il suo display e supporto.
2. Istruzioni per l'installazione
2.1 Disimballaggio del monitor
Rimuovere con cautela tutti i componenti dall'imballaggio. Assicurarsi che siano presenti i seguenti elementi:
- HP ProDisplay P17A Monitor
- Monitor Stand (base and neck)
- Cavo di alimentazione
- Cavo VGA (può variare in base alla regione/confezione)
- Cavo HDMI (può variare in base alla regione/confezione)
2.2 Montaggio del supporto
- Posizionare il monitor a faccia in giù su una superficie morbida e pulita per evitare graffi.
- Attach the stand neck to the back of the monitor, aligning the tabs and pushing until it clicks into place.
- Attach the stand base to the bottom of the stand neck, securing it with the captive screw if present.
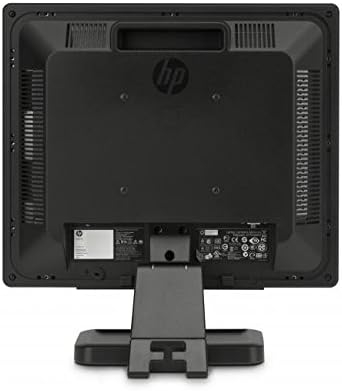
Figura 2: Posteriore view of the monitor, illustrating the stand attachment point and various connectivity ports.
2.3 Cavi di collegamento
- Collegamento elettrico: Collegare il cavo di alimentazione all'ingresso di alimentazione del monitor e quindi a una presa elettrica dotata di messa a terra.
- Collegamento video:
- For VGA: Connect one end of the VGA cable to the VGA port on the monitor and the other end to the VGA port on your computer. Tighten the screws on the VGA connector.
- For HDMI: Connect one end of the HDMI cable to the HDMI port on the monitor and the other end to the HDMI port on your computer.
- Assicurarsi che tutti i collegamenti siano sicuri.
3. Istruzioni per l'uso
3.1 Accensione/Spegnimento
Premere il pulsante di accensione situato sulla cornice anteriore del monitor per accenderlo o spegnerlo. La spia di alimentazione si accende quando il monitor è acceso.
3.2 Adjusting Display Settings (OSD Menu)
The On-Screen Display (OSD) menu allows you to adjust various monitor settings. Use the buttons on the front bezel to navigate and select options.
- Pulsante Menu: Apre il menu OSD.
- Pulsanti di navigazione (+ / - or Up/Down): Move through menu options and adjust values.
- Pulsante Seleziona/OK: Conferma una selezione o accede a un sottomenu.
- Pulsante di uscita: Esce dal menu o dall'OSD corrente.
Le impostazioni regolabili più comuni includono:
- Luminosità/Contrasto: Regola la luminosità complessiva e la differenza tra aree chiare e scure.
- Controllo del colore: Allows adjustment of color temperature, RGB levels, or preset color modes.
- Selezione input: Manually switches between VGA and HDMI input sources.
- Controllo dell'immagine: Adjusts sharpness, aspect ratio, and auto-adjustment for analog signals.
- Gestione: Opzioni di risparmio energetico, timeout OSD, selezione della lingua.
4. Manutenzione
4.1 Pulizia del monitor
- Prima di procedere alla pulizia, spegnere sempre il monitor e scollegare il cavo di alimentazione.
- Utilizzare leggermente un panno morbido e privo di lanugine dampcon acqua o con un detergente per schermi non abrasivo.
- Non spruzzare il detergente direttamente sullo schermo o sul monitor casing.
- Evitare l'uso di benzene, diluenti, detergenti a base di ammoniaca o materiali abrasivi, poiché possono danneggiare la superficie.
4.2 Cura generale
- Evitare di posizionare il monitor alla luce diretta del sole o vicino a fonti di calore.
- Assicurare un'adeguata ventilazione attorno al monitor.
- Non ostruire le aperture di ventilazione.
- Protect the screen from sharp objects or excessive pressure.
5. Risoluzione Dei Problemi
Before contacting support, try the following basic troubleshooting steps:
5.1 Nessuna immagine sullo schermo
- Ensure the monitor's power cable is securely connected to both the monitor and a working electrical outlet.
- Verify the power indicator light on the monitor is on. If not, press the power button.
- Check that the video cable (VGA or HDMI) is securely connected to both the monitor and the computer.
- Ensure the correct input source is selected on the monitor (use the OSD menu to switch inputs).
- Riavvia il computer.
5.2 Scarsa qualità dell'immagine
- Fuzzy or Blurry Image: Assicurati che la risoluzione dello schermo del tuo computer sia impostata sulla risoluzione nativa del monitor (1280 x 1024).
- Colori errati: Adjust color settings through the OSD menu or your computer's display settings.
- Image Off-Center/Incorrect Size (VGA only): Use the "Auto Adjust" function in the OSD menu.
- Sfarfallio: Check the refresh rate setting on your computer; ensure it is set to 60 Hz.
5.3 Monitor Not Responding to Buttons
- Scollegare il cavo di alimentazione del monitor, attendere 10 secondi, quindi ricollegarlo e riprovare.
- Assicurarsi che nessun pulsante sia bloccato.
6. Specifiche tecniche
| Caratteristica | Specificazione |
|---|---|
| Marca | Azienda |
| Nome del modello | HP P17A |
| Numero di modello | F4M97AAABA |
| Dimensioni dello schermo | 17 pollici |
| Tipo di visualizzazione | LCD retroilluminato a LED |
| Risoluzione nativa | 1280x1024 (SXGA) |
| Proporzioni | 5:4 |
| Rapporto di contrasto | 1000:1 |
| Frequenza di aggiornamento | Frequenza 60 Hz |
| Tempo di risposta | 5 millisecondi |
| Viewangolo di ing | 170 gradi |
| Connettività | 1x VGA, 1x HDMI |
| Consumo energetico | 25 Watt (massimo) |
| Dimensioni dell'articolo (P x L x A) | 8.12"P x 14.85"L x 15.24"A |
| Peso dell'articolo | 8.2 libbre |
| Tipo di montaggio | Supporto a parete (compatibile VESA) |
| Caratteristiche aggiuntive | Anti Glare Screen |

Figure 3: Dimensions of the HP ProDisplay P17A monitor.
7. Garanzia e supporto
7.1 Informazioni sulla garanzia
This product is often sold as a refurbished item. Refurbished products typically come with a limited warranty provided by the refurbisher or seller. Please refer to your purchase documentation for specific warranty terms and conditions, including duration and coverage details.
7.2 Supporto tecnico
For technical assistance, troubleshooting beyond this manual, or warranty claims, please contact the vendor or HP customer support. Have your monitor's model number (F4M97AAABA) and serial number ready when contacting support.
You can find additional support resources, drivers, and documentation on the official HP support websito.