
1. Introduzione
Grazie per l'acquistoasing the Hotone Nano Legacy Purple Wind 5-Watt Compact Guitar Amp Head. This ultra-compact amplifier head is designed to deliver premium guitar tones, inspired by the legendary Marshall Plexi Super Lead 1959, in a portable format. This manual provides essential information for safe and effective use of your amppiù vivace.
2. Informazioni sulla sicurezza
- Fonte di energia: Utilizzare solo l'adattatore di alimentazione specificato (18 V CC, negativo centrale).
- Ventilazione: Assicurare una ventilazione adeguata per evitare il surriscaldamento. Non bloccare le aperture di ventilazione.
- Umidità: Non esporre l'unità a pioggia, umidità o umidità eccessiva.
- Gestione: Maneggiare con cura. Evitare di far cadere l'unità o di sottoporla a forti urti.
- Manutenzione: Non tentare di riparare l'unità da soli. Per qualsiasi intervento di manutenzione, rivolgersi a personale qualificato.
- Collegamento dell'altoparlante: Collega sempre il amplifier to a speaker cabinet with the correct impedance (4-16Ω) before powering on to prevent damage.
3. Prodotto finitoview
The Hotone Nano Legacy Purple Wind is a compact 5-watt guitar amplifier head featuring a 3-band EQ and an FX loop. Its design is inspired by classic British rock tones.
Controlli del pannello frontale

- INGRESSO: 1/4" mono jack to plug in your guitar.
- BASSO: Controls the low frequency response.
- MEZZO: Controls the mid frequency response.
- ALTI: Controls the high frequency response.
- GUADAGNO: Controls the gain level.
- VOLUME: Controlla il volume di uscita.
- Interruttore ON/OFF: Accende o spegne l'unità.
Collegamenti del pannello posteriore
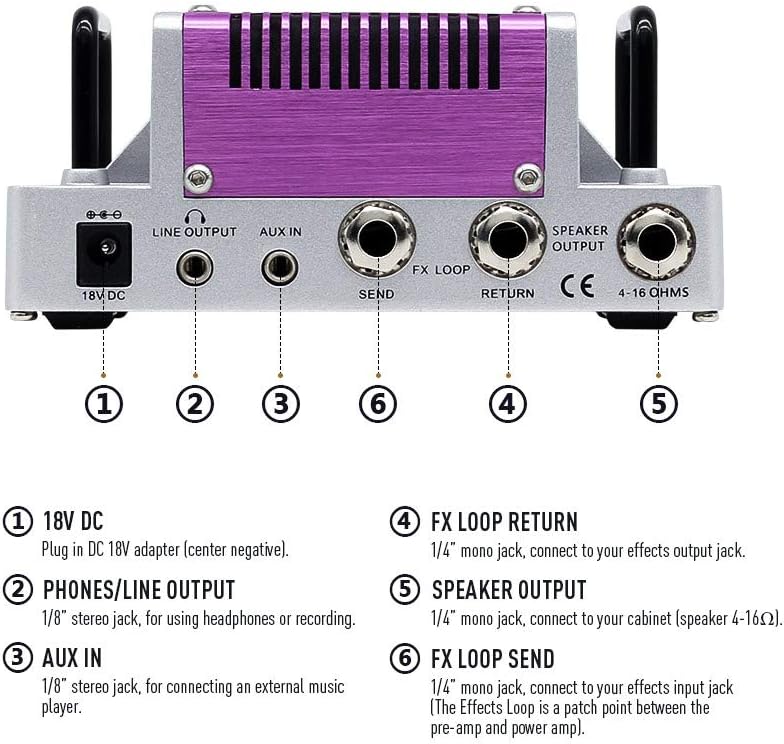
- 18 V CC: Plug in DC 18V adapter (center negative).
- USCITA TELEFONI/LINEA: 1/8" stereo jack, for using headphones or recording.
- INGRESSO AUX: 1/8" stereo jack, for connecting an external music player.
- RITORNO DEL LOOP FX: 1/4" mono jack, connect to your effects output jack.
- USCITA ALTOPARLANTE: 1/4" mono jack, connect to your cabinet (speaker 4-16Ω).
- INVIO LOOP FX: 1/4" mono jack, connect to your effects input jack (The Effects Loop is a patch point between the pre-amp e potere amp).
4. Impostazione
- Collegare il cabinet dell'altoparlante: Before powering on, connect a speaker cabinet (4-16Ω impedance) to the SPEAKER OUTPUT jack on the rear panel using a 1/4" mono speaker cable. Failure to connect a speaker cabinet before powering on can damage the amppiù vivace.
- Connetti alimentazione: Plug the included 18V DC power adapter into the 18V DC input on the rear panel, then plug the adapter into a suitable power outlet.
- Collega la chitarra: Plug your guitar into the INPUT jack on the front panel using a 1/4" mono instrument cable.
- Impostazioni iniziali: Turn the VOLUME and GAIN knobs to their minimum (counter-clockwise) positions before powering on.
- Accensione: Flip the ON/OFF switch to the 'ON' position. The indicator light will illuminate.
5. Istruzioni per l'uso
- Regolazione del tono: Use the BASS, MIDDLE, and TREBLE knobs to shape your desired tonal characteristics. Experiment with different settings to find your preferred sound.
- Regolazione del guadagno: The GAIN knob controls the amount of overdrive and distortion. Turn clockwise for more aggressive tones.
- Regolazione del volume: The VOLUME knob controls the overall output level of the amplifier. Adjust to your desired listening level.
- Using the FX Loop: Connect external effects pedals between the FX LOOP SEND and FX LOOP RETURN jacks to integrate them into your signal chain after the preamp sezione.
- Headphone/Line Out: For silent practice or direct recording, connect headphones or a line-level device to the PHONES/LINE OUTPUT. This output includes speaker cabinet simulation.
- INGRESSO AUX: Connect an external audio source (e.g., MP3 player, smartphone) to the AUX IN jack to play along with backing tracks.
6. Manutenzione
- Pulizia: Utilizzare un panno morbido e asciutto per pulire il ampl'esterno del lificatore. Non utilizzare detergenti liquidi o solventi.
- Magazzinaggio: Conservare il amplifier in un luogo asciutto e fresco, lontano dalla luce solare diretta e da temperature estreme.
- Cura del tubo: As a hybrid amplificatore, il preamp tube may eventually need replacement. If you notice a significant change in tone or performance, consult a qualified technician.
7. Risoluzione Dei Problemi
| Problema | Possibile causa | Soluzione |
|---|---|---|
| Nessun suono | Power not connected, speaker not connected, volume/gain too low, faulty cable. | Check power connection, ensure speaker is connected, increase volume/gain, test with different cables. |
| Suono debole o distorto | Faulty cable, incorrect impedance, worn preamp tubo. | Test cables, ensure correct speaker impedance, consult technician for tube replacement. |
| Excessive hum/noise | Circuito di terra, alimentazione difettosa, interferenze da altri dispositivi elettronici. | Try different power outlets, use a power conditioner, move away from other electronic devices. |
8. Specifiche
- Uscita Wattage: 5 Watt
- Fonte di energia: Elettrico con cavo (18 V CC, negativo centrale)
- Peso dell'articolo: 15.5 once
- Dimensioni del prodotto: 2.34 x 5.03 x 2.95 pollici
- Dispositivi compatibili: Chitarra
- Tipo di connettore: 6.35mm Jack (Input, Speaker Output, FX Loop Send/Return), 3.5mm Jack (Phones/Line Out, AUX IN)
- Impedenza dell'altoparlante: 4-16 Ohm
- Numero modello: TANLA2
9. Video di prodotto
OriPure 5W Tube Guitar AmpTesta del lificatore
Descrizione del video: This video showcases the OriPure 5W Tube Guitar Amplifier Head, demonstrating its features and sound. It highlights the tube components and various controls, providing an overview of its performance capabilities.
The Joyo Jackman II Is Like A Tiny Marshall JCM 800.
Descrizione del video: Questo video fornisce una descrizione dettagliataview and demonstration of the Joyo Jackman II amplifier head, comparing its sound characteristics to a Marshall JCM 800. It covers clean and dirty tones, control adjustments, and overall performance.
OriPure 15W Tube Guitar Amplifier Head OA-H15
Descrizione del video: This video demonstrates the OriPure 15W Tube Guitar Amplifier Head (Model OA-H15), showcasing its sound quality and features. It includes various guitar riffs and tone adjustments to illustrate its versatility.
JOYO Meteor II BanTamp Serie XL Mini Amp Head 20 Watt
Descrizione del video: This video presents the JOYO Meteor II BanTamp Serie XL Mini Amp Head, a 20-watt hybrid tube amplifier. It demonstrates the amplifier's clean and overdrive channels, tone controls, and built-in Bluetooth functionality for playing backing tracks.
Valeton Guitar Amplifier Head TAR-20G Amp Pedal Platform Studio Desktop with CAB SIM
Descrizione del video: This video showcases the Valeton Guitar Amplifier Head TAR-20G, highlighting its features as an amp pedal platform and desktop studio amplifier with built-in cab simulation. It demonstrates various tones and connectivity options.
JOYO 20W Amplifier Head BanTamP Series ATOMIC
Descrizione del video: This video features the JOYO 20W Amplifier Head from the BanTamP Series, specifically the ATOMIC model. It demonstrates the amplifier's sound characteristics and features, designed for AC lovers.
10. Garanzia e supporto
For warranty information and technical support, please refer to the official Hotone webo contattare il rivenditore autorizzato. Conservare la ricevuta d'acquisto come prova d'acquisto.