Stanley DN200/8/6
Manuale utente del compressore d'aria Stanley DN200/8/6
Model: DN200/8/6 | Brand: Stanley
1. Introduzione
This user manual provides comprehensive instructions for the safe and efficient operation, maintenance, and troubleshooting of your Stanley DN200/8/6 Air Compressor. Please read this manual thoroughly before using the compressor and keep it for future reference.
Avvertenze generali sulla sicurezza
- Always wear appropriate personal protective equipment (PPE) such as safety glasses and hearing protection when operating the compressor.
- Assicurarsi che il compressore sia posizionato su una superficie stabile e piana, in un'area ben ventilata.
- Non far funzionare il compressore in damp o in condizioni di umidità, o in prossimità di liquidi o gas infiammabili.
- Before performing any maintenance or adjustments, always disconnect the compressor from the power supply and ensure the tank is depressurized.
- Non dirigere mai l'aria compressa verso persone o animali.
- Regularly inspect the power cord, hoses, and connections for damage. Do not use if damaged.
2. Componenti del prodotto
Familiarize yourself with the main components of your Stanley DN200/8/6 Air Compressor:

Figura 2.1: generale view of the Stanley DN200/8/6 Air Compressor. This image shows the compact design, yellow tank, black motor housing, and integrated carry handle. The control panel with gauges and knobs is visible on top.
- Serbatoio dell'aria (6 litri): Conserva l'aria compressa.
- Gruppo motore/pompa: Genera aria compressa.
- Manometro: Displays the pressure inside the air tank.
- Manopola del regolatore: Regola la pressione dell'aria in uscita.
- Manometro di pressione in uscita: Displays the regulated output air pressure.
- Attacco rapido: Per il fissaggio di tubi dell'aria e utensili.
- Interruttore ON/OFF: Powers the compressor on or off.
- Valvola di sicurezza: Releases pressure if it exceeds a safe limit.
- Valvola di drenaggio: Located at the bottom of the tank, used to drain condensation.
- Maniglia per il trasporto: Per una facile trasportabilità.
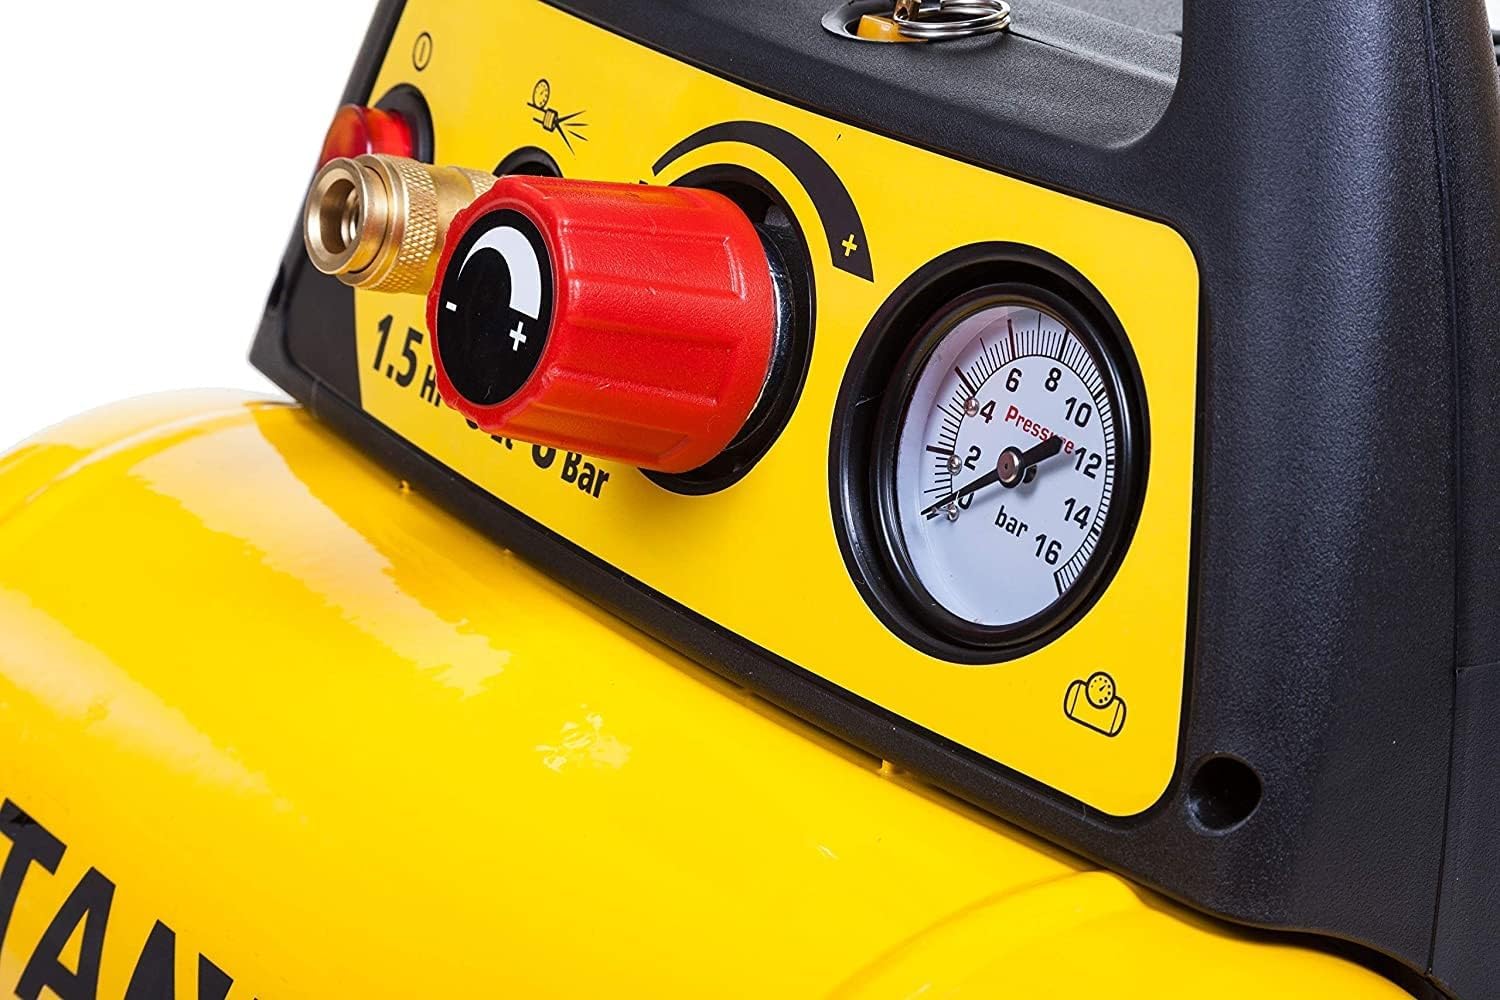
Figura 2.2: dettagliata view of the compressor's control panel. This close-up highlights the red ON/OFF switch, the quick connect fitting, the red pressure regulator knob, and the two pressure gauges (tank pressure and regulated output pressure).
3. Configurazione e utilizzo iniziale
- Disimballaggio: Carefully remove the compressor from its packaging. Inspect for any shipping damage. Retain packaging for future storage or transport.
- Posizionamento: Place the compressor on a firm, level, and stable surface. Ensure there is adequate ventilation around the unit to prevent overheating. Keep it away from walls or other obstructions.
- Collegamento elettrico: Ensure the ON/OFF switch is in the "OFF" position. Connect the power cord to a suitable grounded electrical outlet (230 Volts). Verify that the power supply matches the compressor's requirements.
- Initial Run-in (if applicable): For oil-lubricated compressors, it's often recommended to run the compressor for a short period (e.g., 15-20 minutes) with the drain valve open to allow components to seat properly. Consult the manufacturer's specific instructions if provided.
- Accessori di fissaggio: Connect your air hose to the quick connect coupler on the compressor. Ensure a secure connection. Attach your desired air tool to the other end of the hose.
4. Istruzioni per l'uso
- Accensione: Turn the ON/OFF switch to the "ON" position. The compressor will start to build pressure. The tank pressure gauge will show the increasinpressione g.
- Regolazione della pressione: Once the compressor reaches its maximum tank pressure and shuts off automatically, you can adjust the output pressure. Turn the red regulator knob clockwise to increase pressure and counter-clockwise to decrease it. The output pressure gauge will show the adjusted pressure.
- Utilizzo di utensili pneumatici: With the desired pressure set, you can now operate your air tool. The compressor will automatically cycle on and off to maintain the set pressure as air is consumed.
- Spegni: When finished, turn the ON/OFF switch to the "OFF" position.
- Depressurizzare il serbatoio: Before storing, always open the drain valve at the bottom of the tank to release any remaining air pressure and drain condensation. This prevents rust inside the tank.

Figure 4.1: The Stanley DN200/8/6 Air Compressor in use, powering an orbital sander. This demonstrates a typical application for the compressor, highlighting its utility for various air tools in a workshop setting.
5. Manutenzione
Regular maintenance ensures the longevity and optimal performance of your air compressor. Always disconnect power before performing maintenance.
- Scarico della condensa (giornalmente/dopo ogni utilizzo): Open the drain valve at the bottom of the tank to release accumulated moisture. This is crucial to prevent internal tank corrosion.
- Check Oil Level (Before Each Use): If your model is oil-lubricated (indicated by "Huile" feature), check the oil level using the dipstick or sight glass. Add compressor oil if necessary.
- Change Oil (Every 50-100 Operating Hours or Annually): Refer to the manufacturer's specific guidelines for oil change intervals and type of oil.
- Clean/Replace Air Filter (Monthly or as Needed): A clogged air filter reduces compressor efficiency. Clean or replace the filter element according to the manual.
- Ispezionare tubi flessibili e raccordi (regolarmente): Check for cracks, leaks, or wear on air hoses and fittings. Replace any damaged components immediately.
- Esterno pulito: Pulisci l'esterno del compressore con un pannoamp panno per rimuovere polvere e detriti. Non utilizzare prodotti chimici aggressivi.
6. Risoluzione Dei Problemi
Questa sezione affronta i problemi più comuni che potresti riscontrare con il tuo compressore d'aria.
| Problema | Possibile causa | Soluzione |
|---|---|---|
| Il compressore non si avvia. | Nessuna corrente, interruttore automatico scattato, interruttore difettoso. | Controllare il collegamento elettrico, ripristinare l'interruttore automatico, contattare l'assistenza se l'interruttore è difettoso. |
| Il compressore funziona in modo continuo o frequente. | Air leak in system, excessive air consumption, faulty pressure switch. | Check all connections for leaks, reduce air consumption, contact service for pressure switch. |
| Bassa pressione dell'aria in uscita. | Regolatore impostato troppo basso, perdita d'aria, filtro dell'aria intasato. | Regolare il regolatore, verificare eventuali perdite, pulire/sostituire il filtro dell'aria. |
| Rumore o vibrazioni eccessivi. | Loose components, worn parts, low oil level. | Tighten fasteners, check oil level, contact service for worn parts. |
| Moisture in air output. | Il serbatoio non viene svuotato regolarmente. | Drain condensation from the tank more frequently. |
7. Specifiche tecniche
| Specificazione | Valore |
|---|---|
| Numero di modello | DN200 / 8/6 |
| Produttore | Mecafer |
| Energia | 1100 Watt (1.5 CV) |
| Voltage | 230 Volt |
| Capacità del serbatoio | 6 litri |
| Pressione massima | 8 Barre |
| Portata d'aria | 10800 litri all'ora |
| Livello di rumore | 97 dB |
| Dimensioni del prodotto (L x P x A) | Dimensioni: 50 x 50 x 28 cm |
| Peso | 9 chilogrammi |
| Lunghezza del tubo flessibile | 1.5 metri |
| Caratteristica speciale | Oil-lubricated |
| Uso consigliato | Gonfiaggio dei pneumatici |
| Paese di origine | Cina |
8. Garanzia e supporto
For warranty information, please refer to the documentation included with your purchase or visit the official Stanley websito. Conservare la prova d'acquisto per eventuali reclami in garanzia.
For technical support, spare parts, or service inquiries, please contact Stanley customer service or an authorized service center. Contact details can typically be found on the product packaging or the official brand websito.
Risorse online:
- Official Stanley Websito: www.stanleytools.com (Please note: This is a generic link. Refer to your region's specific Stanley website for accurate support.)