1. Introduzione e oltreview
This manual provides detailed instructions for the safe installation, operation, and maintenance of your ET2 Harmony E24506-91PC LED Pendant Light. Please read all instructions carefully before beginning installation and retain this manual for future reference.
The ET2 Harmony pendant light features multiple bubble glass balls, each illuminated by an integrated LED. The individual pendants are suspended by adjustable cables, allowing for customization of the fixture's overall design and drop height. The fixture is designed for indoor use and is fully dimmable.

Image 1.1: The ET2 Harmony E24506-91PC LED Pendant Light, showcasing its design with multiple bubble glass spheres.
2. Informazioni sulla sicurezza
WARNING: RISK OF ELECTRIC SHOCK. Ensure power is turned off at the circuit breaker or fuse box before installation, servicing, or changing any components. Consult a qualified electrician if you are unsure about the installation process.
- Questo prodotto deve essere installato in conformità al codice di installazione applicabile da una persona a conoscenza della costruzione e del funzionamento del prodotto nonché dei pericoli connessi.
- Use only UL Listed wire connectors.
- Non superare il volume specificatotage (120 Volt).
- Non modificare in alcun modo l'apparecchio.
- Tenere i materiali combustibili lontani dall'apparecchio di illuminazione.
- Durante l'installazione indossare occhiali e guanti di sicurezza.
3. Contenuto della confezione
Carefully unpack the fixture and check that all components are present and undamaged. Retain all packaging materials until installation is complete.
- Pendant Light Fixture (Canopy with integrated LED pendants)
- Mounting Hardware (Mounting plate, screws, wire nuts)
- Manuale di istruzioni (questo documento)
4. Configurazione e installazione
Installation should be performed by a qualified electrician or a person with experience in electrical wiring.
4.1 Strumenti necessari (non inclusi)
- Cacciavite con testa a croce
- Cacciavite a testa piatta
- Spellafili
- Nastro isolante
- Scala
4.2 Passaggi di installazione
- Spegnimento dell'alimentazione: Individuare l'interruttore automatico o la scatola dei fusibili che controlla l'alimentazione al luogo di installazione e spegnere l'alimentazione. Verificare che l'alimentazione sia spenta utilizzando un voltmetro.tagetester.
- Preparare la superficie di montaggio: Ensure the junction box is securely mounted and capable of supporting the fixture's weight (approximately 11.07 pounds).
- Fissare la piastra di montaggio: Secure the fixture's mounting plate to the junction box using the provided screws.
- Effettuare i collegamenti elettrici:
- Connect the bare copper or green ground wire from the fixture to the ground wire from the junction box using a wire nut.
- Collegare il filo bianco (neutro) dell'apparecchio al filo bianco (neutro) della scatola di giunzione utilizzando un dado passacavo.
- Collegare il filo nero (fase) proveniente dall'apparecchio al filo nero (fase) proveniente dalla scatola di giunzione utilizzando un dado passacavo.
- Assicurarsi che tutti i collegamenti siano ben saldi e isolati con nastro isolante, se necessario.
- Secure Fixture Canopy: Carefully push the wired connections into the junction box. Align the fixture canopy with the mounting plate and secure it using the provided screws.
- Regola la lunghezza del pendente: The individual pendant cables are adjustable. To adjust, gently push the cable into the canopy's cable grip and pull to the desired length. Ensure all pendants are securely set before proceeding.
- Install Glass Balls: The bubble glass balls are pre-installed with LED bulbs. Ensure they are securely attached to their respective pendant cables.
- Ripristina alimentazione: Una volta completata l'installazione e verificati tutti i collegamenti, ripristinare l'alimentazione tramite l'interruttore automatico.
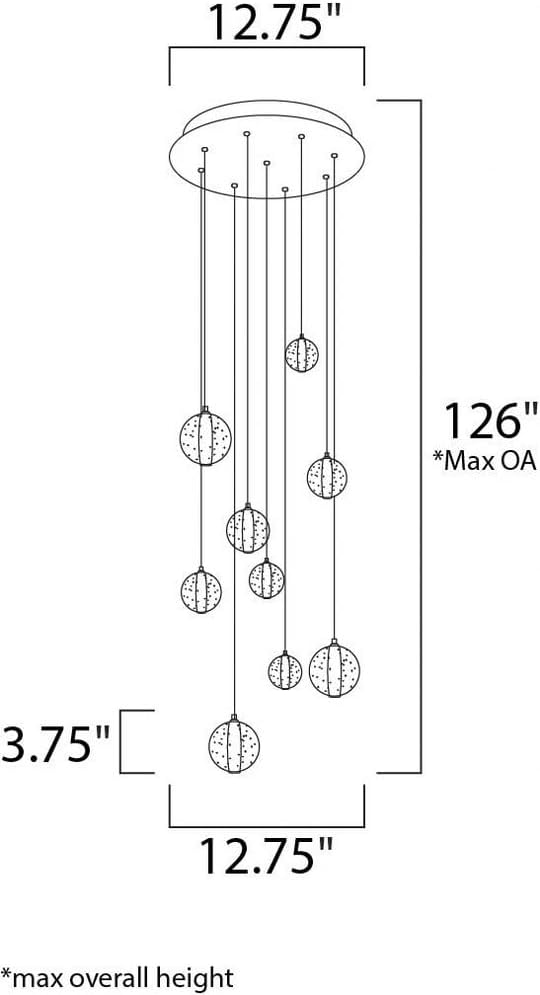
Image 4.1: Dimensional drawing of the ET2 Harmony E24506-91PC, indicating a 12.75-inch width and a maximum overall height of 126 inches.
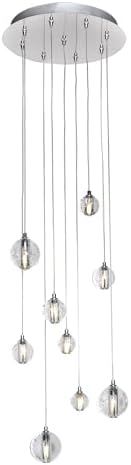
Image 4.2: Detail of the fixture's polished chrome canopy and the attachment points for the adjustable pendant cables.
5. Istruzioni per l'uso
The ET2 Harmony E24506-91PC LED Pendant Light is designed for simple operation.
- Accensione/spegnimento: Controllare la luce tramite un interruttore a parete standard collegato al circuito dell'apparecchio.
- Funzione di attenuazione: This fixture is fully dimmable. For optimal performance, use with a compatible LED dimmer switch. Consult your electrician for dimmer compatibility.
6. Manutenzione
Una manutenzione regolare contribuirà a preservare l'aspetto e la funzionalità della lampada a sospensione.
- Pulizia: Spegnere l'alimentazione prima della pulizia. Utilizzare un panno morbido, asciutto o leggermente asciutto.amp cloth to wipe the polished chrome finish and glass spheres. Do not use abrasive cleaners, solvents, or polishes as they may damage the finish.
- Sostituzione LED: The integrated LED bulbs are designed for long life. If replacement is ever needed, contact ET2 customer support for guidance on obtaining compatible replacement parts. Do not attempt to replace LEDs with standard bulbs.
7. Risoluzione Dei Problemi
If you experience issues with your pendant light, refer to the following troubleshooting guide:
| Problema | Possibile causa | Soluzione |
|---|---|---|
| La luce non si accende | Nessuna alimentazione all'apparecchio Collegamento del cablaggio allentato Interruttore a muro difettoso | Controllare l'interruttore/fusibile. Assicurarsi che l'alimentazione sia attiva. Verificare che tutti i collegamenti dei cavi siano saldi (con l'alimentazione spenta). Testare l'interruttore a parete o sostituirlo se necessario. |
| La luce tremola o si attenua in modo improprio | Interruttore dimmer incompatibile Collegamento del cablaggio allentato | Ensure an LED-compatible dimmer switch is used. Controllare tutti i collegamenti dei cavi (con l'alimentazione spenta). |
| Pendants are not level | Cable lengths are uneven | Adjust individual pendant cable lengths as described in Section 4.2. |
If the problem persists after attempting these solutions, contact ET2 customer support.
8. Specifiche
| Caratteristica | Dettaglio |
|---|---|
| Marca | ET2 |
| Numero di modello | E24506-91PC |
| Dimensioni (L x P x A) | 12.75" x 12.75" x 3.75" (Canopy) Max Overall Height: 126" |
| Peso dell'articolo | 11.07 libbre |
| Materiale | Vetro, Acciaio |
| Tipo di finitura | Polished Chrome / Bubble Glass |
| Tipo di sorgente luminosa | GUIDATO |
| Numero di sorgenti luminose | 9 |
| Cosatage | 13.5 W (totale) |
| Voltage | 120 Volt |
| Luminosità | 945 lumen |
| Colore chiaro | Bianco caldo (3000K) |
| Indice di resa cromatica (CRI) | 80+ |
| Tipo di installazione | Montaggio semi-incassato / a soffitto |
| Caratteristica speciale | Dimmable, Adjustable Cables |
| Uso interno/esterno | Al chiuso |
| Certificazione | Elencato UL |
| Assemblaggio richiesto | SÌ |
9. Garanzia e supporto
9.1 Informazioni sulla garanzia
This ET2 Harmony E24506-91PC LED Pendant Light is covered by a Garanzia limitata del produttore di 1 anni dalla data di acquisto. La presente garanzia copre i difetti di materiali e di fabbricazione in condizioni di normale utilizzo. Non copre danni derivanti da installazione impropria, incidenti, uso improprio, abuso o modifiche non autorizzate.
9.2 Assistenza clienti
For technical assistance, warranty claims, or to order replacement parts, please contact ET2 customer support. Have your model number (E24506-91PC) and proof of purchase ready when contacting support.
You can find contact information for ET2 by visiting their official websito o rivenditore presso cui è stato acquistato il prodotto.