1. Introduzione
Thank you for choosing the Mastech MS2115B True RMS Digital Clamp Meter. This instrument is designed for safe and accurate measurement of various electrical parameters. This manual provides essential information for the proper and safe operation, maintenance, and troubleshooting of your device. Please read this manual thoroughly before use and retain it for future reference.
2. Informazioni sulla sicurezza
Per garantire un funzionamento e una manutenzione sicuri del contatore, seguire queste precauzioni di sicurezza:
- Rispettare sempre i codici di sicurezza locali e nazionali.
- Non utilizzare il misuratore se appare danneggiato o se l'isolamento dei puntali di prova è compromesso.
- Non applicare mai più del volume nominaletage, come indicato sul misuratore, tra i terminali o tra un terminale e la terra.
- Usare estrema cautela quando si lavora con voltages above 60V DC or 30V AC RMS. These voltagrappresentano un rischio di scossa elettrica.
- Keep your fingers behind the probe barriers when making measurements.
- Scollegare i puntali di prova dal circuito prima di modificare le funzioni.
- Rimuovere i puntali dal misuratore prima di aprire il coperchio della batteria.
- Sostituire la batteria non appena appare l'indicatore di batteria scarica per evitare letture errate.
- Non utilizzare il misuratore in ambienti con presenza di gas, vapori o polveri esplosivi.
- Garantire il clamp jaw is fully closed when taking current measurements.
3. Prodotto finitoview
The Mastech MS2115B is a True RMS digital clamp meter designed for professional and home use. It offers a wide range of measurement capabilities and features for electrical testing.
3.1 Caratteristiche principali
- Dual Display with 6000 counts for clear readings.
- Jaw size up to Ø40mm (1.6 inch) for various conductor sizes.
- Auto Ranging and Manual Ranging capabilities.
- Misurazione della corrente CC/CA fino a 1000 A.
- Test AC/DC voltage and current, resistance, capacitance, frequency, and duty cycle.
- True RMS (Root Mean Square) measurement for accurate readings on non-sinusoidal waveforms.
- NCV (Volume senza contattotage Detector) for identifying live wires without direct contact.
- Inrush current measurement for motor startup analysis.
- Data Hold, MAX/MIN Value Measurement, and Relative Measurement functions.
- Diode test and Continuity Buzzer (<50 ohm).
- Display Backlight and Work Light for use in dimly lit areas.
- Low Battery Display and Auto Power Off for extended battery life.
- USB interface for data communication with Windows OS.
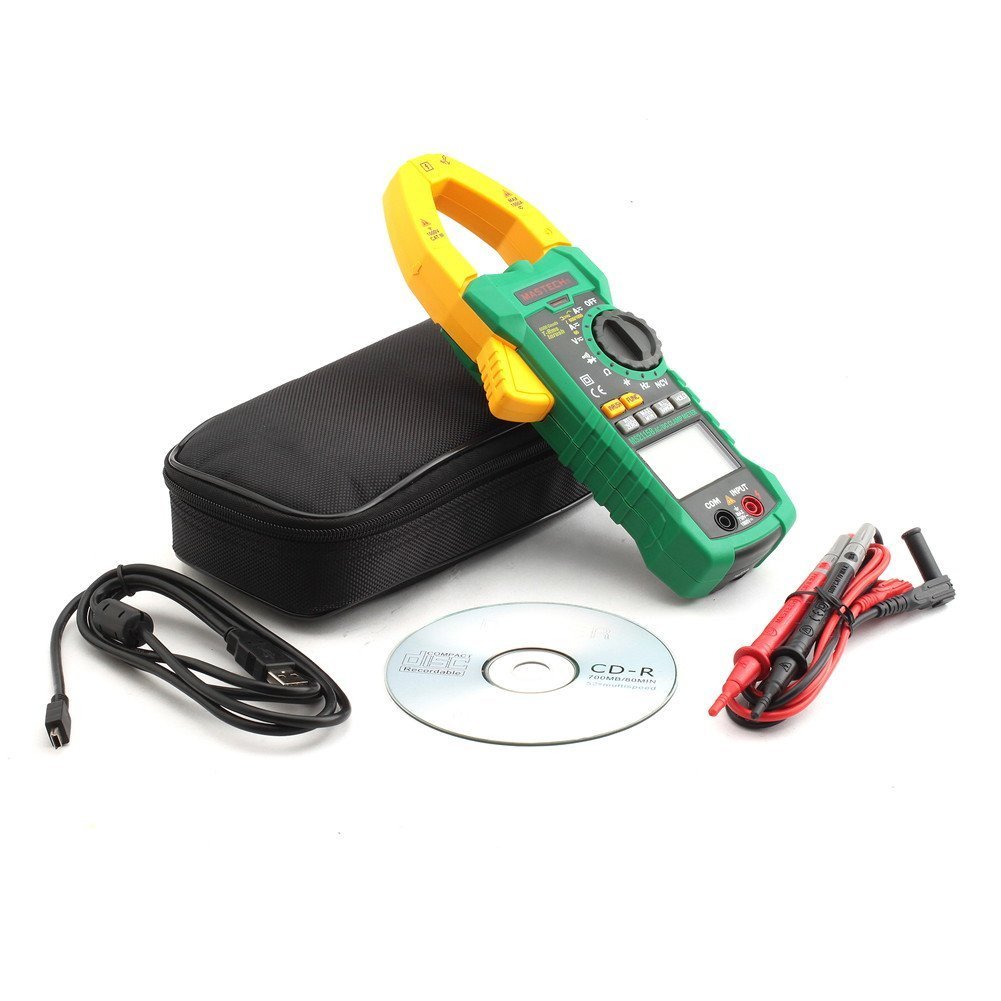
3.2 Componenti
Familiarize yourself with the main components of the MS2115B clamp metro:


4. Impostazione
4.1 Installazione della batteria
The Mastech MS2115B requires batteries for operation. Please note that batteries are not included in the package.
- Assicurarsi che il misuratore sia spento e scollegare tutti i cavi di prova.
- Individuare il coperchio del vano batterie sul retro del misuratore.
- Utilizzare un cacciavite per allentare la vite che fissa il coperchio della batteria.
- Rimuovere con cautela il coperchio della batteria.
- Inserire le batterie necessarie, rispettando la polarità corretta (+ e -).
- Riposizionare il coperchio della batteria e fissarlo con la vite.

4.2 Collegamento dei puntali di prova
Per volumetage, misure di resistenza, capacità, frequenza, diodo e continuità, collegare i puntali di prova:
- Inserire il puntale rosso nel terminale "INPUT".
- Insert the black test lead into the "COM" (common) terminal.
4.3 USB Interface Setup (for Windows OS)
The MS2115B features a USB interface for data logging and analysis on a computer running Windows OS.
- Install the provided communication software from the included CD onto your Windows computer.
- Connect the USB communication cable to the meter's USB port and to an available USB port on your computer.
- Follow the software instructions to establish communication and begin data transfer.
5. Istruzioni per l'uso
5.1 Accensione/spegnimento e spegnimento automatico
- To power on, rotate the rotary switch from "OFF" to any desired measurement function.
- To power off, rotate the rotary switch back to "OFF".
- The meter features an Auto Power Off function to conserve battery life. It will automatically turn off after approximately 15 minutes of inactivity. To disable this feature temporarily, refer to the full user manual for specific button combinations during power-on.
5.2 pulsanti funzione
- FUNZIONE: Seleziona tra diverse modalità di misurazione all'interno di una singola posizione dell'interruttore rotante (ad esempio, AC/DC voltage, Diodo/Continuità).
- RANGE: Toggles between auto-ranging and manual ranging. In manual ranging, press repeatedly to cycle through ranges.
- TENERE: Blocca la lettura corrente del display. Premere di nuovo per rilasciare.
- MASSIMO/MIN: Displays the maximum or minimum reading recorded since activation. Press repeatedly to cycle through MAX, MIN, and current readings.
- REL/ZERO: Activates relative measurement mode, displaying the difference between the current reading and a stored reference value. Also used for zeroing DC current readings.
- INGRESSO: Measures the inrush current (startup current) of motors or other inductive loads.
- Retroilluminazione/Luce da lavoro: Activates the display backlight and work light for improved visibility.
5.3 Procedure di misurazione
5.3.1 CC/CA Voltage Misurazione
- Collegare il puntale di prova rosso al terminale "INPUT" e il puntale di prova nero al terminale "COM".
- Ruotare l'interruttore rotante su V (voltage) position. Press FUNC to select between DC V= o aria condizionata V~.
- Toccare con le sonde di prova i punti di prova desiderati nel circuito.
- Leggi il vol.tage valore sul display.
5.3.2 Misurazione della corrente CC/CA (Clamp)
- Ruotare l'interruttore rotante su A (Current) position. Press FUNC to select between DC A= o aria condizionata A~.
- Aprire il clamp ganasce e racchiudere solo un conduttore del circuito. Assicurarsi che la ganascia sia completamente chiusa.
- Per la corrente continua, premere REL/ZERO to zero the display before measurement if needed.
- Leggere il valore corrente sul display.
5.3.3 Misurazione della resistenza
- Collegare i puntali di prova come per il voltage.
- Ruotare l'interruttore rotante su Ω Posizione (di resistenza).
- Assicurarsi che il circuito sottoposto a test sia disattivato.
- Toccare le sonde di prova sul componente o sul circuito per misurarne la resistenza.
- Leggere il valore di resistenza sul display.
5.3.4 Misurazione della capacità
- Collegare i puntali di prova come per il voltage.
- Ruotare l'interruttore rotante su CAP Posizione (Capacità).
- Prima di effettuare la misurazione, assicurarsi che il condensatore sia completamente scarico.
- Toccare i puntali di prova sui terminali del condensatore.
- Leggere il valore della capacità sul display.
5.3.5 Misurazione della frequenza e del ciclo di lavoro
- Collegare i puntali di prova come per il voltage.
- Ruotare l'interruttore rotante su Hz/% Posizione (Frequenza/Ciclo di lavoro).
- Premere FUNC to toggle between Frequency (Hz) and Duty Cycle (%).
- Mettere a contatto le sonde di prova con la sorgente del segnale.
- Leggere il valore della frequenza o del ciclo di lavoro sul display.
5.3.6 Test diodo e continuità
- Collegare i puntali di prova come per il voltage.
- Ruotare l'interruttore rotante su Diodo/Continuità posizione.
- Premere FUNC to select between Diode test or Continuity test.
- For Diode Test: Touch the red probe to the anode and the black probe to the cathode. The display shows the forward voltage goccia. Invertire le sonde per verificare la presenza di un circuito aperto.
- For Continuity Test: Touch the probes to the circuit. A continuous beep indicates continuity (resistance less than 50 ohms).
5.3.7 NCV (Volume senza contattotage) Rilevamento
- Ruotare l'interruttore rotante su VNC posizione.
- Sposta la parte superiore del clamp meter near a conductor or outlet.
- Il misuratore emetterà un segnale acustico e l'indicatore NCV si accenderà se la tensione CAtage viene rilevato.
5.3.8 Misurazione della corrente di spunto
- Ruotare l'interruttore rotante su A~ Posizione (corrente CA).
- Premere il tasto INRUSH pulsante.
- Aprire il clamp jaw and enclose only one conductor of the circuit where the inrush current is to be measured.
- Turn on the device or motor. The meter will capture and display the peak inrush current.
6. Manutenzione
6.1 Pulizia
- Pulire periodicamente la custodia con un pannoamp panno e detersivo delicato. Non utilizzare abrasivi o solventi.
- Mantenere i terminali di ingresso liberi da sporco e umidità.
6.2 Sostituzione della batteria
Quando sul display compare l'indicatore di batteria scarica, sostituire immediatamente le batterie per garantire letture accurate. Fare riferimento alla Sezione 4.1 per le istruzioni di installazione delle batterie.
6.3 Conservazione
- Se il misuratore non viene utilizzato per un periodo prolungato, rimuovere le batterie per evitare perdite e danni.
- Conservare il misuratore in un luogo fresco e asciutto, lontano dalla luce solare diretta e da temperature estreme.
7. Risoluzione Dei Problemi
If you encounter issues with your Mastech MS2115B, refer to the following common troubleshooting steps:
| Problema | Possibile causa | Soluzione |
|---|---|---|
| Il misuratore non si accende. | Batterie scariche o installate in modo errato. | Controllare la polarità delle batterie; sostituire le batterie. |
| Nessuna lettura o "OL" visualizzato. | Open circuit, out of range, or incorrect function selected. | Check circuit connections, select appropriate range/function, ensure continuity. |
| Letture imprecise. | Low battery, dirty test leads/terminals, external interference. | Replace batteries, clean leads/terminals, move away from strong electromagnetic fields. |
| Auto Power Off activates too quickly. | Funzionamento normale (15 min di inattività). | Press any button or rotate the switch to reset the timer. Refer to the full manual to disable this feature if needed. |
| Clamp current reading is zero or incorrect. | Multiple conductors in jaw, jaw not fully closed, DC current not zeroed. | Ensure only one conductor is in the jaw, close jaw completely, press REL/ZERO for DC current. |
If the problem persists after trying these steps, please contact Mastech customer support or your local distributor for assistance.
8. Specifiche tecniche
The following table outlines the technical specifications for the Mastech MS2115B Digital Clamp Misuratore:
| Funzione di misurazione | Allineare | Precisione |
|---|---|---|
| Volume DCtage | 600 mV / 6 V / 60 V / 600 V / 1000 V | ±(0.5% + 3) for 600mV-600V, ±(0.8% + 2) for 1000V |
| Volume ACtage | 600 mV / 6 V / 60 V / 600 V / 750 V | ±(0.8% + 3) for 600mV-600V, ±(1% + 4) for 750V |
| Corrente continua | 60 A / 600 A / 1000 A. | ±(3.0% + 3) |
| Corrente alternata | 60 A / 600 A / 1000 A. | ±(2.5% + 3) |
| Resistenza | 600Ω / 6kΩ / 60kΩ / 600kΩ / 6MΩ / 60MΩ | ±(1.0% + 3) for 600Ω-6MΩ, ±(1.5% + 3) for 60MΩ |
| Capacità | 6nF / 60nF / 600nF / 6uF / 60uF / 600uF / 6mF / 60mF | ±(4.0% + 3) |
| Frequency (from Clamp) | 0 ~ 10kHz | ±(1.5% + 5) |
| Frequency (AC Voltage) | 0 ~ 10kHz | ±(1.5% + 5) |
| Frequenza logica | 0 ~ 60MHz | ±(0.5% + 3) |
| Ciclo di lavoro | 10% ~ 90% | ±3.0% |
| Test diodi | 2.7V | Volume in avantitage goccia |
| Buzzer di continuità | <50 ohm | Segnale acustico |
Specifiche generali:
- Display: Dual Display, 6000 counts
- Apertura della mascella: Ø40mm (1.6 pollici)
- Vero valore efficace: SÌ
- Valore NC: SÌ
- Spunto: SÌ
- Data Hold: SÌ
- MASSIMO/MIN: SÌ
- Misurazione relativa: SÌ
- Retroilluminazione/Luce da lavoro: SÌ
- Indicazione di batteria scarica: SÌ
- Spegnimento automatico: SÌ
- Interfaccia USB: Yes (Windows OS compatible)
- Fonte di energia: Alimentato a batteria (batterie non incluse)
- Dimensioni: Circa 26 x 14 x 6.6 cm
- Peso: Circa 720 g
- Produttore: MASTECH
- Numero modello: MS2115B
- ASIN: B00LD8IIJS
- Codice UPC: 702382755386, 702382755881, 706551142168
9. Garanzia e supporto
For warranty information, please refer to the documentation provided with your purchase or contact the seller directly. Mastech products typically come with a manufacturer's warranty against defects in materials and workmanship.
For technical support, troubleshooting assistance beyond this manual, or inquiries about replacement parts, please contact Mastech customer service or your authorized Mastech distributor. Contact details can usually be found on the manufacturer's official websito o sulla fattura di acquisto.