
1. Introduzione
Thank you for choosing the Philips Daily HD7462/20 Filter Coffee Maker. This manual provides essential information for the safe and efficient use, maintenance, and troubleshooting of your appliance. Please read these instructions carefully before first use and keep them for future reference.
This coffee maker is designed to brew delicious filter coffee with features like Aroma Swirl for optimal taste, a generous 1.2-liter capacity, and a convenient drip-stop system.
2. Informazioni importanti sulla sicurezza
- Leggere tutte le istruzioni prima di mettere in funzione l'apparecchio.
- Non immergere l'apparecchio, il cavo o la spina in acqua o altri liquidi.
- Questo apparecchio non è destinato all'uso da parte di persone (bambini compresi) con ridotte capacità fisiche, sensoriali o mentali, o prive di esperienza e conoscenza, a meno che non siano supervisionate o abbiano ricevuto istruzioni riguardanti l'uso dell'apparecchio da una persona responsabile della loro sicurezza.
- I bambini devono essere sorvegliati per assicurarsi che non giochino con l'apparecchio.
- Scollegare dalla presa quando non in uso e prima di pulire. Lasciare raffreddare prima di mettere o togliere parti e prima di pulire l'apparecchio.
- Non utilizzare alcun apparecchio con un cavo o una spina danneggiati, dopo che l'apparecchio stesso non funziona correttamente o è stato danneggiato in qualsiasi modo.
- The heating plate remains hot after brewing. Avoid contact with hot surfaces.
- Always ensure the carafe lid is properly closed during brewing to prevent hot water or steam from escaping.
- Use only the original carafe provided with the appliance.
3. Prodotto finitoview
Familiarize yourself with the components of your Philips Daily HD7462/20 Filter Coffee Maker.

Figure 1: Philips Daily HD7462/20 Filter Coffee Maker, front view with coffee brewing.
- Riserva d'acqua: For filling with fresh water. Features a clear level indicator.
- Coperchio: Covers the water reservoir and filter holder.
- Portafiltro: Removable basket for holding the coffee filter and ground coffee.
- Aroma Swirl Nozzle: Distributes coffee evenly in the carafe for optimal aroma.
- Caraffa di vetro: With a capacity of 1.2 liters (15 cups).
- Piastra riscaldante: Mantiene caldo il caffè preparato.
- Interruttore di alimentazione: Pulsante di accensione/spegnimento con spia luminosa.
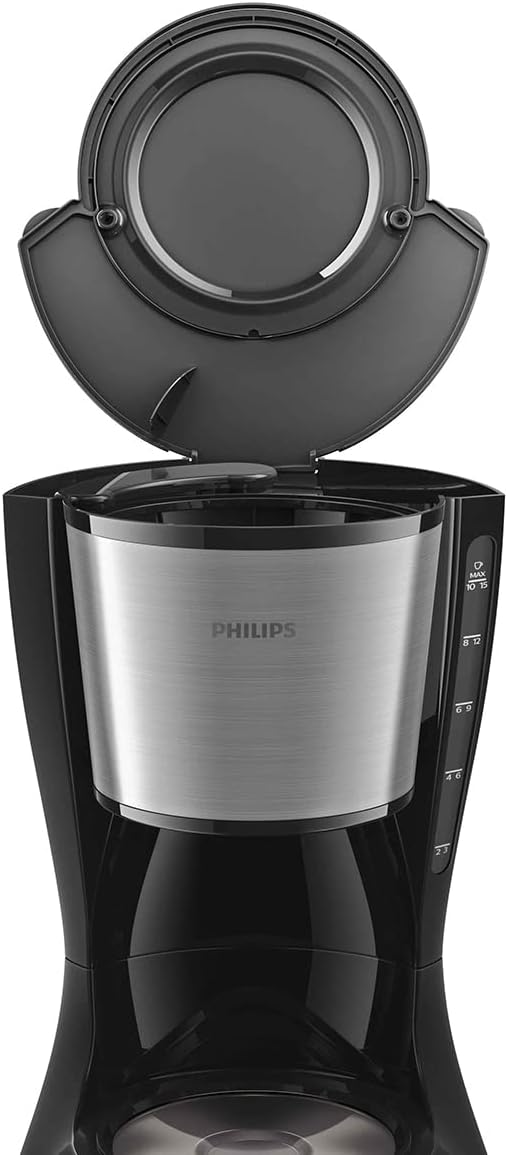
Figura 2: in alto view of the coffee maker with the lid open, revealing the water reservoir and filter basket area.
4. Impostazione
4.1 Disimballaggio
Carefully remove all packaging materials from the coffee maker. Ensure all parts are present and undamaged. Dispose of packaging responsibly.
4.2 Pulizia al primo utilizzo
Before brewing coffee for the first time, clean the appliance to remove any manufacturing residues:
- Fill the water reservoir with fresh cold water up to the MAX level.
- Place an empty paper filter (size 1x4 or similar) into the filter holder.
- Posizionare la caraffa di vetro vuota con il coperchio sulla piastra riscaldante.
- Press the power switch to start a brewing cycle with only water.
- Once the cycle is complete, discard the water and rinse the carafe and filter holder.
4.3 Posizionamento
Place the coffee maker on a stable, flat, heat-resistant surface, away from water sources and direct heat. Ensure there is adequate space around the appliance for ventilation.
5. Istruzioni per l'uso
5.1 Erogazione del caffè
- Riempire il serbatoio dell'acqua: Open the lid and fill the water reservoir with fresh, cold water. Use the water level indicator on the side of the appliance to measure the desired number of cups (up to 1.2 liters or 15 cups).
- Add Coffee Filter: Place a paper filter (e.g., size 1x4) into the filter holder.
- Aggiungere caffè macinato: Add the desired amount of ground coffee into the filter. A general guideline is one level scoop (approximately 7g) per cup, but adjust to your taste.
- Chiudi coperchio: Chiudere bene il coperchio.
- Posizionare la caraffa: Assicurarsi che la caraffa di vetro con il suo coperchio sia posizionata correttamente sulla piastra riscaldante.
- Inizia a preparare la birra: Plug the appliance into a power outlet. Press the power switch. The indicator light will illuminate, and the brewing process will begin.
- Drip-Stop Function: The drip-stop system allows you to temporarily remove the carafe during brewing to pour a cup of coffee. The flow of coffee will stop automatically. Return the carafe to the heating plate within 20 seconds to prevent overflow.
- Aroma Swirl: During brewing, the Aroma Swirl nozzle inside the carafe will circulate the coffee, ensuring an optimal and consistent aroma throughout the entire pot.
- Spegnimento automatico: For safety and energy saving, the coffee maker will automatically switch off approximately 30 minutes after the brewing cycle is complete. The indicator light will turn off.
5.2 After Brewing
Once brewing is complete, the heating plate will keep the coffee warm until the automatic shut-off activates. To turn off the appliance manually, press the power switch again.
6. Pulizia e manutenzione
6.1 Pulizia giornaliera
- Scollegare sempre la macchina per il caffè e lasciarla raffreddare completamente prima di pulirla.
- Remove the filter holder and discard the used coffee filter and grounds.
- Wash the glass carafe and filter holder in warm, soapy water. Rinse thoroughly and dry. These parts are generally dishwasher-safe (top rack).
- Pulire l'esterno dell'apparecchio con un panno morbido, damp panno. Non utilizzare detergenti abrasivi o pagliette.
- Non immergere l'unità principale in acqua o in qualsiasi altro liquido.
6.2 Decalcificazione
Regular descaling is crucial to maintain optimal performance and extend the lifespan of your coffee maker. The frequency depends on water hardness and usage, but generally every 2-3 months is recommended.
- Prepare a descaling solution according to the manufacturer's instructions (e.g., white vinegar and water, or a commercial descaler).
- Pour the descaling solution into the water reservoir up to the MAX level.
- Posizionare la caraffa vuota sulla piastra riscaldante.
- Start a brewing cycle. After about half of the solution has run through, switch off the appliance and let it soak for 15-20 minutes.
- Switch the appliance back on to complete the brewing cycle.
- After descaling, run at least two full cycles with fresh, cold water to rinse the appliance thoroughly and remove any residual descaler taste.
7. Risoluzione Dei Problemi
Se riscontri problemi con la tua macchina per il caffè, fai riferimento ai seguenti problemi comuni e alle relative soluzioni:
| Problema | Possibile causa | Soluzione |
|---|---|---|
| Il caffè non si prepara. | No power; water reservoir empty; appliance not switched on. | Check power connection; fill water reservoir; press the power switch. |
| Coffee is weak or tastes bad. | Insufficient coffee grounds; incorrect grind size; appliance needs descaling. | Add more coffee; use medium grind; descale the appliance. |
| Coffee overflows from the filter holder. | Too much coffee grounds; filter holder clogged; carafe not placed correctly. | Reduce coffee amount; clean filter holder; ensure carafe is fully seated. |
| Perdite d'acqua dall'elettrodomestico. | Water reservoir overfilled; components not assembled correctly. | Do not exceed MAX fill line; reassemble filter holder and carafe properly. |
Se il problema persiste dopo aver provato queste soluzioni, contattare l'assistenza clienti.
8. Specifiche
- Numero modello: Modello HD7462/20
- Energia: 1000 Watt
- Voltage: 220V
- Capacità: 1.2 litri (15 tazze)
- Materiale: Metallo
- Colore: Nero/Argento
- Dimensioni (L x P x A): Dimensioni: 6 x 19 x 14 cm
- Peso: 2.13 chilogrammi
- Caratteristiche: Aroma Swirl, Drip-stop system, Automatic shut-off
9. Garanzia e supporto
9.1 Garanzia
This Philips appliance comes with a standard manufacturer's warranty. Please refer to the warranty card included in your product packaging or visit the official Philips website for detailed warranty terms and conditions applicable in your region. Keep your proof of purchase for warranty claims.
Spare parts are generally available for a period of 2 years from the date of purchase.
9.2 Assistenza clienti
Per ulteriore assistenza, registrazione del prodotto o per trovare risposte alle domande frequenti, visitare il sito ufficiale di supporto Philips website or contact their customer service helpline. Contact details can typically be found on the Philips websito o nella documentazione del prodotto.
Supporto online: www.philips.com/support