SINGER Start 1306
Manuale d'uso della macchina da cucire SINGER Start 1306
Modello: Start 1306
1. Introduzione
This manual provides essential instructions for the safe and efficient operation of your SINGER Start 1306 Sewing Machine. Please read it thoroughly before using the machine to ensure proper setup, usage, and maintenance. The SINGER Start 1306 is designed for home sewing projects, featuring 6 built-in stitches, easy threading, and a 4-step buttonhole function.

Immagine 1.1: anteriore view of the SINGER Start 1306 Sewing Machine.
2. Informazioni sulla sicurezza
Quando si utilizzano apparecchi elettrici, seguire sempre le precauzioni di sicurezza di base per ridurre il rischio di incendi, scosse elettriche o lesioni.
- Leggere tutte le istruzioni prima di utilizzare la macchina.
- Tenere la macchina lontana dall'acqua o da superfici bagnate.
- Scollegare la macchina dalla presa elettrica quando non è in uso, durante la manutenzione o quando si sostituiscono gli accessori.
- Non utilizzare mai la macchina se il cavo o la spina sono danneggiati, se non funziona correttamente o se è caduta o è danneggiata.
- Tenere le dita lontane da tutte le parti in movimento. È necessaria una cura speciale intorno all'ago della macchina per cucire.
- Utilizzare solo gli accessori consigliati dal produttore.
- Non far cadere o inserire mai alcun oggetto in nessuna apertura.
3. Impostazione
3.1 Disimballaggio e contenuto
Carefully remove the machine from its packaging. Retain all packaging materials for future transport or storage. Verify that all included components are present:
- Piede multiuso
- Piedino per cerniera
- Piedino per asole
- Piatto per rammendo
- Confezione di aghi
- Bobine
- Spool Pin Felts
- Needle Plate Screwdriver
- Seam Ripper / Lint Brush
- Vinyl Dust Cover
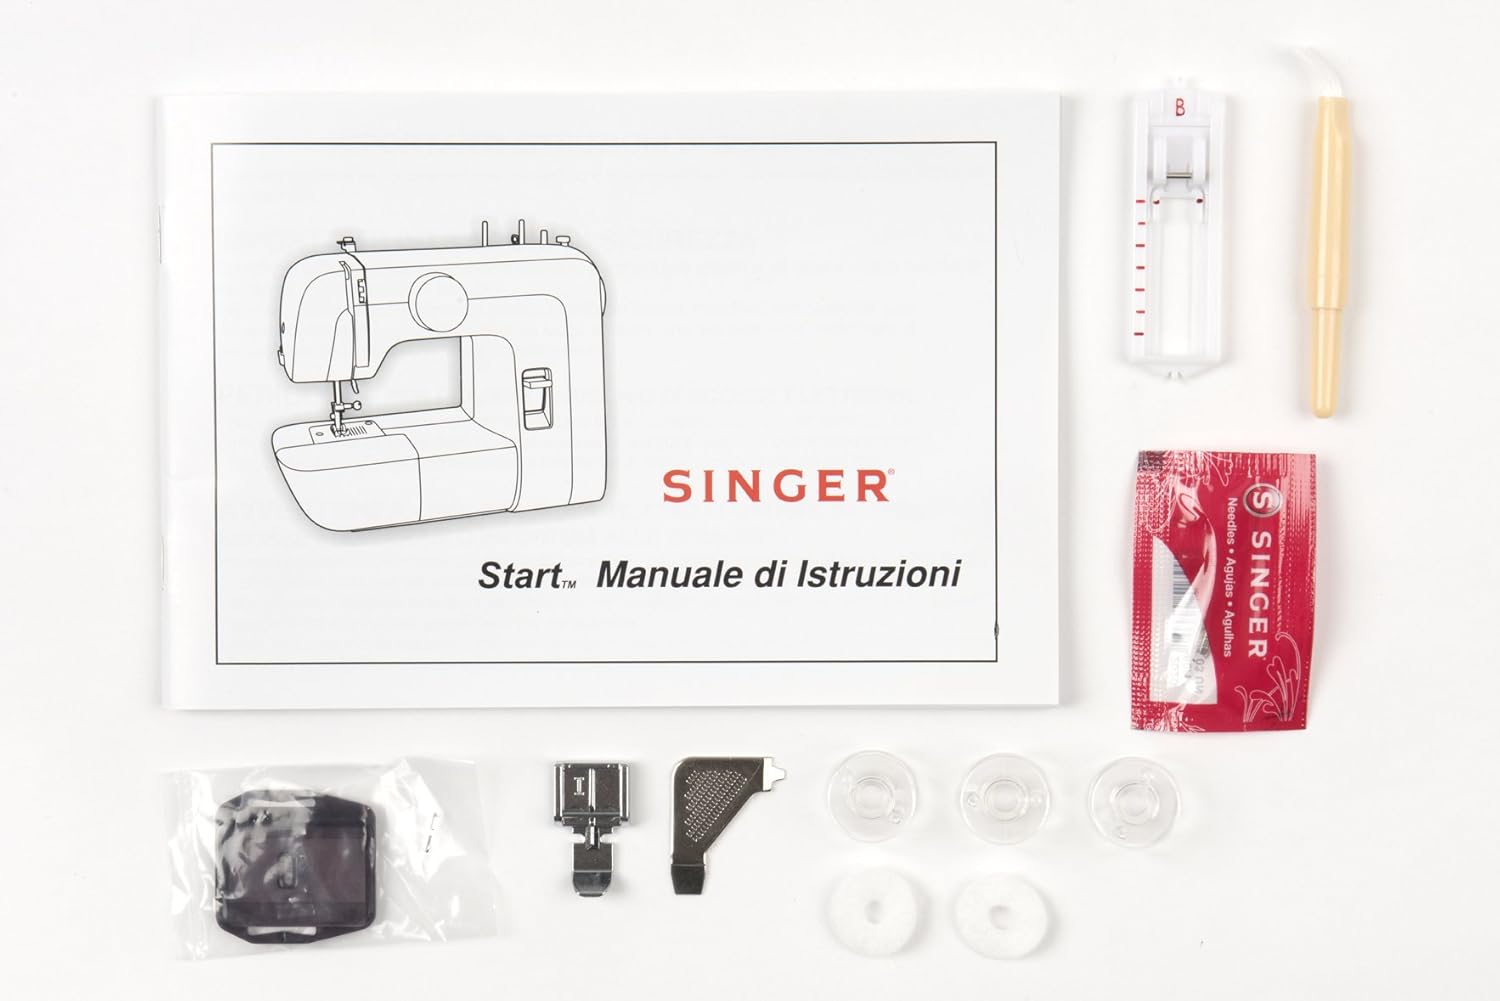
Image 3.1: Included accessories and instruction manual.
3.2 Collegamento di alimentazione
Connect the power cord to the machine's power input socket and then plug it into a suitable electrical outlet (220V). Ensure the machine is switched off before connecting to power.

Immagine 3.2: posteriore view showing power input and foot pedal connection.
3.3 Infilatura della macchina
Correct threading is crucial for proper stitch formation.
3.3.1 Avvolgimento della bobina
- Posizionare un rocchetto di filo sul portarocchetto.
- Far passare il filo attraverso il guidafilo superiore.
- Wrap the thread clockwise around the bobbin winding tension disc.
- Insert the thread through the small hole in the bobbin from the inside out.
- Place the bobbin onto the bobbin winder spindle and push the spindle to the right.
- Hold the thread end and press the foot pedal. Wind a few turns, then trim the excess thread.
- Continue winding until the bobbin is full. The winder will stop automatically.
- Push the bobbin winder spindle to the left and remove the bobbin.
3.3.2 Inserimento della bobina
- Aprire la piastra di copertura della bobina.
- Inserire la bobina avvolta nella capsula con il filo che si svolge in senso antiorario.
- Guide the thread into the tension spring slot and pull it firmly until it snaps into place.
- Chiudere la piastra di copertura della bobina.
3.3.3 Filettatura superiore
- Sollevare l'ago nella posizione più alta utilizzando il volantino.
- Sollevare l'alzapiedino.
- Posizionare un rocchetto di filo sul portarocchetto.
- Far passare il filo attraverso il guidafilo superiore.
- Bring the thread down through the right channel, then up through the left channel, ensuring it passes through the take-up lever.
- Infilare l'ago da davanti a dietro.

Image 3.3: Illustration of the upper threading path.
3.4 Installazione dell'ago
To install or replace a needle:
- Ruotare il volantino per sollevare l'ago nella posizione più alta.
- Allentare l'ago clamp vite.
- Rimuovere il vecchio ago.
- Insert the new needle with the flat side facing the back of the machine. Push it up as far as it will go.
- Stringere l'ago clamp avvitare saldamente.

Image 3.4: Close-up of the needle and presser foot area.
4. Istruzioni per l'uso
4.1 Selezione del punto
The SINGER Start 1306 offers 6 built-in stitch patterns. Turn the stitch selector dial to choose your desired stitch. The available stitches include 4 basic, 1 decorative, and 1 buttonhole stitch.

Image 4.1: Stitch selector dial with various stitch patterns.
4.2 Nozioni di base sul cucito
4.2.1 Starting a Seam
- Posizionare il tessuto sotto il piedino premistoffa, allineando il bordo con una guida per cuciture sulla placca ago.
- Abbassare il piedino premistoffa.
- Turn the handwheel to lower the needle into the fabric at the starting point.
- Press the foot pedal gently to begin sewing.
4.2.2 Finishing a Seam
- Sew to the end of your seam.
- Press the reverse stitch lever to sew a few stitches backward to secure the seam.
- Sollevare l'ago nella posizione più alta.
- Sollevare il piedino premistoffa.
- Pull the fabric away from the machine, then cut the threads using the thread cutter on the machine.
4.3 4-Step Buttonhole Function
The machine features a 4-step buttonhole function for creating buttonholes. Refer to the markings on the stitch selector dial for each step (1, 2, 3, 4). Use the buttonhole foot for best results.
4.4 Zipper Insertion
Attach the zipper foot to the machine. This foot allows you to sew close to the zipper teeth, ensuring a neat finish. Follow standard zipper insertion techniques, adjusting the needle position as needed.
4.5 Free Arm Usage
The removable free arm provides access to difficult-to-reach areas such as collars, sleeves, cuffs, and pant hems. To use, slide off the accessory storage compartment to expose the free arm.
5. Manutenzione
5.1 Pulizia
Regular cleaning helps maintain machine performance. Always unplug the machine before cleaning.
- Rimozione dei pelucchi: Use the provided lint brush to remove lint and dust from the bobbin area and feed dogs.
- Pulizia esterna: Pulire le superfici esterne con un panno morbido e asciutto. Non utilizzare prodotti chimici aggressivi o detergenti abrasivi.
5.2 Sostituzione dell'ago
Replace needles regularly, especially when sewing different fabric types or if the needle becomes bent or dull. A damaged needle can cause skipped stitches or fabric damage. Refer to section 3.4 for needle installation instructions.
6. Risoluzione Dei Problemi
Questa sezione affronta i problemi più comuni che potresti riscontrare. Per problemi non elencati qui, contatta l'assistenza clienti.
| Problema | Possibile causa | Soluzione |
|---|---|---|
| Punti saltati | Ago sbagliato, ago piegato, infilatura non corretta. | Sostituire l'ago, reinfilare la macchina, assicurarsi che il tipo di ago sia corretto per il tessuto. |
| Rottura del filo | Incorrect threading, tension too tight, damaged needle, poor quality thread. | Re-thread, adjust tension, replace needle, use good quality thread. |
| Bobbin Thread Jamming | Improperly wound bobbin, incorrect bobbin insertion, lint in bobbin case. | Re-wind bobbin, re-insert bobbin correctly, clean bobbin area. |
| La macchina non si avvia | Power cord not connected, machine switched off, foot pedal not connected. | Check power connections, ensure switch is ON, connect foot pedal. |
7. Specifiche
| Caratteristica | Dettaglio |
|---|---|
| Marca | SINGER |
| Numero di modello | Inizio 1306 |
| Peso dell'articolo | 4.3 kg |
| Dimensioni del prodotto (LxWxH) | Dimensioni: 35 x 18 x 29 cm |
| Voltage | 220V |
| Cosatage | 70 Watt |
| Punti incorporati | 6 (4 basic, 1 decorative, 1 buttonhole) |
| Tipo di asola | automatico a 4 fase |
| Materiale del telaio | Metallo per impieghi gravosi |
| Componenti inclusi | All Purpose Foot, Zipper Foot, Buttonhole Foot, Darning Plate, Pack of Needles, Bobbins, Spool Pin Felts, Needle Plate Screwdriver, Seam Ripper / Lint Brush, Vinyl Dust Cover |

Image 7.1: Product dimensions of the SINGER Start 1306 Sewing Machine.
8. Garanzia e supporto
Your SINGER Start 1306 Sewing Machine comes with a manufacturer's warranty. Please refer to the warranty card included with your product for specific terms, conditions, and duration. For technical assistance, service, or to inquire about replacement parts, please contact SINGER customer support through their official websito o le informazioni di contatto fornite nella documentazione di garanzia.
Ask a question about this manual
Ask about setup, troubleshooting, compatibility, parts, safety, or missing instructions. Manuals+ will review the question and use this page’s manual context to help answer it.