
Introduzione
This manual provides essential instructions for the safe and effective use, assembly, operation, maintenance, and troubleshooting of your Mintcraft SX-8B 2 Gallon Polyethylene Compression Sprayer. Please read this manual thoroughly before operating the sprayer and retain it for future reference.
The Mintcraft SX-8B is a general-purpose pressure sprayer designed for applying water, fertilizers, herbicides, and pesticides. It features a non-corrosive polyethylene construction, a heavy-duty hose, and a sprayer wand with an adjustable nozzle and on/off trigger lock.
Informazioni importanti sulla sicurezza
ATTENZIONE: la mancata osservanza di queste istruzioni di sicurezza può causare gravi lesioni o danni alla proprietà.
- Quando si maneggiano sostanze chimiche, indossare sempre dispositivi di protezione individuale (DPI) adeguati, come guanti, occhiali protettivi e maschera.
- Never use flammable liquids, hot liquids, or caustic chemicals in this sprayer.
- Do not over-pressurize the sprayer. Follow the recommended pressure levels.
- Tenere lo spruzzatore fuori dalla portata dei bambini e degli animali domestici.
- Rilasciare la pressione dallo spruzzatore dopo ogni utilizzo e prima di riporlo o sottoporlo a manutenzione.
- Ensure all connections are tight before pressurizing.
- Do not leave the sprayer unattended while pressurized.
- Dispose of chemical residues according to local regulations.
Elenco delle parti
Familiarize yourself with the components of your sprayer:
- Sprayer Tank (2 Gallon Polyethylene)
- Pump Assembly (with handle)
- Valvola di rilascio della pressione
- Tubo flessibile
- Bacchetta spruzzatrice
- Ugello regolabile
- Blocco grilletto
- Shoulder Strap (if included)
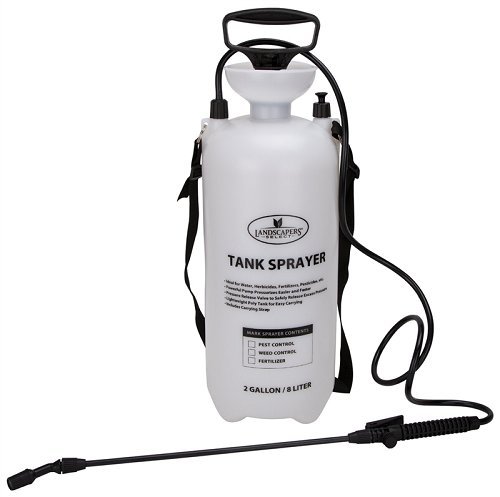
Image: The Mintcraft SX-8B 2 Gallon Polyethylene Compression Sprayer, showing the main tank, pump handle, hose, and wand assembly.
Installazione e assemblaggio
- Disimballare i componenti: Rimuovere con attenzione tutti i componenti dall'imballaggio. Verificare che non vi siano danni.
- Collegare il tubo: Securely connect the hose to the sprayer tank outlet and the sprayer wand inlet. Ensure connections are hand-tight to prevent leaks.
- Fissare la tracolla (facoltativo): If a shoulder strap is provided, attach it to the designated loops on the sprayer tank for easier carrying.
- Preparare la soluzione: Before filling, ensure your desired liquid solution is properly mixed according to its manufacturer's instructions.
- Riempire il serbatoio: Unscrew the pump assembly from the tank. Carefully pour the prepared solution into the tank, ensuring not to exceed the maximum fill line. Do not fill above the shoulder of the tank.
- Montaggio sicuro della pompa: Reinsert the pump assembly into the tank opening and screw it down tightly to create a secure seal.
Istruzioni per l'uso
- Pressurizzare lo spruzzatore: With the pump assembly securely tightened, pump the handle up and down approximately 10-20 times until resistance is felt. This builds pressure inside the tank. Do not over-pump.
- Regola l'ugello: Twist the adjustable nozzle at the end of the wand to achieve the desired spray pattern (from a fine mist to a solid stream).
- Iniziare a spruzzare: Point the wand towards the target area. Squeeze the trigger on the wand to begin spraying.
- Use Trigger Lock: For continuous spraying, push the trigger lock forward while the trigger is depressed. To stop, release the trigger lock and then the trigger.
- Mantenere la pressione: If the spray weakens, pump the handle a few more times to restore pressure.
- Rilasciare la pressione dopo l'uso: Once spraying is complete, Sempre release the pressure from the tank. To do this, pull the pressure release valve (usually a small knob or lever on the pump assembly) until all air has escaped. You will hear a hissing sound.
Manutenzione
- Pulizia dopo ogni utilizzo:
- Svuotare il serbatoio da eventuali residui di soluzione.
- Sciacquare accuratamente il serbatoio con acqua pulita.
- Fill the tank with clean water, pressurize, and spray through the wand until the tank is empty to flush the hose and nozzle.
- Release all pressure and allow all components to air dry before storage.
- Pulizia degli ugelli: If the nozzle becomes clogged, unscrew it from the wand and clean it with a small brush or by rinsing under strong water pressure. Do not use metal objects that could damage the nozzle.
- Lubrificazione delle guarnizioni: Periodically inspect the O-rings and seals on the pump assembly and wand. If they appear dry or cracked, apply a small amount of silicone grease to maintain a good seal and prevent leaks.
- Magazzinaggio: Conservare lo spruzzatore in un luogo fresco e asciutto, al riparo dalla luce solare diretta e da temperature sotto lo zero. Assicurarsi che tutta la pressione sia stata scaricata prima di riporlo.
Risoluzione dei problemi
| Problema | Possibile causa | Soluzione |
|---|---|---|
| Sprayer does not build pressure. | Loose pump assembly; Worn O-rings/seals; Clogged check valve. | Tighten pump assembly; Inspect and lubricate/replace O-rings; Clean check valve. |
| Perdite di liquido dai collegamenti. | Collegamenti allentati; O-ring/guarnizioni danneggiati. | Stringere tutti i collegamenti; ispezionare e sostituire gli O-ring/guarnizioni danneggiati. |
| Nessuno spruzzo o spruzzo debole. | Insufficient pressure; Clogged nozzle or wand; Empty tank. | Pump more to build pressure; Clean nozzle/wand; Refill tank. |
| Pressure releases too quickly. | Loose pump assembly; Faulty pressure release valve; Damaged tank. | Tighten pump assembly; Inspect pressure release valve for debris; Check tank for cracks. |
Specifiche
- Modello: SX-8B
- Capacità: 2 galloni
- Materiale: Polyethylene (non-corrosive)
- Dimensioni del prodotto: 14.96 x 22.65 x 22.24 pollici
- Peso dell'articolo: 3.19 libbre
- Produttore: ORGILL WWS-L&G (Brand: Mintcraft)
- Caratteristiche: Adjustable nozzle, on/off trigger lock, heavy-duty hose.
Garanzia e supporto
For warranty information or technical support, please refer to the documentation provided with your purchase or contact Mintcraft customer service. Keep your purchase receipt as proof of purchase.
Note: Specific warranty terms may vary. Please consult the official Mintcraft website or your retailer for the most current information.