1. Introduzione
This manual provides detailed instructions for the installation, operation, maintenance, and troubleshooting of the ASRock H81M-HDS R2.0 Micro ATX Motherboard. Please read this manual thoroughly before installing or using your motherboard to ensure proper functionality and to prevent damage.
The ASRock H81M-HDS R2.0 is designed for Intel LGA 1150 processors, supporting DDR3 memory and offering essential connectivity for a reliable computing experience.
2. Prodotto finitoview
The ASRock H81M-HDS R2.0 motherboard features the Intel H81 chipset, providing a stable platform for your system. Key features include:
- Tipo di presa: LGA1150
- Chipset: Intel H81
- Memoria: 2x DDR3/DDR3L-1600/1333/1066 DIMM Slots, Dual Channel, Non-ECC, Unbuffered, Max Capacity of 16GB
- Slot di espansione: 1x PCI Express 2.0 x16 Slot, 1x PCI Express 2.0 x1 Slot
- Magazzinaggio: 2x SATA3 Ports, 2x SATA2 Ports
- Audio: CODEC audio ad alta definizione a 5.1 canali Realtek ALC662
- Porte USB: 4x USB 3.0 Ports (2 rear, 2 via header), 8x USB 2.0 Ports (4 rear, 4 via headers)
- Uscite video: 1x VGA Port, 1x DVI-D Port, 1x HDMI Port
- Rete: 1x RJ45 LAN Port
- Fattore di forma: MicroATX
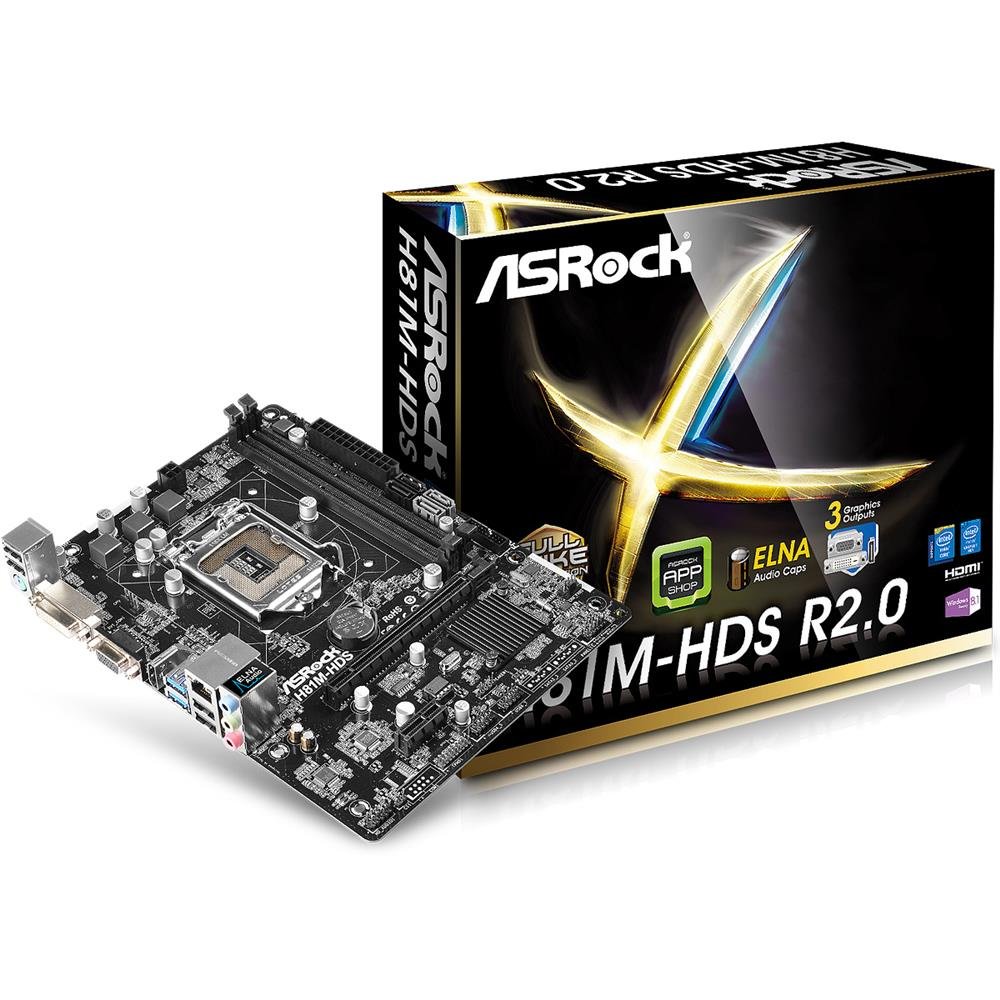
Figura 2.1: ASRock H81M-HDS R2.0 Micro ATX Motherboard. This image displays the overall layout of the motherboard, including the CPU socket, RAM slots, PCIe slots, and various connectors.
3. Configurazione e installazione
Prima di iniziare l'installazione, assicurarsi che il sistema sia spento e scollegato dalla presa a muro. Indossare un braccialetto antistatico per evitare danni ai componenti causati da scariche elettrostatiche (ESD).
3.1. Installazione della CPU
- Individuare il socket della CPU LGA 1150 sulla scheda madre.
- Spingere delicatamente verso il basso la leva di caricamento ed estrarla per aprire il coperchio del socket della CPU.
- Allineare il segno triangolare sulla CPU con il segno sul socket. Inserire con cautela la CPU nel socket, senza forzarla.
- Chiudere la piastra di carico e spingere la leva di carico nella posizione originale finché non scatta.
3.2. Installazione del dissipatore della CPU
Follow the instructions provided with your CPU cooler for proper installation. Ensure thermal paste is applied correctly between the CPU and the cooler's base.
3.3. Installazione della memoria (RAM)
- Aprire le clip su entrambe le estremità degli slot DIMM DDR3.
- Allineare la tacca sul modulo di memoria con la chiave nello slot DIMM.
- Insert the memory module firmly into the slot until the clips snap into place. For dual-channel operation, install modules in matching colored slots (if applicable, refer to motherboard diagram for specific slots).
3.4. Montaggio della scheda madre
- Installare la schermatura I/O nell'apertura posteriore del case del computer.
- Place the motherboard into the case, aligning the screw holes with the standoffs.
- Fissare la scheda madre con le viti, assicurandosi che siano ben inserite ma non troppo strette.
3.5. Collegamento dell'alimentazione
- Collegare il connettore di alimentazione ATX a 24 pin dell'alimentatore al connettore corrispondente sulla scheda madre.
- Connect the 4-pin ATX 12V power connector (CPU power) to its header.
3.6. Collegamento dei dispositivi di archiviazione
Connect your SATA hard drives or SSDs to the SATA3 (6Gb/s) or SATA2 (3Gb/s) ports using SATA data cables. Connect power cables from the power supply to each drive.
3.7. Connecting Front Panel and USB Headers
Connect the front panel connectors (power button, reset button, HDD LED, power LED) and USB headers from your case to the corresponding pins on the motherboard. Refer to the motherboard's detailed diagram for correct pin assignments.
4. Istruzioni per l'uso
4.1. Configurazione BIOS/UEFI
Upon initial boot, press Del or F2 during the POST (Power-On Self-Test) to enter the UEFI Setup Utility. Here you can configure system settings such as boot order, date/time, and hardware parameters. The ASRock UEFI is designed to be user-friendly.
4.2. Installazione del driver
After installing your operating system, install the necessary drivers for the motherboard's components (chipset, audio, LAN, graphics if using integrated) from the ASRock support website or the provided driver CD (if applicable). Ensure all drivers are up-to-date for optimal performance and stability.
5. Manutenzione
Una manutenzione regolare contribuisce a garantire la longevità e il funzionamento stabile della scheda madre e del sistema.
- Rimozione della polvere: Periodically clean dust from inside your computer case, especially from CPU coolers, case fans, and heatsinks, using compressed air. Ensure the system is powered off and unplugged before cleaning.
- Gestione dei cavi: Ensure internal cables are neatly routed to improve airflow and prevent obstruction of components.
- Aggiornamenti BIOS/UEFI: Controlla ASRock website for BIOS/UEFI updates. Updates can improve compatibility, stability, and performance. Follow ASRock's specific instructions for BIOS flashing carefully to avoid damaging the motherboard.
- Aggiornamenti driver: Keep your system drivers updated to ensure compatibility and optimal performance with your operating system and applications.
6. Risoluzione Dei Problemi
If you encounter issues with your ASRock H81M-HDS R2.0 motherboard, refer to the following common troubleshooting steps:
6.1. Nessuna alimentazione / Nessun avvio
- Verificare che tutti i cavi di alimentazione (ATX a 24 pin, ATX a 4 pin 12 V) siano collegati saldamente alla scheda madre e all'alimentatore.
- Assicurarsi che l'interruttore di alimentazione sia in posizione "ON".
- Controllare i collegamenti del pulsante di accensione del pannello frontale alla scheda madre.
- Se possibile, provare con un alimentatore diverso.
6.2. Nessuna uscita di visualizzazione
- Ensure your monitor is connected to the correct video output (VGA, DVI-D, or HDMI) on the motherboard or discrete graphics card.
- Verificare che il monitor sia acceso e impostato sulla sorgente di ingresso corretta.
- Reseat the RAM modules. Faulty or improperly seated RAM is a common cause of no display.
- If using a discrete graphics card, ensure it is properly seated in the PCIe slot and has adequate power connected.
6.3. RAM Issues (e.g., one slot not working)
- Assicurarsi che i moduli RAM siano completamente inseriti nei rispettivi slot.
- Test each RAM module individually in each slot to identify a potentially faulty module or slot.
- Check the motherboard's QVL (Qualified Vendor List) for compatible memory modules.
6.4. Instabilità del sistema / Arresti anomali casuali
- Controllare le temperature della CPU e della GPU per assicurarsi che siano entro i limiti operativi di sicurezza.
- Verify all drivers are correctly installed and up-to-date.
- Eseguire strumenti di diagnostica della memoria per verificare la presenza di errori nella RAM.
- Ensure your power supply provides sufficient and stable power to all components.
7. Specifiche
Detailed technical specifications for the ASRock H81M-HDS R2.0 Motherboard:
| Marca | AssoRock |
| Numero di modello | H81M-HDS R2.0 |
| Presa CPU | LGA1150 |
| Tipo di chipset | Intel H81 |
| Tecnologia della memoria RAM | DDR3 |
| Slot di memoria disponibili | 2 |
| Dimensione massima della memoria RAM | 16 GB |
| Velocità di clock della memoria | 1333 MHz (Supports up to 1600 MHz) |
| Interfaccia della scheda grafica | PCI-Espresso |
| Porte SATA | 2x SATA3, 2x SATA2 |
| Porte USB | 4x USB 3.0 (2 rear, 2 via header), 8x USB 2.0 (4 rear, 4 via headers) |
| Uscite video | 1x VGA, 1x DVI-D, 1x HDMI |
| Audio | Realtek ALC662 5.1-Channel HD Audio |
| Rete locale | Ethernet Gigabit |
| Fattore di forma | MicroATX |
| Peso dell'articolo | 0.6 chilogrammi |
8. Garanzia e supporto
ASRock offre una garanzia limitata per i suoi prodotti. Per i termini e le condizioni di garanzia specifici, fare riferimento alla scheda di garanzia inclusa con il prodotto o visitare il sito ufficiale ASRock. websito. Conservare la prova d'acquisto per eventuali reclami in garanzia.
For technical support, driver downloads, and BIOS updates, please visit the official ASRock support websito:
When contacting support, please have your motherboard model (H81M-HDS R2.0) and serial number ready.