
Introduzione
This manual provides detailed instructions for the setup, operation, and maintenance of your Homtime C12PRO Docking Station Speaker. The C12PRO integrates a Bluetooth speaker, FM radio, alarm clock, and dual USB charging capabilities, designed for convenient everyday use.
Contenuto della confezione
Si prega di verificare che tutti gli articoli elencati di seguito siano inclusi nel pacchetto:
- 1 x Homtime C12PRO Speaker Unit
- 1 x adattatore di alimentazione
- 1 x Manuale utente
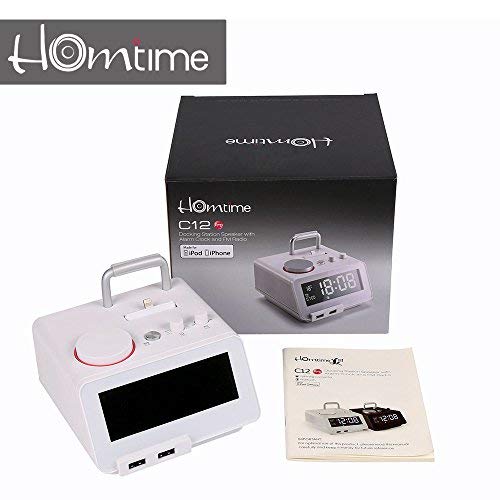
Immagine: Contents of the Homtime C12PRO package, showing the main speaker unit, power adapter, and the user manual.
Prodotto finitoview
Familiarize yourself with the various components and controls of your C12PRO unit.

Immagine: Davanti view of the Homtime C12PRO with an iPhone docked. The large digital display shows time and temperature, and the front features dual USB charging ports.

Immagine: Davanti view of the Homtime C12PRO without a phone docked. This image clearly shows the digital display, the docking connector, and the control buttons on the top surface.
Pannello frontale e display
- Ampio display LCD da 4.2 pollici: Shows time, alarm status, and room temperature (Celsius or Fahrenheit). Brightness is adjustable.
- Doppie porte di ricarica USB: Located at the front base for convenient charging of external devices.
Controlli del pannello superiore
- Connettore di aggancio: Apple Certified Lightning connector for iPod/iPhone.
- Control Buttons/Knobs: For setting time, alarm, volume, mode selection, and FM radio tuning.
Collegamenti del pannello posteriore
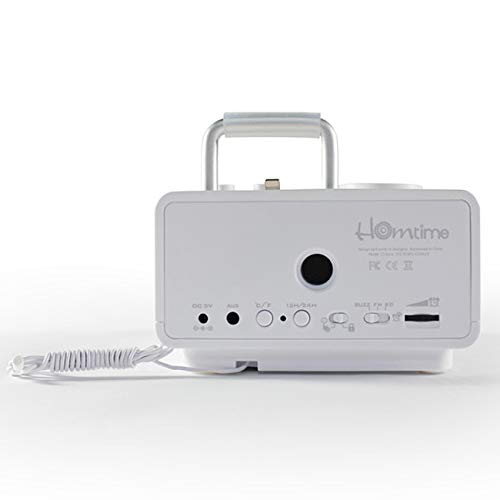
Immagine: Posteriore view of the Homtime C12PRO. This image displays the DC 9V power input, AUX-in port, 12H/24H time format button, and other rear controls.
- Ingresso alimentazione CC 9 V: Collegare qui l'adattatore di alimentazione fornito.
- Porta AUX-in: Jack da 3.5 mm per il collegamento di sorgenti audio esterne.
- 12H/24H Button: Toggles between 12-hour and 24-hour time display formats.
- Altri controlli: May include snooze/dimmer, alarm on/off, and FM antenna connection.
Impostare
- Disimballare l'unità: Carefully remove the C12PRO speaker and all accessories from the packaging.
- Connetti alimentazione: Insert the DC plug of the power adapter into the DC 9V input port on the rear of the unit. Plug the power adapter into a standard wall outlet. The display will illuminate.
- Impostazione dell'ora iniziale:
- Premere e tenere premuto il tasto IMPOSTAZIONE DELL'ORA button (location may vary, typically on top or rear).
- Utilizzare il +/- buttons or rotary knob to adjust the hour. Press IMPOSTAZIONE DELL'ORA di nuovo per confermare.
- Regolare i minuti utilizzando il +/- buttons or rotary knob. Press IMPOSTAZIONE DELL'ORA per confermare e uscire dalla modalità di impostazione dell'ora.
- Per passare dal formato 12 ore a quello 24 ore, premere il tasto 12 ore/24 ore pulsante sul pannello posteriore.
- Regola la luminosità del display: Premere il tasto SNOOZE/DIMMER button (often combined) repeatedly to cycle through brightness levels.
- Imposta l'unità di temperatura: Se applicabile, premere il ° C / ° F button to switch between Celsius and Fahrenheit display for room temperature.
Istruzioni per l'uso
Accensione/spegnimento
Premere il tasto ENERGIA button to turn the unit on or off. When off, the clock display remains active.
Impostazione della sveglia
- Premere e tenere premuto il tasto SET ALLARME pulsante. L'ora della sveglia lampeggerà.
- Utilizzare il +/- buttons or rotary knob to adjust the alarm hour. Press SET ALLARME per confermare.
- Regola i minuti della sveglia. Premi SET ALLARME per confermare.
- Select the alarm source (Buzzer, FM Radio, or Docked Device). Use +/- or rotary knob and press SET ALLARME per confermare.
- Per attivare/disattivare l'allarme, premere il tasto ALLARME ON / OFF pulsante. Quando è attivo, sul display apparirà un'icona di allarme.
- Quando suona la sveglia, premere il tasto POSTICIPARE button to temporarily silence it for a few minutes. Press ENERGIA per spegnere la sveglia per la giornata.
Funzionamento della radio FM
- Premere il tasto MODALITÀ finché sul display non compare la scritta "FM".
- Per la scansione automatica delle stazioni, tenere premuto il tasto RIPRODUCI/PAUSA button (or a dedicated SCANSIONE button). The radio will scan and save available stations.
- Per sintonizzare manualmente, utilizzare il PREC./SUCCESSIVO buttons or rotary knob to adjust the frequency.
- To select a saved station, press the PRESET pulsante e quindi utilizzare PREC./SUCCESSIVO per navigare.
- Regolare il volume utilizzando il VOLUME manopola o pulsanti.
Accoppiamento Bluetooth
- Premere il tasto MODALITÀ button until "BT" or "Bluetooth" appears on the display. The Bluetooth indicator will flash, indicating pairing mode.
- Sul tuo dispositivo mobile, attiva il Bluetooth e cerca nuovi dispositivi.
- Select "Homtime C12PRO" from the list of available devices.
- Once paired, the Bluetooth indicator on the C12PRO will stop flashing and remain solid. You can now play audio wirelessly from your device.
- Adjust volume on both the C12PRO and your connected device.
Utilizzo della Docking Station
The C12PRO features an Apple Certified Lightning connector for compatible iPod/iPhone devices.
- Carefully align your iPhone/iPod with the Lightning connector on the top of the unit.
- Gently push down until the device is securely seated.
- The C12PRO will automatically charge your device and can play audio from it.
- Premere il tasto MODALITÀ button to select the docking station as the audio source.
Ricarica USB
The unit includes dual USB ports for charging other devices.
- Connect your USB charging cable to one of the USB ports on the front of the C12PRO.
- Connect the other end of the cable to your device (e.g., Android phone, tablet).
- The C12PRO will provide power to charge your device.
Connessione AUX-in
Connect external audio players via the 3.5mm AUX-in port.
- Connect a 3.5mm audio cable (not included) from your external audio device's headphone jack to the AUX-in port on the rear of the C12PRO.
- Premere il tasto MODALITÀ finché sul display non compare la scritta "AUX".
- Play audio from your external device. Adjust volume on both the C12PRO and the external device.
Manutenzione
- Pulizia: Disconnect the power adapter before cleaning. Use a soft, dry cloth to wipe the exterior surfaces. Do not use abrasive cleaners, waxes, or solvents.
- Magazzinaggio: Se si conserva l'unità per un periodo prolungato, scollegarla dall'alimentazione e conservarla in un luogo fresco e asciutto, lontano dalla luce solare diretta e da temperature estreme.
- Batteria: The unit contains a CR2 battery (included) for clock memory backup. This battery is not user-replaceable for general operation and should only be replaced by qualified service personnel if necessary.
Risoluzione dei problemi
| Problema | Possibile causa | Soluzione |
|---|---|---|
| Nessuna alimentazione/Display spento | Adattatore di alimentazione non collegato o presa difettosa. | Assicurarsi che l'adattatore di alimentazione sia collegato saldamente all'unità e a una presa a muro funzionante. |
| Nessun suono dall'altoparlante | Volume too low; incorrect source selected; device not connected properly. | Aumentare il volume. Premere MODALITÀ to select the correct audio source (BT, FM, Dock, AUX). Reconnect Bluetooth device or docked phone. |
| L'associazione Bluetooth non riesce | C12PRO not in pairing mode; device too far; interference. | Ensure C12PRO is in BT mode and flashing. Move device closer. Turn off other Bluetooth devices. |
| Radio FM statica/scarsa ricezione | Segnale debole; antenna non estesa. | Extend the FM antenna fully. Reposition the unit for better reception. Perform auto-scan again. |
| L'allarme non suona | Allarme non attivato; volume dell'allarme troppo basso. | Ensure the alarm icon is visible on the display. Check alarm volume settings. |
| Device not charging via USB/Dock | Cable issue; device not compatible; unit not powered. | Try a different USB cable. Ensure the C12PRO is powered on. Verify device compatibility with the Lightning dock. |
Specifiche

Immagine: A table detailing the specifications of the Homtime C12PRO, including driver units, S/N ratio, Bluetooth version, range, radio frequency, power, and dimensions.
| Modello | C12 Pro |
| Unità di guida | 2x40mm |
| Rapporto segnale/rumore | >70 dB |
| Versione Bluetooth | 2.1 + EDR |
| Portata Bluetooth | 10 milioni |
| Gamma di frequenze radio | 87.5 MHz - 108 MHz |
| Dispositivi compatibili | iPad, iPhone, Android, Windows Phone, Computer |
| Adattatore di alimentazione | AC100-240V, 50/60Hz, DC 5V 3A |
| Potenza di uscita | 3W + 3W (6 Watts total) |
| Dimensioni (LxWxH) | Dimensioni: 12.8 x 12.9 x 10.7 cm |
| Peso dell'articolo | 800 grammi |
| Fonti audio | Apple Lightning, USB, Bluetooth, Aux-in |
| Tipo di visualizzazione | Digital LCD (4.2 inches) |
| Batterie | 1 CR2 battery required (included for clock memory) |
Garanzia e supporto
Informazioni sulla garanzia
The Homtime C12PRO comes with a Garanzia limitata di 1 anni from the date of purchase. This warranty covers manufacturing defects in materials and workmanship under normal use. It does not cover damage caused by misuse, accidents, unauthorized modifications, or external causes.
Conservare la prova d'acquisto per eventuali richieste di garanzia.
Assistenza clienti
For technical assistance, troubleshooting not covered in this manual, or warranty inquiries, please contact Homtime customer support. Refer to the contact information provided with your product packaging or visit the official Homtime websito per i dettagli di supporto più aggiornati.