
1. Introduzione
The Lutron Grafik Eye QSGR-3PJA is a sophisticated 3-zone control unit designed for advanced lighting management in both residential and commercial environments. This system integrates an annual timer and offers versatile control over various lighting fixtures from different manufacturers. Users can easily recall pre-set lighting scenes with a single touch or via remote control. The unit supports a wide range of light sources, including LEDs, incandescent lamps, basso voltage fixtures with electronic transformers, and fluorescent lamps, when used with a dedicated interface.
Key features include an easy-to-read LCD "Infoscreen" for displaying system status and energy-saving guidelines, built-in weekly and annual timers for automated lighting patterns, and automatic calculation of sunrise/sunset times for major cities to synchronize timer control. The QSGR-3PJA also supports integration with PICO remotes and wireless sensors, enabling both traditional scene control and zone-specific control. Lutron's patented Real Time Illumination Stability System (RTISSTM) ensures consistent dimming levels even under unstable power conditions.
2. Informazioni sulla sicurezza
Please read and understand all safety instructions before installing or operating the Lutron Grafik Eye QSGR-3PJA. Failure to follow these instructions may result in electric shock, fire, or property damage.
- Sicurezza elettrica: Always ensure the main power supply to the circuit breaker is OFF before performing any installation, wiring, or maintenance.
- Messa a terra: Always connect the ground wire before installation to prevent malfunctions due to noise and for safety.
- Cablaggio: Do not bend, twist, or place main power wires near heat sources. Follow load manufacturer instructions for transformers. Do not attach outlets or receptacles to the output side.
- Collegamento elettrico: Do not connect 100V power directly to the unit if not specified. Do not connect to power solely for ON/OFF control of loads.
- Dissipazione del calore: All Lutron Grafik Eye QS modules generate heat during use. Ensure adequate ventilation and maintain specified clearances (at least 12mm left/right, 11mm top/bottom) when installing in an existing box.
- Posizionamento: Avoid installing near electronic devices such as copiers, printers, dryers, microwave ovens, or medical equipment, as noise from these devices may cause malfunctions.
- Installazione professionale: L'installazione deve essere eseguita da un elettricista qualificato, nel rispetto di tutte le normative elettriche locali e nazionali.
3. Prodotto finitoview
The Lutron Grafik Eye QSGR-3PJA is a central control unit for managing up to three independent lighting zones. It features a user-friendly interface with dedicated buttons for scene selection, dimming, and timer functions, complemented by an informative LCD display.
3.1. Caratteristiche del pannello frontale

Figure 3.1: Front Panel of the QSGR-3PJA Unit
This image displays the front of the Lutron Grafik Eye QSGR-3PJA. Visible components include the central Infoscreen LCD, individual dimming buttons for each of the three zones, scene selection buttons, and dedicated buttons for timer functions and confirmation (OK). A mini USB terminal and an external receiver are also indicated.
- Infoscreen LCD: Displays system status, energy-saving guidelines, and various information.
- Zone Dimming Buttons: Individual controls for adjusting brightness in each of the three lighting zones.
- Pulsanti di selezione scena: Allows for one-touch recall of pre-programmed lighting scenes.
- Pulsante Timer: Accesses weekly and annual timer settings.
- Pulsante OK: Conferma le selezioni e le impostazioni.
- Mini USB Terminal: For configuration and data transfer (usage details in advanced manual).
- External Receiver: Per segnali di controllo remoto.
3.2. Caratteristiche principali
- 3-zone lighting control with individual brightness adjustment.
- Preset scene recall with adjustable fade times.
- Integrated weekly and annual timers with automatic sunrise/sunset calculation.
- Compatibility with various light sources (LED, incandescent, fluorescent, low-voltage) via dedicated interfaces.
- Supports PICO remotes and wireless sensors for enhanced control.
- Lutron's RTISSTM technology for stable dimming performance.
4. Configurazione e installazione
Proper installation is crucial for the safe and effective operation of the Grafik Eye QSGR-3PJA. Refer to the diagrams and instructions below carefully.
4.1. Dimensioni e montaggio
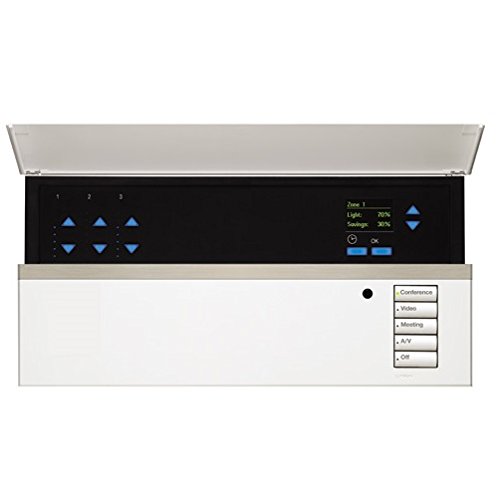
Figura 4.1: dimensioni dell'unità
This diagram illustrates the physical dimensions of the QSGR-3PJA unit, including front, side, and top measurements, essential for planning installation space.

Figure 4.2: Installation Diagram and Precautions
Questa immagine fornisce una descrizione dettagliata view of the unit with its cover open, highlighting internal wiring connections and mounting points. It also includes important precautions for installation, such as ensuring proper grounding and avoiding heat sources.
Metodo di montaggio:
- Turn off the circuit breaker for the dimmer's power supply.
- Strip approximately 10mm from the power wiring.
- Use VVF1.6mm or VVF2.0mm wire to connect the power circuit.
- Secure the unit to the wall.
- Attach the unit's cover.
- Turn on the unit's power.
- Collega il carico.
Precauzioni per l'installazione:
- Always connect ground before installation.
- Main power wires should not be bent, twisted, or placed near heat sources. Follow load manufacturer instructions. Do not attach outlets to the output.
- Do not connect 100V power directly.
- Do not connect to power for ON/OFF control of loads.
- Do not overtighten the knob screw.
- Never connect the fixed main unit to power before completing all wiring.
- Turn off all power sources connectable to 100V before working on this device.
- When connecting NGRX-P5, NGRX-P6, use dedicated detectors and combine with wireless sensors and PICO remotes.
- Install the unit at eye level, on the right side when viewscattata dal fronte.
- When installing in an existing box, leave a gap of 12mm or more on the left and right, and 11mm or more on the top and bottom for heat dissipation.
- Avoid installing near electronic devices (copiers, printers, dryers, microwaves, medical equipment) to prevent malfunctions from noise.
4.2. Schemi elettrici

Figura 4.3: Schema elettrico interno
This diagram illustrates the internal wiring connections for the QSGR-3PJA, including power input (AC100V 50/60Hz), zone output terminals, occupancy sensor input, and 1-pole signal input. It also details the maximum capacities and compatible load types.

Figure 4.4: External Signal Control Wiring
This diagram shows how to connect the QSGR-3PJA for external signal control, including RS232 and other data communication lines. It emphasizes the importance of proper grounding and using dedicated cables for external control functions.

Figure 4.5: Multiple Unit Wiring Example
Questo diagramma fornisce un esempioample of wiring two QS control units and their auxiliary controls, connected to one QSGR-3PJA. It specifies signal line lengths, dedicated cable usage, and power adapter requirements (QSGR-3PJA-1-50 power adapter sold separately).
Linee guida generali per il cablaggio:
- To prevent noise-induced malfunctions, always connect the ground.
- When connecting QS control units and QSGR-3PJA, use dedicated cables and connect the power circuit.
- The main control unit can be connected up to 150m.
- Occupancy sensors are only compatible with Lutron (LCS-CDT-300R-WH/JA) models.
- For external signal control, use the dedicated cable for QSGR-3PJA.
- Terminal block voltage is DC24V power circuit; the white wire is the signal wire. Set to OFF/DC0-5V.
- When using power modules or interfaces for zone output, refer to the wiring diagrams of those specific devices.
- Do not connect this device when using NGRX-P5 or transformers with circuit breakers.
- Connect control wires to signal wires.
- Lutron power lines should not be installed in the same conduit as control installation locations, other management devices, relays, or other power/signal lines.
- Do not supply control power from other device power sources.
- When connecting two Grafik Eye QS control units, connect only the auxiliary control of that group, and do not connect to the control unit of another group.
- The QSGR-3PJA requires a QSGR-3PJA-1-50 power adapter (sold separately).
5. Istruzioni per l'uso
The Lutron Grafik Eye QSGR-3PJA offers intuitive control over your lighting environment. Here are the basic operating procedures:
5.1. Scene Recall
- Selecting a Scene: Premi uno dei Scene Selection Buttons on the front panel to instantly recall a pre-programmed lighting scene.
- Adjusting Fade Time: The system allows you to set a fade time for scenes, enabling lights to change brightness gradually. Refer to the advanced programming guide for detailed instructions on setting fade times.
5.2. Zone Dimming
- Controllo individuale delle zone: Utilizza l'apposito Zone Dimming Buttons for each of the three zones to manually adjust the brightness level.
5.3. Funzioni del timer
- Accessing Timer Settings: Premere il tasto Pulsante timer to access the weekly and annual timer programming menus.
- Pianificazione: Program specific lighting patterns to activate automatically based on your schedule. The unit can also automatically adjust to sunrise and sunset times for major cities.
5.4. Infoscreen Display
- IL Infoscreen LCD provides real-time information on system status, current scene, dimming levels, and energy-saving indicators.
5.5. Controllo remoto
- The unit is compatible with Lutron PICO remotes and wireless sensors for convenient remote operation. Refer to the PICO remote manual for pairing and usage instructions.
6. Manutenzione
The Lutron Grafik Eye QSGR-3PJA is designed for long-term reliability with minimal maintenance. Follow these guidelines to ensure optimal performance:
- Pulizia: Gently wipe the unit's surface with a soft, dry cloth. Do not use abrasive cleaners, solvents, or excessive moisture, as these can damage the finish or internal components.
- Ventilazione: Assicurarsi che le aperture di ventilazione non siano ostruite per consentire una corretta dissipazione del calore.
- Controlli regolari: Periodically check all wiring connections to ensure they are secure. If any loose connections are found, turn off the main power before tightening.
- Ispezione professionale: For any internal issues or complex maintenance, contact a qualified Lutron service technician.
7. Risoluzione Dei Problemi
If you encounter issues with your Lutron Grafik Eye QSGR-3PJA, refer to the following common problems and solutions:
| Problema | Possibile causa | Soluzione |
|---|---|---|
| L'unità non si accende. | Nessuna alimentazione; interruttore automatico scattato; cablaggio errato. | Check main power supply and circuit breaker. Verify wiring connections. |
| Lights do not dim or respond. | Incorrect load type; wiring issue; scene not properly programmed. | Ensure compatible load types are connected. Check wiring. Reprogram the scene. |
| Telecomando non funzionante. | PICO remote not paired; battery low; obstruction. | Ensure PICO remote is paired. Replace battery. Remove obstructions between remote and unit. |
| Infoscreen is blank or displays error. | Problema di alimentazione; guasto interno. | Cycle power to the unit. If error persists, contact support. |
| L'unità è calda al tatto. | Insufficient ventilation; overloaded circuit. | Ensure proper clearances for ventilation. Check total load capacity. |
If the problem persists after attempting these solutions, please contact Lutron customer support or a qualified electrician.
8. Specifiche
Detailed technical specifications for the Lutron Grafik Eye QSGR-3PJA control unit:
| Caratteristica | Dettaglio |
|---|---|
| Marca | Lutron |
| Numero di modello del prodotto | QSGR-3PJA |
| Alimentazione nominale | AC100V (±10V) 50/60Hz |
| Consumo energetico | 10W (Unit only) |
| Load Capacity (per zone) | 600 W/VA |
| Load Capacity (total for all zones) | 1600 W/VA |
| Numero di zone | 3 |
| Display | Infoscreen LCD |
| Tipi di carico compatibili | Incandescenteamps, electromagnetic transformer low-voltage fixtures. With separate interface: LED, fluorescent lamps, electronic transformer low-voltage fixtures, DMX, ON/OFF fixtures. |
| Temperatura ambiente di esercizio | da 0°C a 40°C (da 32°F a 104°F) |
| Umidità ambiente di funzionamento | 90% o meno, senza condensa |
| Cablaggio consigliato | 1.6mm or 2.0mm solid wire |
| Max Wiring Length | Up to 5m for VVT-1.6mm solid wire |
| Max Connected Units (System) | Up to 100 main control units and QS units combined |
| Max Occupancy Sensors | Up to 180 per main control unit |
| Funzione timer | Weekly/Annual Timer |
| Controllo remoto senza fili | PICO Remote compatible |
| Dimensioni del pacco | Dimensioni: 45 x 35 x 20 cm |
| Peso dell'articolo | 1 chilogrammo |
| Accessori inclusi | Unità principale |
| Prima data disponibile | 2015/10/16 |
9. Garanzia e supporto
For warranty information, technical support, or service inquiries regarding your Lutron Grafik Eye QSGR-3PJA, please refer to the official Lutron website or contact your local Lutron distributor.
- Garanzia: Specific warranty terms and conditions may vary by region. Please consult your purchase documentation or the official Lutron websito per i dettagli.
- Supporto tecnico: For assistance with installation, programming, or troubleshooting, contact Lutron customer support. Have your model number (QSGR-3PJA) and purchase date ready.
- Risorse online: Visit the official Lutron website for additional product documentation, FAQs, and software updates.


