
1. Introduzione
This manual provides essential instructions for the installation, operation, and maintenance of your HP Compaq 6005 Pro Socket AM3 System Motherboard (P/N 531966-001). This motherboard is designed for use in personal computers and supports AMD Socket AM3 processors. Please read this manual thoroughly before proceeding with installation or operation.
2. Informazioni sulla sicurezza
Osservare le seguenti precauzioni di sicurezza per evitare danni alla scheda madre o lesioni personali:
- Scollegare sempre l'alimentatore dalla presa a muro prima di installare o rimuovere qualsiasi componente.
- Wear an anti-static wrist strap and work on an anti-static mat to prevent electrostatic discharge (ESD) damage to sensitive components.
- Maneggiare la scheda madre tenendola per i bordi, evitando il contatto con componenti e connettori.
- Assicurare una corretta ventilazione all'interno del case del computer per evitare il surriscaldamento.
- In caso di dubbi su una qualsiasi fase dell'installazione, consultare un tecnico qualificato.
3. Componenti della scheda madreview
Familiarize yourself with the key components and connectors on your HP Compaq 6005 Pro motherboard.

Figura 3.1: Top-down view of the HP Compaq 6005 Pro motherboard, showing the CPU socket, RAM slots, and various chipsets.
The motherboard features an AMD Socket AM3 for compatible processors, four DDR3 DIMM slots for memory, and various expansion slots for additional cards. The rear I/O panel provides connectivity for peripherals.
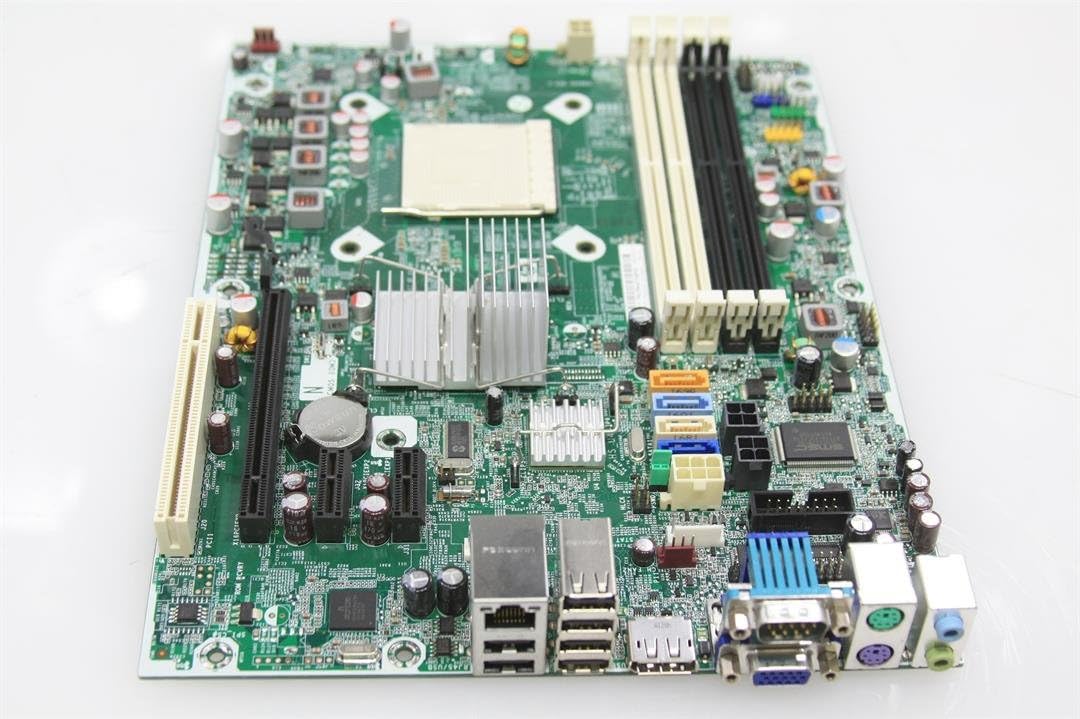
Figura 3.2: Rear I/O panel of the HP Compaq 6005 Pro motherboard, featuring VGA, DisplayPort, DVI, USB ports, Ethernet, and audio jacks.
Key areas include:
- Socket CPU (AM3): For installing the central processing unit.
- Slot DIMM: For installing DDR3 memory modules.
- Slot PCIe: Per schede grafiche e altre schede di espansione.
- Porte SATA: For connecting storage devices like hard drives and SSDs.
- Connettori di alimentazione: Main 24-pin ATX and 4-pin CPU power connectors.
- Connettori del pannello frontale: For case buttons, LEDs, and front USB/audio ports.

Figura 3.3: Another perspective of the HP Compaq 6005 Pro motherboard, highlighting expansion slots and internal connectors.
4. Configurazione e installazione
Per installare correttamente la scheda madre e i suoi componenti, seguire questi passaggi.
4.1. Lista di controllo pre-installazione
- Computer case with appropriate standoffs.
- Compatible AMD Socket AM3 processor.
- DDR3 memory modules.
- CPU cooler with thermal paste.
- Alimentatore (PSU).
- Screwdriver and anti-static wrist strap.
4.2. Installazione della scheda madre
- Installare la schermatura I/O nell'apertura posteriore del case del computer.
- Posizionare con attenzione la scheda madre nel case, allineando i fori delle viti con i distanziatori.
- Fissare la scheda madre con le viti, assicurandosi che siano ben inserite ma non troppo strette.
4.3 Installazione della CPU
- Sollevare la leva del socket della CPU.
- Allineare il segno triangolare sulla CPU con il segno corrispondente sul socket.
- Inserire delicatamente la CPU nel socket senza forzarla.
- Abbassare la leva del socket per fissare la CPU.
- Apply a thin, even layer of thermal paste to the CPU's surface.
- Install the CPU cooler according to its manufacturer's instructions, ensuring good contact with the CPU.
4.4. Installazione della memoria (RAM)
- Aprire le clip su entrambe le estremità dello slot DIMM.
- Allineare la tacca sul modulo di memoria DDR3 con la chiave nello slot DIMM.
- Premere con decisione su entrambe le estremità del modulo di memoria finché le clip non scattano in posizione.
4.5. Collegamenti di alimentazione
- Connect the 24-pin ATX power cable from the PSU to the main power connector on the motherboard.
- Connect the 4-pin CPU power cable from the PSU to the CPU power connector near the CPU socket.
4.6. Storage Devices and Expansion Cards
- Collegare i cavi dati SATA dai dispositivi di archiviazione (HDD/SSD) alle porte SATA sulla scheda madre.
- Install any necessary expansion cards (e.g., graphics card) into the appropriate PCIe slots and secure them with screws.
4.7. Pannello frontale e connessioni periferiche
- Connect the front panel cables (power button, reset button, HDD LED, power LED, front USB, front audio) to their respective headers on the motherboard. Refer to your case manual for specific pin assignments.
- Connect external peripherals such as keyboard, mouse, monitor, and network cable to the rear I/O ports.
5. Istruzioni per l'uso
5.1. Primo avvio
- After all components are installed and connected, connect the power cord to the PSU and turn on the power switch.
- Premere il pulsante di accensione sul case del computer.
- Il sistema dovrebbe accendersi e sul monitor dovrebbe apparire una schermata.
5.2. Configurazione BIOS/UEFI
Per accedere all'utilità di configurazione BIOS/UEFI, premere il tasto designato (comunemente F10 or F12 for HP systems) repeatedly during the initial boot sequence. In the BIOS/UEFI, you can configure system settings, boot order, and monitor hardware status.
5.3. Installazione del sistema operativo
Once the system is booting correctly, you can proceed with installing your preferred operating system (e.g., Windows 10) from a bootable USB drive or DVD.
6. Manutenzione
6.1. Pulizia
Regularly clean dust from the motherboard, CPU cooler, and case fans using compressed air. Ensure the system is powered off and unplugged before cleaning. Avoid using liquid cleaners directly on components.
6.2. Aggiornamenti del BIOS
Controllare periodicamente il supporto ufficiale HP website for BIOS/firmware updates. BIOS updates can improve system stability, compatibility, and performance. Follow HP's instructions carefully when performing a BIOS update to avoid system damage.
7. Risoluzione Dei Problemi
In caso di problemi, fare riferimento ai seguenti passaggi comuni per la risoluzione dei problemi:
- Nessun potere: Ensure all power cables (24-pin ATX, 4-pin CPU) are securely connected. Check the PSU switch and wall outlet.
- Nessuna visualizzazione: Verify the monitor is connected to the correct video output (VGA, DVI, or DisplayPort) and is powered on. Reseat the graphics card (if applicable) and RAM modules.
- Segnali acustici di sistema: Listen for beep codes during startup. These codes often indicate specific hardware issues (e.g., memory failure, graphics card issue). Consult the HP support website for a list of beep codes for your model.
- Instabilità/arresti anomali del sistema: Check for overheating (monitor temperatures in BIOS). Ensure all drivers are up to date. Test memory modules individually.
- Componente non rilevato: Reseat the component (e.g., hard drive, expansion card). Check cable connections. Verify BIOS settings.
8. Specifiche
Detailed technical specifications for the HP Compaq 6005 Pro Motherboard (P/N 531966-001).
| Caratteristica | Specificazione |
|---|---|
| Marca | HP |
| Nome del modello | HP Compaq 6005 Pro |
| Numero di modello | 531966-001 |
| Presa CPU | Presa AMD AM3 |
| Processori compatibili | AMD Phenom II, Athlon II, AMD FX |
| Tipo di chipset | AMD 760MP |
| Tecnologia della memoria RAM | DDR3 |
| Slot di memoria disponibili | 4 slot DIMM |
| Dimensione massima della memoria RAM | 16 GB |
| Velocità di clock della memoria | Up to 2133 MHz (depending on CPU/RAM) |
| Interfaccia della scheda grafica | PCI Express x16 |
| Slot di espansione | 1x PCIe x16, 2x PCIe x1, 1x PCI |
| Total SATA Ports | 4 SATA2.0 |
| Tipo di connettore di alimentazione principale | ATX a 24 pin |
| Porte I/O posteriori | 6x USB 2.0, 1x VGA, 1x DVI-D, 1x DisplayPort, 1x RJ-45 Ethernet, Audio In/Out/Mic, 2x PS/2 |
| Dispositivi compatibili | Personal computer |
| Piattaforma | Windows 10 (e versioni precedenti compatibili) |
| Fattore di forma | Micro-ATX |
9. Informazioni sulla garanzia
For specific warranty terms and conditions related to your HP Compaq 6005 Pro Motherboard, please refer to the original purchase documentation or contact HP customer support directly. Warranty coverage may vary based on region and point of purchase.
10. Supporto
For additional assistance, driver downloads, updated documentation, or to contact technical support, please visit the official HP support websito:
When contacting support, please have your motherboard model number (531966-001) and any relevant system information ready.