1. Introduzione
The Noyafa NF-909C is a compact and easy-to-use 2-in-1 testing instrument designed for optical fiber networks. It integrates both an optical power meter and an optical light source, making it suitable for absolute optical power measurements and insertion loss tests. This device offers a wide range of power measurement, high accuracy, and stable output, providing a cost-effective solution for fiber optic testing.
2. Informazioni sulla sicurezza
- Leggi il manuale: Before operating the device, thoroughly read and understand this user manual.
- Sicurezza della batteria: Use only specified 1.5V batteries (3x AAA). Do not mix old and new batteries or different types of batteries. Remove batteries if the device will not be used for an extended period.
- Sicurezza laser: The optical light source emits laser radiation. NON FARE look directly into the optical output port or into a fiber connected to the light source. Direct exposure to laser light can cause severe eye damage.
- Condizioni ambientali: Operate the device within the specified operating temperature range (-10°C to +60°C). Avoid exposure to extreme temperatures, humidity, or dust.
- Pulizia: Keep optical connectors clean. Use only approved cleaning methods and materials to avoid damaging the fiber end-faces.
- Manutenzione: Non tentare di aprire o riparare il dispositivo. Per qualsiasi intervento di assistenza, rivolgersi a personale qualificato.
3. Contenuto della confezione
Verificare che tutti gli articoli siano presenti e in buone condizioni al momento del disimballaggio:
- Noyafa NF-909C Fiber Optic Tester Unit
- Manuale d'uso
- Protective Cap for Optical Ports
- (Batteries may or may not be included depending on the retailer)
4. Prodotto finitoview
The NF-909C features a clear LCD display, intuitive control buttons, and standard optical connectors for versatile use.
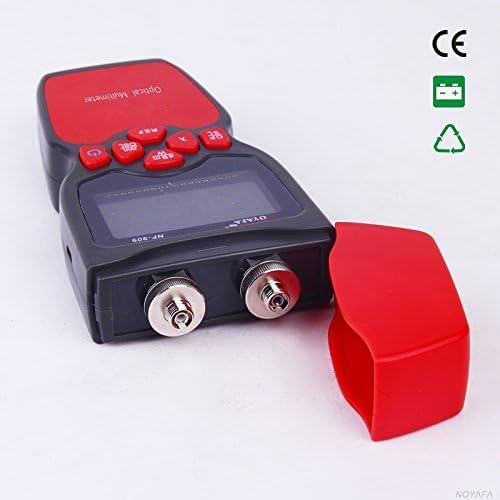
Figura 1: Davanti view of the Noyafa NF-909C Fiber Optic Tester. This image shows the device's display screen, the red control buttons (Power, REF, dBm/W, λ, Hz), and the two optical input/output ports on the front, protected by a red cap. The device is black and red.
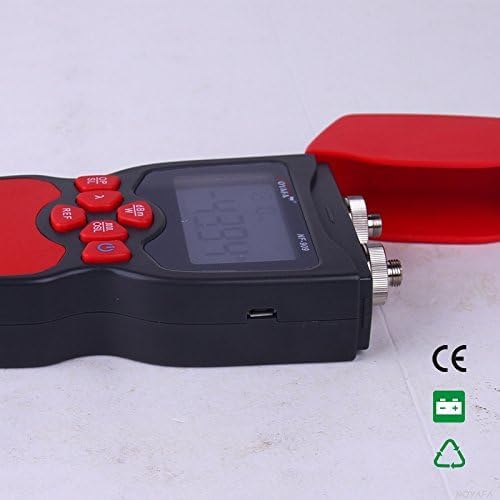
Figura 2: Lato view of the Noyafa NF-909C Fiber Optic Tester. This image highlights the micro USB port located on the side of the device, which may be used for power or data transfer, though its primary function is typically for charging or external power supply. The red protective cap is shown detached.
Componenti chiave:
- Schermo LCD: Shows measurement readings, selected wavelength, unit, and battery status.
- Pulsanti di controllo: Power On/Off, Reference (REF), Unit (dBm/W), Wavelength (λ), Frequency (Hz).
- Optical Power Meter Input: Typically supports SC, ST, LC connectors (optional).
- Optical Light Source Output: Typically FC connector (SC, ST, LC optional).
- Vano batteria: Located on the rear, for 3x 1.5V batteries.
- Porta micro USB: For power supply or charging (refer to Figure 2).
5. Impostazione
5.1 Installazione della batteria
- Individuare il coperchio del vano batteria sul retro del dispositivo.
- Per aprirlo, far scorrere o sganciare il coperchio.
- Inserire tre (3) batterie AAA da 1.5 V, assicurandosi della corretta polarità (+/-) come indicato all'interno del vano.
- Riposizionare saldamente il coperchio del vano batteria.
5.2 Accensione iniziale
Premere e tenere premuto il tasto Energia button to turn on the device. The LCD display will illuminate, showing the current mode and settings.
6. Istruzioni per l'uso
6.1 Optical Power Meter Mode
This mode measures the absolute optical power or relative loss in optical fiber networks.
- Connetti Fibra: Connect the optical fiber to be tested to the Power Meter input port. Ensure the connector is clean.
- Seleziona la lunghezza d'onda: Premere il tasto λ button to cycle through the available calibrated wavelengths: 850nm, 1300nm, 1310nm, 1490nm, 1550nm, 1625nm. Select the wavelength matching your light source.
- View Misurazione: The display will show the optical power in dBm.
- Cambia unità: Premere il tasto dBm/W button to switch between dBm and W (Watts) units.
- Set Reference (REF): For relative measurements (loss), connect a known good fiber to a stable light source and the power meter. Press the RIF. button to set the current power reading as the reference (0dB). Subsequent measurements will show the loss relative to this reference.
- Frequency Identification: The power meter can identify modulation frequencies from 10Hz to 60KHz. If the incoming signal is modulated, the frequency will be displayed.
6.2 Optical Light Source Mode
This mode provides a stable optical signal for testing fiber optic cables.
- Connetti Fibra: Connect the optical fiber to be tested to the Light Source output port. Ensure the connector is clean.
- Seleziona la lunghezza d'onda: Premere il tasto λ button to cycle through the available wavelengths: 1310nm and 1550nm. Select the desired wavelength.
- Select Modulation Frequency: Premere il tasto Hz button to cycle through modulation frequencies: 270Hz, 1KHz, 2KHz, or continuous wave (CW).
- Segnale di uscita: The device will emit a stable optical signal at the selected wavelength and modulation.
6.3 Funzione di spegnimento automatico
The device features an auto-off function to conserve battery life. If no operation is performed for approximately 15 minutes, the device will automatically power off. Press the Energia pulsante per riaccenderlo.
7. Manutenzione
- Cleaning Optical Connectors: Always ensure optical connectors are clean before use. Use lint-free wipes and appropriate optical cleaning solutions. Dirty connectors can lead to inaccurate measurements and damage to the device or fiber.
- Sostituzione della batteria: When the battery indicator on the display shows low power, replace all three 1.5V AAA batteries promptly.
- Magazzinaggio: When not in use, store the device in a dry, cool place, away from direct sunlight and extreme temperatures. Always replace the protective caps on the optical ports to prevent dust and damage.
- Pulizia esterna: Pulire l'esterno del dispositivo con un panno morbido, damp panno. Non usare detergenti abrasivi o solventi.
8. Risoluzione Dei Problemi
- Il dispositivo non si accende:
- Controllare che le batterie siano installate correttamente e con la giusta polarità.
- Sostituire con batterie nuove.
- Inaccurate power meter readings:
- Ensure optical connectors are clean.
- Verify the selected wavelength on the power meter matches the light source wavelength.
- Check if the fiber under test is properly connected and not damaged.
- No light output from light source:
- Ensure the device is powered on and in light source mode.
- Controllare il livello della batteria.
- Verify the fiber is properly connected to the output port.
- Auto-off activates too quickly:
- The auto-off is fixed at 15 minutes of inactivity. This is normal operation.
9. Specifiche
| Caratteristica | Specificazione |
|---|---|
| Optical Power Meter Module | |
| Detector Measurement Range | -50 ~ +26 dBm |
| Lunghezze d'onda calibrate | 850, 1300, 1310, 1490, 1550, 1625 nm |
| Risoluzione | 0.01 dBm |
| Identification Frequency Range | 10Hz ~ 60KHz |
| Connettore ottico | SC, ST, LC (optional) |
| Optical Light Source Module | |
| Emitter Wavelengths | 1310 / 1550 nm (other wavelengths customizable) |
| Potenza di uscita | -7 dBm |
| Stabilità dell'output | 0.05 dB / 15 mins; 0.1 dB / 8 hours |
| Modulation Frequencies | 270 Hz, 1 KHz, 2 KHz |
| Connettore ottico | FC (SC, ST, LC optional) |
| Specifiche generali | |
| Alimentazione elettrica | 3 batterie AAA da 1.5 V |
| Tempo di spegnimento automatico | 15 minuti (circa) |
| Temperatura di esercizio | Temperatura di esercizio -10°C ~ +60°C |
| Dimensioni (L x P x A) | Dimensioni: 160 x 75 x 32 mm |
| Peso | 400 g (unit only) / 150 g (item weight from specs) |
| Volume di esercizio minimotage | 1.5 Volt |
| Massimo volume di eserciziotage | 5 Volt |
| Specifica Met | UL 61010-1, IEC 61010-2-030 |
| Produttore | Shenzhen Noyafa Electronic |
10. Garanzia e supporto
For warranty information, technical support, or service inquiries, please refer to the warranty card included with your product or contact your authorized Noyafa dealer or the manufacturer directly. Keep your purchase receipt as proof of purchase.