
LUX P711-010
Lux Pro Home Thermostat P711 User Manual
Model: P711-010 | 7-Day Programmable: 1 Heat & 1 Cool Stage
1. Prodotto finitoview
The Lux Pro Home Thermostat Model P711-010 is a versatile 7-day programmable thermostat designed for 1 heat and 1 cool stage HVAC systems. It offers flexible temperature control options, including 7-day, 5/2-day programming, or non-programmable settings. Key features include an easy-view backlight, keypad lock for security, and customizable display options for Fahrenheit or Celsius.
This thermostat is dual-powered, operating on 2 AA alkaline batteries (included) or a 24-volt system, ensuring reliable performance. It is designed for easy installation and intuitive operation, making it a convenient solution for managing your home's heating and cooling.

Figura 1: Fronte view of the Lux Pro P711 Thermostat, showing the display, fan and system mode switches, and control buttons.

Figure 2: Labeled diagram of the P711 control panel, indicating the LCD Display Screen, Fan Mode Switch, System Mode Switch, SET, NEXT, HOLD buttons, and UP and DOWN buttons.
2. Informazioni sulla sicurezza
Before installation or operation, please read all instructions carefully. Failure to follow these instructions could result in property damage or personal injury.
- Prima di installare o effettuare la manutenzione del termostato, disattivare sempre l'alimentazione del sistema di riscaldamento/raffreddamento tramite il fusibile principale o il pannello dell'interruttore automatico.
- Assicurarsi che tutti i collegamenti elettrici siano sicuri e conformi alle normative elettriche locali.
- Do not short (jumper) across the electrical terminals on the thermostat base.
- Questo termostato è progettato per bassi volumitage (24V) systems. Do not use with line voltagsistemi e (120V/240V).
- Tenere le batterie fuori dalla portata dei bambini. Smaltire le batterie usate in modo appropriato.
3. Installazione
3.1. Compatibilità
The P711 thermostat is compatible with a variety of 24V heating and cooling systems. Refer to the compatibility chart below to ensure your system is supported.

Figure 3: System Compatibility Chart for the P711 Thermostat, detailing compatible and non-compatible HVAC systems.
3.2. Strumenti e materiali necessari
- Cacciavite con testa a croce
- Drill with 3/16” (4.8mm) drill bit (if new holes are needed)
- Spelafili (se necessario)
- Matita
- Livello (facoltativo)
3.3. Fasi di installazione
- Spegni l'alimentazione: Locate the circuit breaker or fuse box that controls your heating and cooling system and turn off the power. Verify the power is off by attempting to turn on your system.
- Rimuovere il vecchio termostato: Carefully remove the cover of your old thermostat. Take a picture of the wiring connections before disconnecting any wires. Label each wire with the terminal designation (e.g., R, G, Y, W, C) using the provided wire labels.
- Rimuovere la piastra di montaggio: Svitare e rimuovere la piastra di montaggio del vecchio termostato dalla parete.
- Montare la nuova base del termostato: Separate the front cover of the P711 thermostat from its base. Position the new thermostat base on the wall, feeding the wires through the opening. Mark the mounting holes with a pencil. If drilling new holes, use a 3/16” drill bit and insert the wall anchors. Secure the thermostat base to the wall using the provided screws.
- Cablare il termostato: Connect the labeled wires to the corresponding terminals on the P711 thermostat base. Refer to the wiring diagrams below for common configurations. Ensure connections are tight.

Figure 4: Wiring diagram for 3/4 wire conventional, non-heat pump, 1-stage cool only systems. Shows connections for C, G, RH, RC, W, Y, O/B terminals.
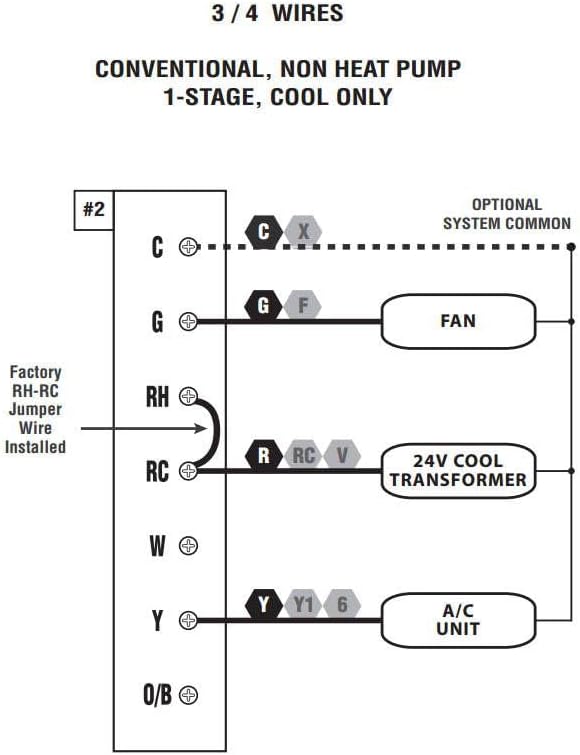
Figure 5: Wiring diagram for 4/5 wire conventional, non-heat pump, 1-stage calore e 1-stage cool systems. Shows connections for C, G, RH, RC, W, Y, O/B terminals.

Figure 6: Wiring diagram for 5/6 wire conventional, non-heat pump, 1-heat / 1-cool systems with two transformers. Shows connections for C, G, RH, RC, W, Y, O/B terminals, and the removal of the factory RH-RC jumper wire.
- Inserire le batterie: If using battery power, insert the 2 AA alkaline batteries into the battery compartment.
- Fissare il coperchio del termostato: Allineare con attenzione il coperchio del termostato alla base e farlo scattare in posizione.
- Ripristina alimentazione: Return to the circuit breaker or fuse box and restore power to your heating and cooling system.
4. Configurazione e installazione iniziale
4.1. Impostazione dell'ora e del giorno
Upon initial power-up or after a battery change, the display will show a flashing time and day. Use the IMPOSTATO button to navigate through the time and day settings, and the UP E GIÙ buttons to adjust the values. Press PROSSIMO per confermare ogni impostazione.
4.2. Modalità di programmazione
The P711 offers three programming options: 7-day, 5/2-day, or non-programmable. You can select your preferred mode during the initial setup or by accessing the system settings. Refer to the detailed programming instructions in the full manual for specific steps on setting schedules for each day or period.
4.3. Display Options (Fahrenheit/Celsius)
You can switch between Fahrenheit (°F) and Celsius (°C) display modes. This setting is typically found within the advanced setup menu. Consult the full manual for instructions on accessing and changing this option.
4.4. Blocco tastiera
The keypad lock feature prevents unauthorized access or accidental changes to your thermostat settings. To activate or deactivate the keypad lock, follow the instructions provided in the comprehensive manual.
5. Funzionamento
5.1. Regolazione della temperatura
In modalità di funzionamento normale, utilizzare il UP or GIÙ buttons to adjust the desired temperature setpoint. The new setpoint will be displayed, and the thermostat will adjust the system to reach it.
5.2. Impostazioni della ventola
The fan mode switch allows you to select between two settings:
- AUTO: La ventola funziona solo quando il sistema di riscaldamento o raffreddamento è in funzione. Questa è l'impostazione più efficiente dal punto di vista energetico.
- SOPRA: La ventola funziona continuamente, indipendentemente dal fatto che sia attivo il sistema di riscaldamento o di raffreddamento.
5.3. Modalità di sistema
The system mode switch allows you to select the operating mode for your HVAC system:
- CALORE: Il termostato controllerà il tuo impianto di riscaldamento per mantenere la temperatura impostata.
- OFF: Both heating and cooling systems are turned off.
- FREDDO: Il termostato controllerà il sistema di raffreddamento per mantenere la temperatura impostata.
5.4. Mantieni la funzione
IL PRESA button allows you to temporarily or permanently override the programmed schedule. When activated, the thermostat will maintain the current temperature setpoint until the HOLD function is canceled or a new schedule period begins (for temporary hold).
5.5. Override temporaneo
Adjusting the temperature using the UP or GIÙ buttons during a programmed period will initiate a temporary override. The thermostat will maintain this new temperature until the next scheduled program period begins.
6. Manutenzione
6.1. Sostituzione della batteria
The thermostat uses 2 AA alkaline batteries. When the battery indicator appears on the display, replace the batteries promptly to ensure continuous operation. Open the battery compartment, remove old batteries, and insert new ones, observing polarity (+/-). The thermostat has battery-free memory, so programming should not be lost during battery replacement.
6.2. Pulizia
Pulisci l'esterno del termostato con un panno morbido eamp panno. Non utilizzare detergenti abrasivi o solventi, poiché potrebbero danneggiare la finitura o i componenti interni.
7. Risoluzione Dei Problemi
If you experience issues with your Lux Pro P711 thermostat, refer to the common troubleshooting steps below. For more complex problems, contact customer support.
| Problema | Possibile causa | Soluzione |
|---|---|---|
| Il display è vuoto o scuro | Low or dead batteries; No 24V power (if wired); Loose connections. | Replace batteries. Check circuit breaker for HVAC system. Verify wiring connections are secure. |
| System (Heat/Cool) does not turn on | System switch in OFF position; Incorrect wiring; Blown fuse in HVAC system; Temperature setpoint not calling for heat/cool. | Ensure system switch is set to HEAT or COOL. Recheck wiring against diagrams. Check HVAC system fuse. Adjust setpoint to be above (for heat) or below (for cool) current room temperature. |
| La ventola non funziona | Fan switch in AUTO; Incorrect wiring. | Set fan switch to ON to test continuous operation. Verify fan wiring (G terminal). |
| Lettura della temperatura imprecisa | Thermostat exposed to direct sunlight or drafts; Needs calibration. | Relocate thermostat if possible. Access user temperature calibration setting (refer to full manual). |
| Problemi di programmazione | Incorrect programming steps; Keypad locked. | Review programming instructions carefully. Unlock keypad if activated. |
8. Specifiche
| Caratteristica | Specificazione |
|---|---|
| Marca | LUSSO |
| Nome del modello | P711-010 |
| Tipo di controllore | Premere il pulsante |
| Caratteristica speciale | Basso volumetage |
| Colore | Bianco |
| Tipo di controllo della temperatura | Manuale, Programmabile |
| Tecnologia di connettività | N/A (Note: Product specifications list Wi-Fi, but this model is typically non-Wi-Fi. Refer to specific product packaging for confirmation.) |
| Componenti inclusi | P711-010 Programmable 7 Day Thermostat, 2 AA LR6 batteries, 2 ST screws, 2 wall anchors, wire labels, instruction manual |
| Fonte di alimentazione | Battery Powered (2 AA included), 24 Volts (system power) |
| Peso dell'articolo | 1.6 once |
| Voltage | 24 Volt |
| Materiale | Plastica |
| Forma | Rettangolare |
| Tipo di visualizzazione | LCD con retroilluminazione |
| Tipo di controllo | Controllo dei pulsanti |
| Tipo di montaggio | Montaggio a parete |
| Stile | Programmable: 1 heat & 1 cool Stage |
| Retroilluminazione | SÌ |
| Certificazione | UL (Underwriters Laboratories) Low Voltage Certification |
| Dimensioni del prodotto | 1.25 x 3.38 x 5.38 pollici |
| Codice UPC | 021079147113 |
9. Garanzia e supporto
9.1. Informazioni sulla garanzia
The Lux Pro P711 Thermostat typically comes with a 5-year limited warranty from the date of purchase. This warranty covers defects in materials and workmanship under normal use and service. Please retain your proof of purchase for warranty claims.
9.2. Assistenza clienti
For technical assistance, troubleshooting not covered in this manual, or warranty inquiries, please contact LUX customer support. Refer to the contact information provided on the product packaging or the official LUX webposto (www.prodottidilusso.com) per le opzioni di supporto più aggiornate.
Ask a question about this manual
Ask about setup, troubleshooting, compatibility, parts, safety, or missing instructions. Manuals+ will review the question and use this page’s manual context to help answer it.