
Introduzione
This manual provides detailed instructions for the installation, operation, and maintenance of your Jensen JWM6A AM/FM/DVD Stereo. Please read this manual thoroughly before using the product to ensure proper functionality and safety.
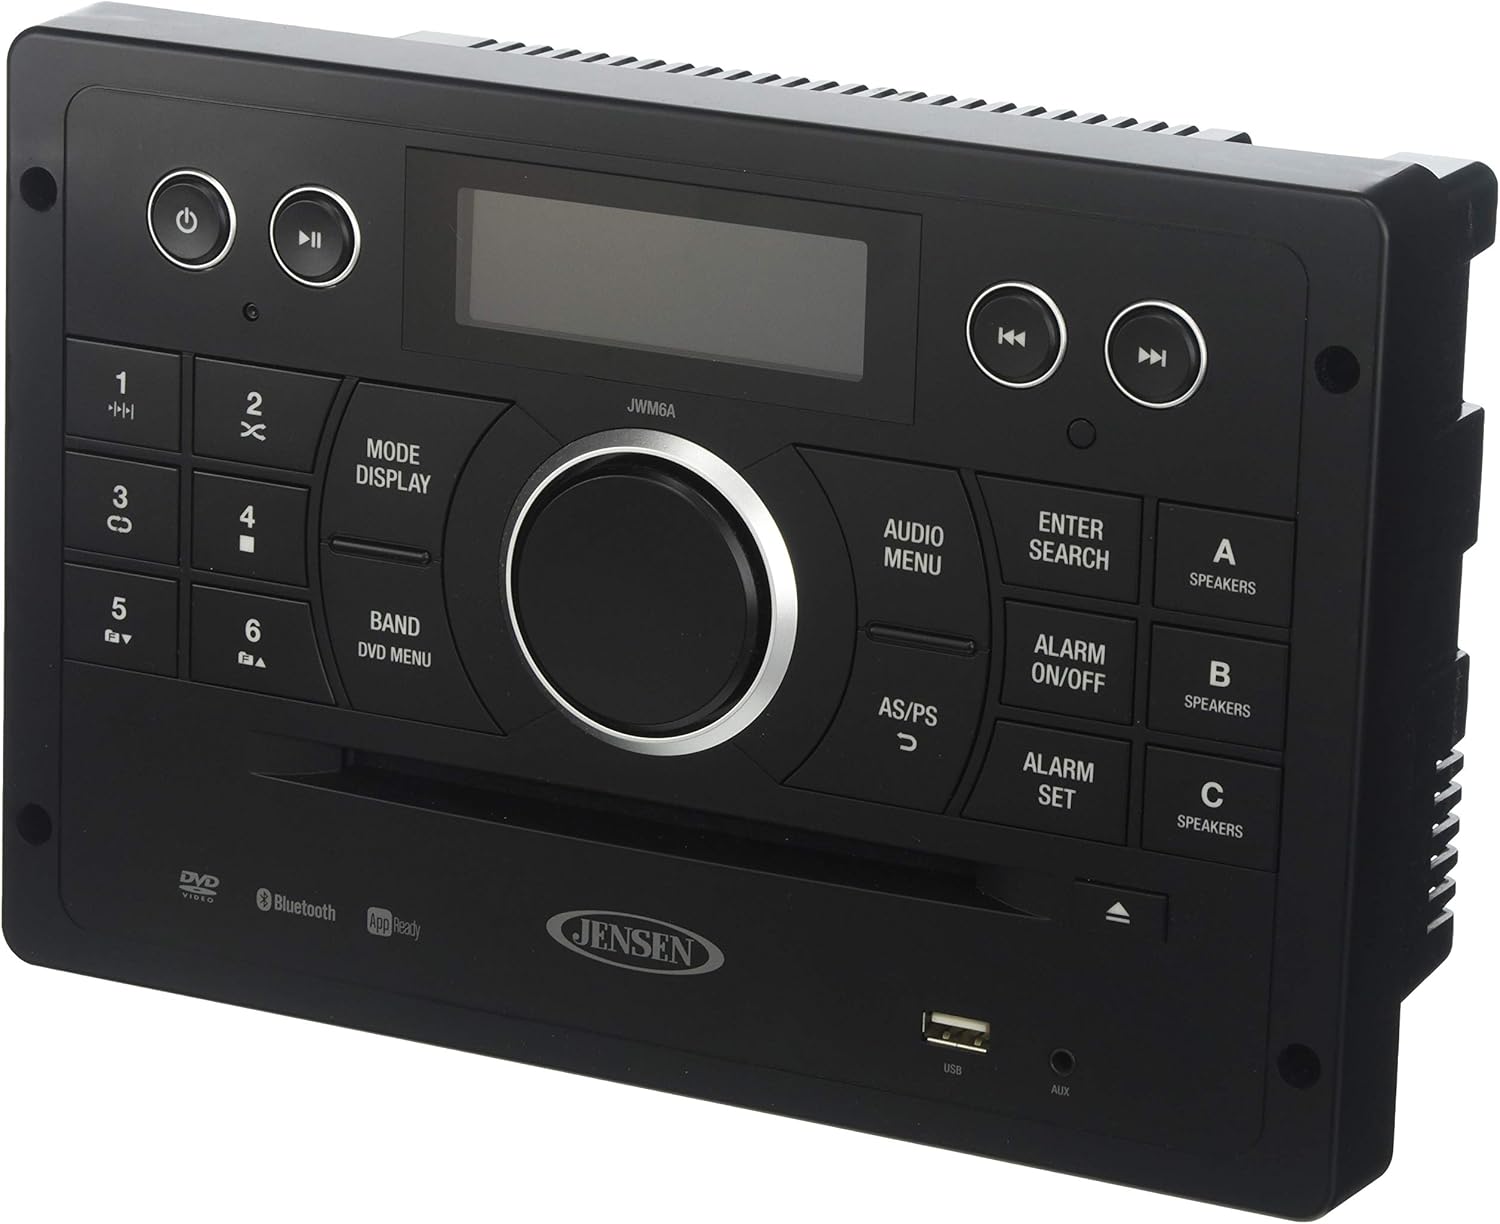
Figura 1: Davanti view of the Jensen JWM6A AM/FM/DVD Stereo, showing the display, control buttons, and disc slot.
Informazioni sulla sicurezza
Osservare sempre le seguenti precauzioni di sicurezza:
- Ensure the unit is powered by a 12 Volts DC source.
- Non esporre l'unità a umidità o temperature estreme.
- Affidare qualsiasi intervento di manutenzione a personale qualificato.
- Scollegare l'alimentazione prima di effettuare qualsiasi cablaggio o manutenzione.
Configurazione e installazione
The JWM6A is designed for wall-mount installation and has a standard footprint for easy upgrade. Professional installation is recommended.
Collegamenti elettrici
The unit requires 12 Volts DC power and includes a blunt-cut labeled wiring harness. Ensure correct polarity when connecting power and ground. The unit has a red positive and black ground wire. Speaker wires are labeled for zones A, B, and C.
- Energia: Connect the red wire to a 12V DC positive source and the black wire to ground.
- Relatori: The unit supports 3 zones and 8 speaker outputs. Connect speakers to the corresponding labeled wires (e.g., A FL+, A FL- for Zone A Front Left).
- Ingressi ausiliari: Front 1/8" auxiliary audio input, Rear Audio RCA Inputs.
- Uscita video: HDMI Video Output with JCOM link, RCA Video Output.
- USB: Front USB port for MP3/WMA files and iPod/iPhone connectivity.
Montaggio
The overall dimensions are 10.4" (W) x 7.0" (D) x 6.25" (H). Mounting hole dimensions are 9.3" (W) x 5.12" (H) with a mounting depth of 5.12".
Istruzioni per l'uso
Controlli di base
Figura 2: Dettagliato view of the Jensen JWM6A control panel, highlighting buttons for power, playback, mode, and speaker zones.
- Pulsante di accensione: Located on the top left. Press to turn the unit on or off.
- Mode/Display Button: Cycles through available audio sources (AM/FM, DVD/CD, USB, AUX, Bluetooth).
- Manopola del volume: Central knob to adjust volume.
- Speaker Zone Buttons (A, B, C): Attiva o disattiva le zone degli altoparlanti.
- Slot disco: Insert DVDs or CDs into the slot located below the main controls.
- Porta USB: Located on the bottom right for USB devices.
- Ingresso AUX: 1/8" jack located next to the USB port.
Funzionamento radio (AM/FM)
- tuning: Utilizzare i pulsanti di ricerca (<< / >>) to tune to stations.
- Preselezioni: Store up to 30 stations (12 AM/18 FM). Use numbered buttons (1-6) to recall presets.
- Auto-Store/Preset Scan: Automatically scans and stores strong stations.
Disc Playback (DVD/CD)
- Insert a disc into the slot. The unit will automatically switch to DVD/CD mode.
- Use playback controls (Play/Pause, Skip, Stop) for media navigation.
- The unit is compatible with DVD/CD-R/RW and MP3 discs.
Funzionamento Bluetooth
- Abbinamento: Enable Bluetooth on your device and search for "JWM6A". Select to pair.
- Streaming: Once paired, stream audio (A2DP, AVRCP) from your Bluetooth-enabled device.
- jControl App: Download the free jControl app to control stereo functions from your mobile device.
Riproduzione USB e AUX
- USB: Insert a USB drive into the front USB port for MP3/WMA file playback. Supports iPod/iPhone connectivity.
- AUSILIARI: Connect external audio devices to the front 1/8" auxiliary input or rear RCA inputs.
Impostazioni audio
- Equalizzatore: Select from 5 pre-set equalizer settings (User, Flat, Pop, Classical, Rock).
- Controllo dei toni: Electronic Bass, Treble, Balance, and Fader control.
Orologio e sveglia
- Time/Alarm Clock: Imposta e view the current time and alarm.
- Attivazione/disattivazione sveglia: Activate or deactivate the alarm function.
- Sveglia impostata: Configure alarm time.
Manutenzione
- Pulizia: Utilizzare un panno morbido e asciutto per pulire l'esterno dell'unità. Non utilizzare detergenti abrasivi o solventi.
- Cura del disco: Maneggiare i dischi tenendoli per i bordi. Mantenerli puliti e privi di graffi.
- Aggiornamenti del firmware: Controllare il produttore websito per eventuali aggiornamenti firmware disponibili.
Risoluzione dei problemi
| Problema | Possibile causa | Soluzione |
|---|---|---|
| Nessun potere | Incorrect wiring; Blown fuse; Low battery voltage. | Check power and ground connections; Replace fuse; Check vehicle battery. The unit has a low battery alarm. |
| Nessun suono | Speakers not connected; Volume too low; Mute activated; Incorrect speaker zone selected. | Verify speaker wiring; Increase volume; Deactivate mute; Select correct speaker zone (A, B, or C). |
| Disc not playing/ejecting | Disc inserted incorrectly; Damaged disc; Shipping screw not removed (if applicable). | Re-insert disc correctly; Try a different disc; Ensure shipping screw is removed. |
| Problemi di associazione Bluetooth | Dispositivo non in modalità di associazione; Unità non rilevabile; Interferenza. | Ensure Bluetooth is enabled on device and unit; Move closer to the unit; Restart both devices. |
| Il telecomando non funziona | Dead batteries; Obstruction between remote and unit; Incorrect remote mode. | Replace batteries; Remove obstructions; Ensure remote is pointed at the unit's IR receiver. |
Specifiche
- Requisiti di potenza: 12 Volt CC
- Sintonizzatore: Digital AM/FM Tuner, 30 Presets (12 AM/18 FM)
- Bluetooth: A2DP, AVRCP Streaming Audio, APP Ready (jControl)
- Compatibilità del disco: Slot type DVD/CD-R/RW, MP3 Compatible
- USB: Playback of MP3/WMA Files, Made for iPod/iPhone (USB Input)
- Ingressi ausiliari: 1/8" Front Auxiliary Audio Input, Rear Audio RCA Inputs
- Uscite video: HDMI Video Output with JCOM link, RCA Video Output
- Uscite audio: 3 Zone / 8 Speaker Output, RCA Coaxial Input, Optical Input
- Equalizzatore: 5 Pre-set settings (User, Flat, Pop, Classical, Rock)
- Display: White LED Backlight LCD
- Dimensioni (totali): 10.4" (L) x 7.0" (P) x 6.25" (A)
- Mounting Hole Dimensions: 9.3" (L) x 5.12" (A)
- Profondità di montaggio: 5.12"
- Peso: Circa 4 libbre
Garanzia e supporto
Informazioni sulla garanzia
For specific warranty details, please refer to the warranty card included with your product or visit the official Jensen websito. Conservare la ricevuta d'acquisto come prova d'acquisto per eventuali reclami in garanzia.
Assistenza clienti
If you encounter any issues not covered in this manual or require further assistance, please contact Jensen customer support. Visit the Negozio Jensen su Amazon o il loro funzionario websito per informazioni di contatto e risorse aggiuntive.