
1. Introduzione
This manual provides comprehensive instructions for the installation, operation, and maintenance of your Lorex LNR1141TC4 4-Channel 1TB Network Video Recorder (NVR) system with four 1080p HD cameras. This system is designed to provide high-definition surveillance for your property, offering real-time recording and remote access capabilities.
Please read this manual thoroughly before setting up and operating your system to ensure proper functionality and to maximize its features.
2. Contenuto della confezione
Verify that all components listed below are included in your package. If any items are missing or damaged, please contact Lorex support.
- 1 x NVR with Pre-Installed 1TB HDD
- 1 cavo HDMI
- 1 x adattatore di alimentazione per NVR
- Mouse 1 x USB
- 1 x cavo Ethernet
- Guide rapide
- 4 x IP Bullet Cameras (1080p HD)
- 4 x Mounting Kits for Cameras
- 4 x 60ft (18m) Cat5e Ethernet Cables
3. Sistema finitoview
The Lorex LNR1141TC4 system consists of a Network Video Recorder (NVR) and four 1080p HD IP cameras. The NVR manages video recording, storage, and network connectivity, while the cameras capture high-definition video footage.
3.1 Componenti NVR e telecamera

Figura 3.1: Lorex LNR1141TC4 NVR system with four 1080p HD bullet cameras. This image displays the main components of the surveillance system, including the central NVR unit and the four included bullet-style IP cameras.
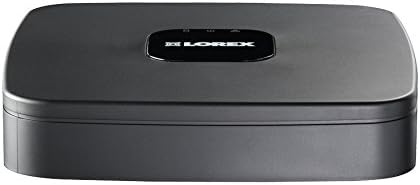
Figura 3.2: Superiore view of the Lorex LNR1141TC4 NVR. The NVR unit features a sleek black design with the Lorex logo prominently displayed on the top surface.

Figura 3.3: Rear panel of the Lorex LNR1141TC4 NVR. This view shows the various input and output ports, including HDMI, VGA, USB, Ethernet, and the four Power over Ethernet (PoE) ports for camera connections.

Figura 3.4: Close-up of a Lorex 1080p HD bullet camera lens. This image highlights the camera's lens, infrared LEDs for night vision, and light sensor.
4. Impostazione
Follow these steps to set up your Lorex LNR1141TC4 NVR system.
4.1 Collegamento dell'NVR
- Collegare un monitor: Connect the NVR to a monitor using the supplied HDMI cable or a VGA cable (not included).
- Collega il mouse: Plug the USB mouse into one of the USB ports on the NVR's rear panel.
- Connessione di rete (facoltativa ma consigliata): Connect the NVR to your router using the supplied Ethernet cable for remote access and system updates.
- Accensione: Collegare l'adattatore di alimentazione dell'NVR all'NVR e poi a una presa di corrente. L'NVR si accenderà automaticamente.
4.2 Collegamento delle telecamere
The Lorex LNR1141TC4 NVR features Power over Ethernet (PoE) ports, simplifying camera installation.
- Montare le telecamere: Securely mount each camera in your desired location using the provided mounting kits. Ensure the camera's field of view copre l'area che desideri monitorare.
- Collegare i cavi Ethernet: Connect one end of the supplied 60ft Cat5e Ethernet cable to the camera's Ethernet port and the other end to one of the PoE ports on the NVR's rear panel. The NVR will automatically detect and power the cameras.
- Regola l'angolazione della telecamera: Once connected, adjust each camera's angle to optimize surveillance coverage.
5. Funzionamento
This section covers the basic operation of your Lorex NVR system.
5.1 Procedura guidata di configurazione iniziale
Upon first power-up, the NVR will guide you through an initial setup wizard to configure basic settings such as language, date/time, network settings, and password creation. Follow the on-screen prompts.
5.2 Registrazione
- Registrazione continua: The NVR is configured for continuous recording by default, utilizing the pre-installed 1TB hard drive.
- Registrazione programmata: You can customize recording schedules for each camera through the NVR's menu. This allows you to set specific times for recording.
- Registrazione del movimento: Configure motion detection zones and sensitivity to trigger recording only when movement is detected. This helps conserve storage space.
- High Definition 1080p: The system records in 1080p resolution at 30/25 frames per second (fps) per channel, ensuring clear and detailed footage.
5.3 Riproduzione
Accedi a foo registratotage through the NVR's playback menu. You can search by date, time, and event type (e.g., motion detection). The system supports selectable area digital zoom during live view and playback for detailed examination.
5.4 Remote Access (FLIR Cloud)
The FLIR Cloud connectivity solution enables remote viewing of your surveillance system.
- Scarica l'app: Download the free Lorex FLIR Cloud app on your iOS or Android smartphone or tablet.
- Scansiona il codice QR: Use the app to scan the QR code located on your NVR or in the quick start guide.
- Collegare: Follow the app's instructions to connect to your NVR. This allows you to view live feeds, playback recordings, and receive push notifications for motion events and instant email alerts with snapshot attachments from anywhere with an internet connection.
6. Manutenzione
Una manutenzione regolare garantisce la longevità e le prestazioni ottimali del vostro sistema di sorveglianza.
- Pulizia: Pulire periodicamente le lenti della fotocamera con un panno morbido eamp cloth to remove dust and smudges. Ensure the NVR's ventilation openings are clear of obstructions.
- Stato del disco rigido: The NVR's hard drive is crucial for recording. Monitor its health through the NVR's system settings. Consider backing up important footage regolarmente.
- Aggiornamenti del firmware: Check the Lorex website for any available firmware updates for your NVR to ensure you have the latest features and security enhancements.
7. Risoluzione Dei Problemi
This section addresses common issues you might encounter with your Lorex LNR1141TC4 system.
- Nessuna uscita video sul monitor:
- Assicurarsi che il cavo HDMI/VGA sia collegato saldamente sia all'NVR che al monitor.
- Verificare che il monitor sia impostato sulla sorgente di input corretta.
- Prova un altro cavo HDMI/VGA o un altro monitor.
- Le telecamere non visualizzano:
- Check that the Ethernet cables are securely connected to both the cameras and the NVR's PoE ports.
- Assicurarsi che l'NVR sia acceso.
- If a camera is still not detected, try connecting it to a different PoE port on the NVR.
- A power cycle of the NVR (unplug and replug) can sometimes resolve camera detection issues.
- Accesso remoto non funzionante:
- Verify the NVR is connected to your router and has internet access.
- Assicurati che il tuo smartphone/tablet abbia una connessione Internet stabile.
- Double-check the QR code scan and account login details in the FLIR Cloud app.
- Problemi di registrazione:
- Check the hard drive status in the NVR's system settings.
- Assicurarsi che le pianificazioni delle registrazioni siano configurate correttamente.
- Verify that motion detection settings are appropriate if using motion-triggered recording.
8. Specifiche
| Caratteristica | Dettaglio |
|---|---|
| Numero di modello | LNR1141TC4 |
| Risoluzione di acquisizione video | Risoluzione 1080p |
| Numero di canali | 4 |
| Capacità di archiviazione della memoria | 1 TB (HDD preinstallato) |
| Tecnologia di connettività | Wired (Ethernet, PoE for cameras) |
| Caratteristica speciale | Motion Sensor, Remote Access (FLIR Cloud) |
| Frequenza dei fotogrammi | 30/25 fps per channel |
| Modalità di registrazione | Continuous, Scheduled, Motion |
| Fonte di alimentazione | Elettrico con cavo |
| Dimensioni NVR (L x P x A) | 8.1 x 8.1 x 1.8 pollici (20.6 x 20.6 x 4.6 cm) |
| NVR Item Weight | 1.1 libbre (0.5 kg) |
| Dispositivi compatibili | Cameras, Personal Computers, Smartphones, Tablets |
9. Garanzia e supporto
For warranty information and technical support, please refer to the documentation included with your product or visit the official Lorex website. Lorex provides resources and customer service to assist with any questions or issues you may encounter.
Risorse online: www.lorex.com/support