1. Importanti istruzioni di sicurezza
Quando si utilizzano apparecchi elettrici, è necessario adottare le seguenti precauzioni di sicurezza di base, tra cui:
- Leggere tutte le istruzioni prima di utilizzare l'apparecchio.
- Non tentare di far funzionare il forno con lo sportello aperto, poiché ciò potrebbe causare un'esposizione dannosa all'energia delle microonde.
- Non posizionare alcun oggetto tra la parte anteriore del forno e lo sportello e non lasciare che residui di sporco o detergente si accumulino sulle superfici di tenuta.
- Non azionare il forno se è danneggiato. È particolarmente importante che la porta del forno si chiuda correttamente e che non vi siano danni a: (1) porta (piegata), (2) cerniere e chiavistelli (rotte o allentate), (3) guarnizioni e superfici di tenuta della porta.
- Il forno non deve essere riparato o regolato da nessuno, eccetto personale di assistenza adeguatamente qualificato.
- Assicurarsi che l'apparecchio sia adeguatamente messo a terra.
- Non immergere il cavo o la spina nell'acqua.
- È necessaria un'attenta supervisione quando l'apparecchio viene utilizzato da bambini o in loro presenza.
- Do not use the oven for purposes other than heating food.
2. Prodotto finitoview
2.1. Microwave Oven Components

Figura 1: Fronte view of the Sharp R-369T Microwave Oven, showcasing its 33L capacity, 6 microwave power levels, and various cooking functions.
The Sharp R-369T is a 33-liter solo microwave oven designed for efficient food preparation. It features a sleek silver finish and a black glass door. Key components include the oven cavity, glass turntable, control panel, and door with a push-open mechanism.

Figura 2: Interno view of the microwave oven, showing the spacious 33L cavity and the removable glass turntable for even cooking.
The interior includes a 272mm glass turntable that rotates during operation to ensure food is heated evenly. The oven door opens with a simple push mechanism.
2.2. Pannello di controllo
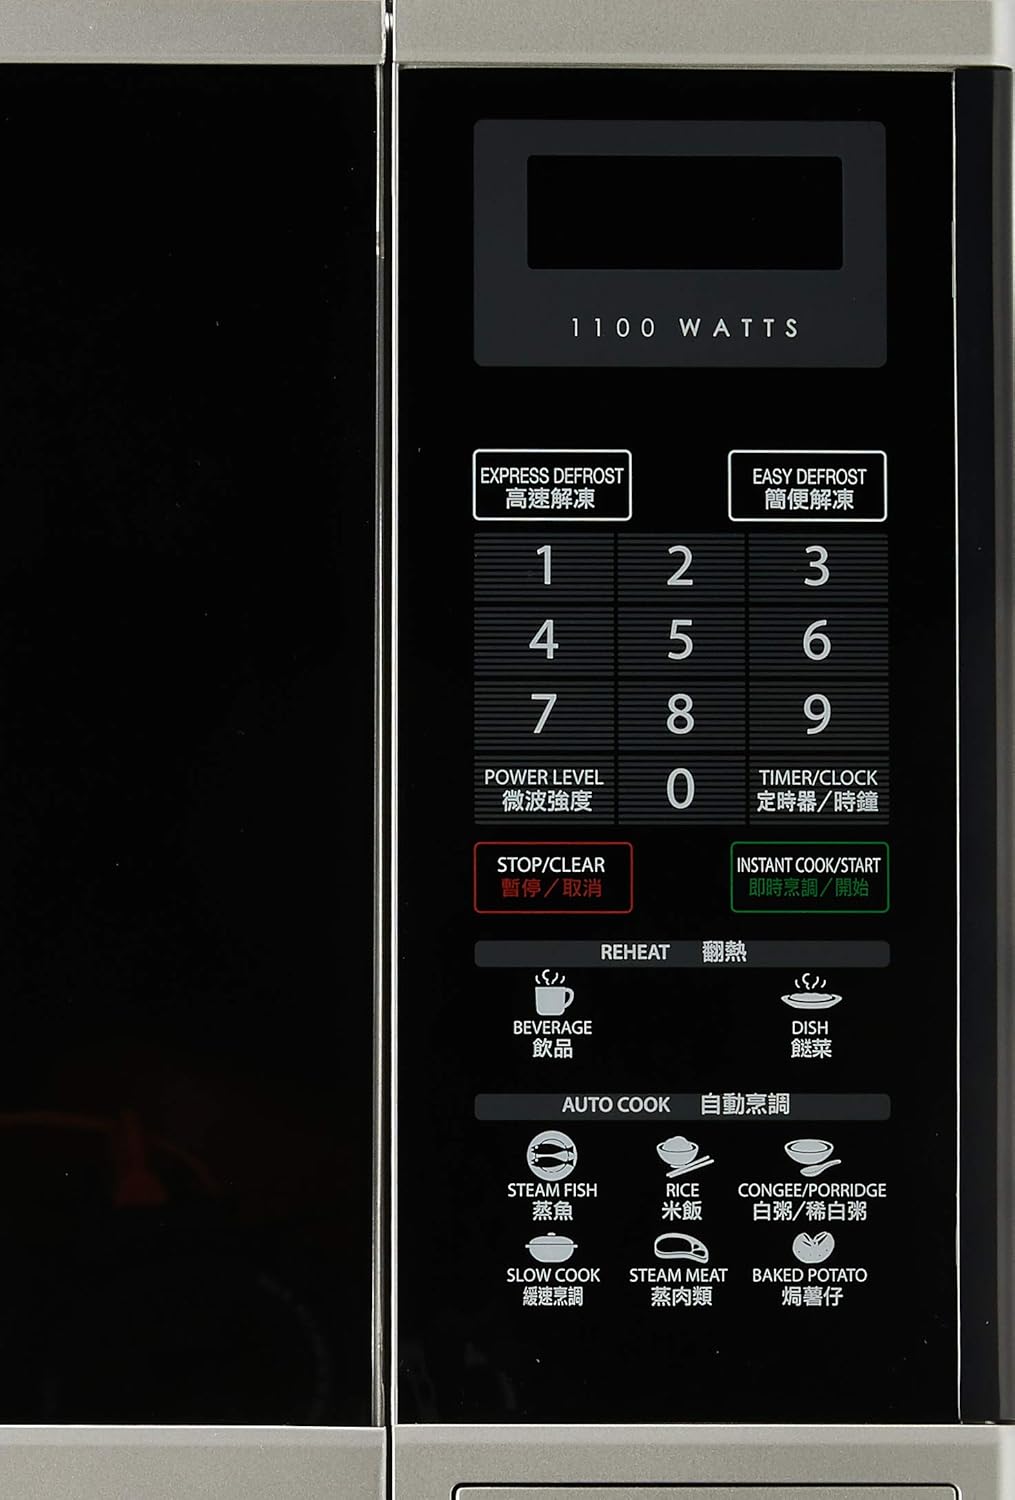
Figura 3: dettagliata view of the control panel, featuring numerical keys, function buttons, and the digital display.
The control panel is located on the right side of the oven and features a digital display, numerical keypad (0-9), and various function buttons:
- EXPRESS DEFROST / EASY DEFROST: For quick and convenient defrosting.
- LIVELLO DI POTENZA: Regola la potenza di uscita del microonde.
- TIMER/OROLOGIO: Sets the cooking timer or the current time.
- STOP/CANCELLAZIONE: Interrompe l'operazione in corso o cancella le impostazioni.
- INSTANT COOK/START: Starts cooking immediately or confirms settings.
- RISCALDARE: Dedicated buttons for reheating beverages and dishes.
- COTTURA AUTOMATICA: Pre-programmed settings for various food types like Steam Fish, Rice, Congee/Porridge, Slow Cook, Steam Meat, and Baked Potato.
3. Configurazione e installazione
3.1. Disimballaggio
Carefully remove the microwave oven and all packing materials from the carton. Check the oven for any damage, such as dents or a misaligned door. Do not operate the oven if it is damaged. Contact your dealer or authorized service center.
3.2. Posizionamento
- Place the oven on a flat, stable surface strong enough to hold its weight (approximately 17kg).
- Ensure adequate ventilation. Leave a minimum of 10 cm (4 inches) clearance at the rear, 20 cm (8 inches) at the top, and 5 cm (2 inches) on each side for proper airflow.
- Non ostruire le prese d'aria.
- Tenere il forno lontano da fonti di calore, vapore o schizzi di liquidi.
- Non posizionare il forno vicino a radio o TV, poiché potrebbero verificarsi interferenze.
3.3. Connessione elettrica

Figura 4: Posteriore view of the microwave oven, illustrating the power cord connection and important safety warnings regarding microwave energy.
- Plug the oven into a properly grounded 220V, 50Hz AC outlet with a dedicated circuit.
- Non utilizzare prolunghe o adattatori.
- Assicurarsi che il cavo di alimentazione non sia danneggiato o schiacciato.
4. Istruzioni per l'uso
4.1. Impostazione dell'orologio
- Premere il tasto TIMER/OROLOGIO pulsante una volta.
- Use the numerical keypad to enter the current time (e.g., 12:30 for 12:30 PM).
- Premere il tasto TIMER/OROLOGIO nuovamente il pulsante per confermare.
4.2. Cottura di base al microonde
- Disporre il cibo in un contenitore adatto al microonde sul piatto girevole in vetro.
- Chiudere bene lo sportello del forno.
- Premere il tasto LIVELLO DI POTENZA button repeatedly to select the desired power level (e.g., P100 for 100% power, P80 for 80% power). The oven offers 6 microwave power levels.
- Use the numerical keypad to enter the cooking time.
- Premere INSTANT COOK/START per iniziare a cucinare.
4.3. Scongelamento
The oven offers two defrost functions:
- EXPRESS DEFROST: For quick defrosting of smaller items. Follow on-screen prompts or manual for specific weight settings.
- EASY DEFROST: For more controlled defrosting. Refer to the manual for weight and food type guidelines.
- Posizionare il cibo congelato sul piatto girevole.
- Premere uno dei due SCONGELAMENTO ESPRESSO or EASY DEFROST.
- Inserire il peso dell'alimento utilizzando il tastierino numerico.
- Premere INSTANT COOK/START.
4.4. Reheat Functions
The oven includes 2 Reheat Menu keys for common items:
- BEVANDE: For reheating drinks.
- DISH: For reheating prepared meals.
- Place the item to be reheated on the turntable.
- Premere il tasto appropriato RISCALDARE button (BEVERAGE or DISH).
- The oven will automatically set the time. Press INSTANT COOK/START per iniziare.
4.5. Funzioni di cottura automatica
IL COTTURA AUTOMATICA menu provides pre-programmed settings for various foods:
- PESCE AL VAPORE
- RISO
- CONGEE/PORRIDGE
- COTTURA LENTA
- CARNE AL VAPORE
- PATATE AL FORNO
- Place the food in a suitable container on the turntable.
- Premere il desiderato COTTURA AUTOMATICA pulsante.
- Select the quantity or weight if prompted (refer to the full manual for specific auto cook settings).
- Premere INSTANT COOK/START.
5. Manutenzione e pulizia
Una pulizia regolare del forno a microonde ne garantirà la longevità e il funzionamento efficiente.
5.1. Pulizia esterna
- Pulire le superfici esterne con un panno morbido, damp stoffa.
- Non utilizzare detergenti abrasivi o prodotti chimici aggressivi.
5.2. Pulizia degli interni
- Clean the oven cavity after each use with a mild detergent and a soft cloth.
- For stubborn food splatters, place a bowl of water with lemon slices inside and microwave on high for 2-3 minutes. The steam will loosen the residue, making it easier to wipe clean.
- Ensure the door seals and sealing surfaces are clean to maintain proper operation.
5.3. Piatto rotante in vetro
- Il piatto girevole in vetro e l'anello rotante possono essere rimossi per la pulizia.
- Lavarli in acqua calda e sapone oppure in lavastoviglie.
- Assicuratevi che siano completamente asciutti prima di rimetterli nel forno.
6. Risoluzione Dei Problemi
Prima di contattare l'assistenza, verificare i seguenti problemi comuni:
| Problema | Possibile causa | Soluzione |
|---|---|---|
| Il forno non si avvia | Cavo di alimentazione non collegato; sportello non chiuso correttamente; fusibile bruciato o interruttore automatico scattato. | Collegare il cavo di alimentazione; Chiudere bene lo sportello; Controllare il fusibile o ripristinare l'interruttore automatico. |
| Il cibo non si riscalda | Tempo di cottura o livello di potenza impostato non corretti; sportello non chiuso correttamente. | Adjust time/power; Ensure door is latched. |
| Giradischi non rotante | Giradischi non posizionato correttamente; Ostruzione sotto il giradischi. | Riposizionare il piatto girevole e l'anello rotante; rimuovere eventuali ostruzioni. |
| Scintille all'interno del forno | Metal or foil in oven; Food splatters. | Rimuovere gli oggetti metallici; pulire accuratamente l'interno del forno. |
If the problem persists after checking these points, please contact an authorized service technician.
7. Specifiche
| Marca | Affilato |
| Modello | R-369T |
| Capacità | 33 litri |
| Potenza di uscita | 800 W (forno a microonde) |
| Cosatage | 1100 watt (ingresso) |
| Diametro del giradischi | 272mm |
| Dimensioni esterne (L x A x P) | Dimensioni: 520 x 310 x 448 mm |
| Peso | 16.96 kg |
| Voltage | 220 Volt |
| Frequenza | Frequenza 50 Hz |
| Materiale | Acciaio |
| Caratteristiche speciali | Programmable, 6 Microwave Power Levels, 2 Reheat Menu Keys, Easy Defrost, Slow Cook Key, Black Glass Door |

Figure 5: Dimensional drawing of the Sharp R-369T Microwave Oven, illustrating its width (520 mm / 52 cm), height (310 mm / 31 cm), and depth (448 mm / 44.8 cm).
8. Garanzia e supporto
For warranty information and customer support, please refer to the warranty card included with your product or visit the official Sharp websito per la tua regione. Conserva la ricevuta d'acquisto come prova d'acquisto per eventuali reclami in garanzia.
For technical assistance or service inquiries, please contact Sharp customer service.