InstallGear IGKE
InstallGear Car Keyless Entry System User Manual
Model: IGKE
1. Introduzione
The InstallGear Car Keyless Entry System provides a convenient and secure way to control your vehicle's door locks and trunk remotely. This system includes a main control unit and two 3-button remote key fobs, designed to enhance your vehicle's accessibility and security features.

Figura 1.1: Oltreview of the InstallGear Keyless Entry System components.
This manual provides essential information for the proper installation, operation, and maintenance of your new keyless entry system. Please read it thoroughly before attempting installation or use.
2. Contenuto della confezione
Verifica che tutti gli articoli elencati di seguito siano presenti nel tuo pacco:
- 1 x Main Control Unit Module
- 2 x 3-Button Remote Key Fobs
- 1 x Wiring Harness with Integrated Fuse
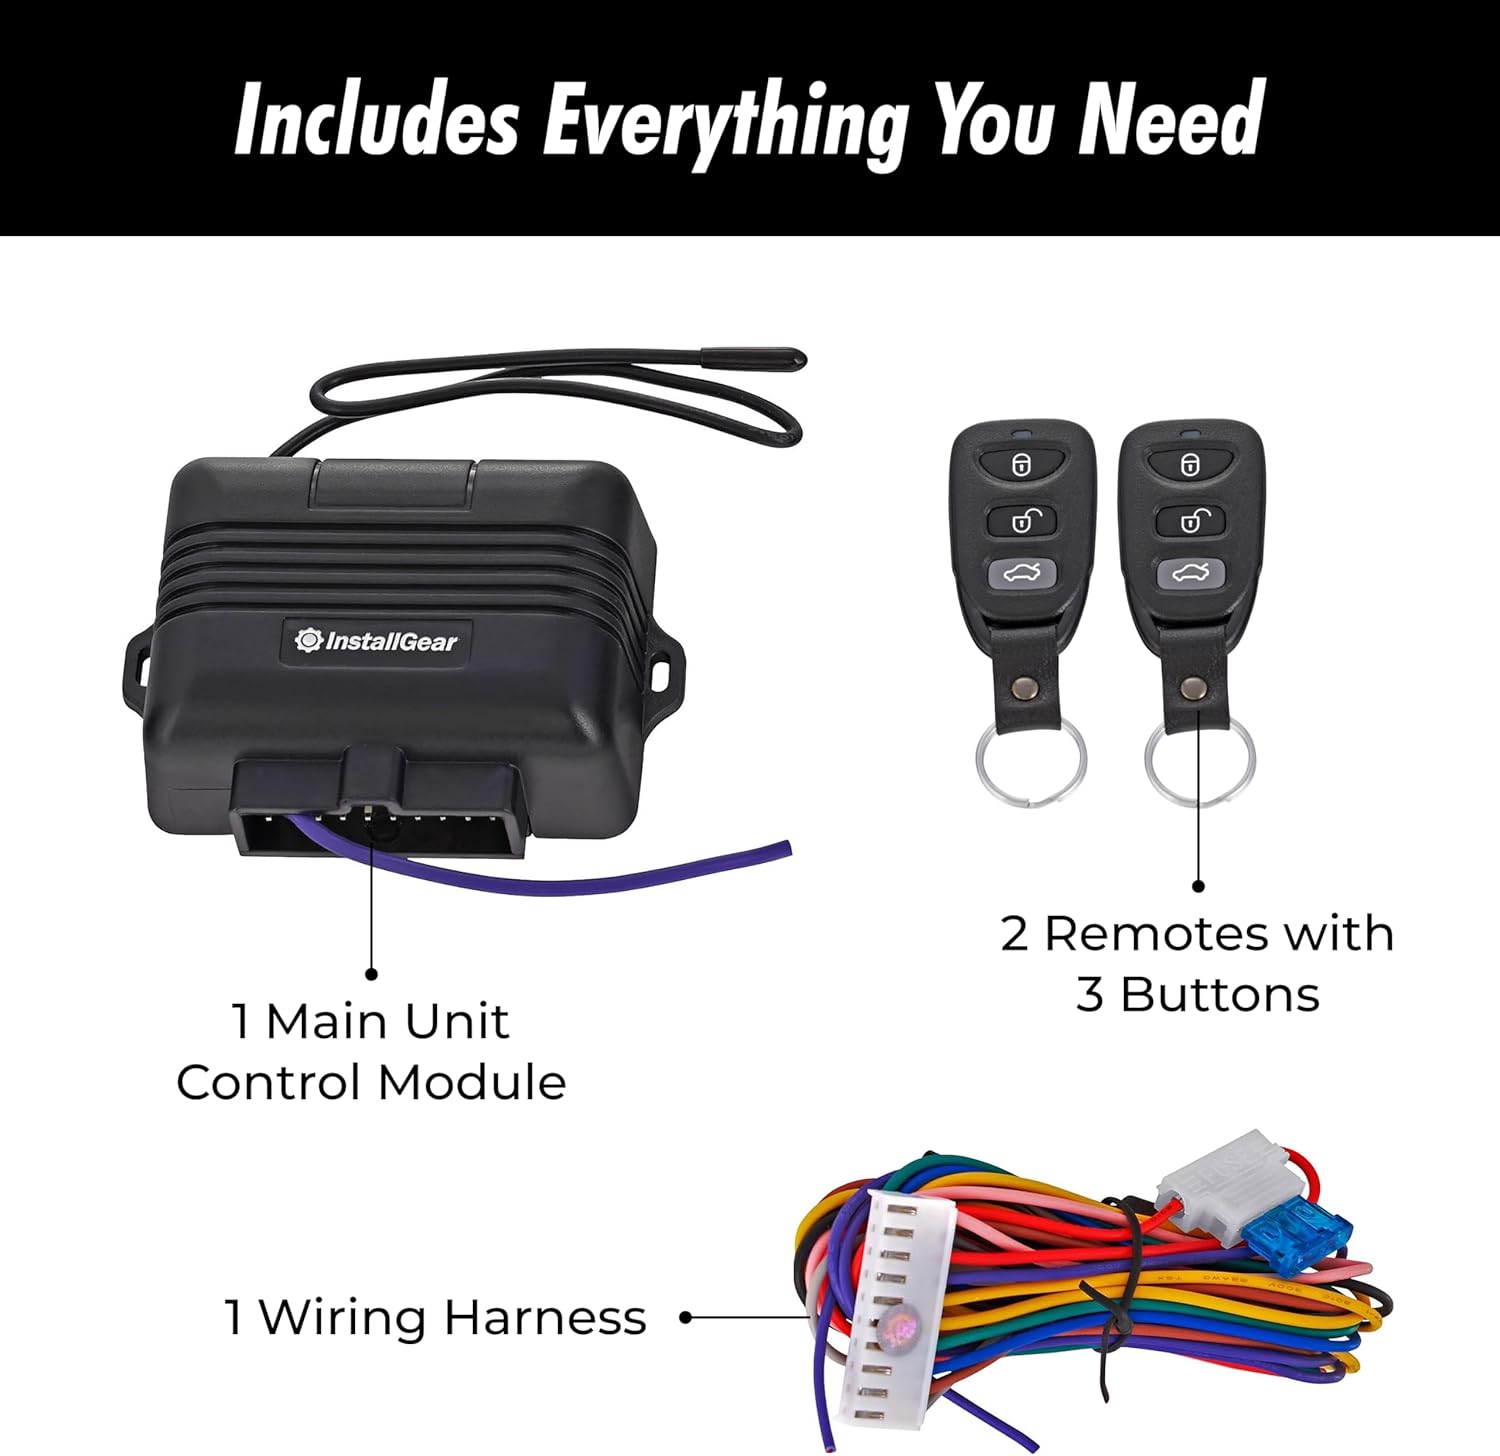
Figure 2.1: Contents of the InstallGear Keyless Entry System package.
3. Configurazione e installazione
Avviso importante sulla sicurezza:
Installation of this keyless entry system requires advanced knowledge of automotive electrical systems and vehicle-specific wiring diagrams. Incorrect installation can lead to vehicle damage, electrical shorts, or fire. It is highly recommended that installation be performed by a qualified professional. If you are not experienced with car electrical wiring, please seek professional assistance.
3.1. Fasi generali di installazione (installazione professionale consigliata)
- Scollegare la batteria del veicolo: Before beginning any electrical work, disconnect the negative terminal of your vehicle's battery to prevent accidental shorts.
- Identificare il cablaggio del veicolo: Obtain your vehicle's specific wiring diagram to identify the correct wires for constant 12V power, ground, door lock/unlock signals (positive or negative trigger), and optional trunk release or parking light signals. This system supports various lock types.
- Montare l'unità di controllo: Choose a secure, dry location inside the vehicle, typically under the dashboard, to mount the main control unit. Ensure it is away from excessive heat or moisture.
- Collegare l'alimentazione e la terra: Connect the main control unit's power wire (typically red) to a constant 12V power source and the ground wire (typically black) to a reliable chassis ground point.
- Connect Lock/Unlock Wires: Based on your vehicle's wiring diagram and lock type (e.g., negative trigger, positive trigger, 5-wire reverse polarity), connect the appropriate wires from the system's wiring harness to your vehicle's central locking system.
- Connect Optional Features: If desired, connect the trunk release wire and parking light wires according to your vehicle's diagram.
- Proteggi tutte le connessioni: Use high-quality connectors, solder, and electrical tape or heat shrink tubing to ensure all connections are secure and insulated.
- Sistema di test: Reconnect the vehicle battery. Test the lock, unlock, and trunk pop functions using the remote key fobs before reassembling any interior panels.
- Cablaggio sicuro: Disporre e fissare tutti i cavi per evitare schiacciamenti, sfregamenti o interferenze con le parti mobili.

Figure 3.1: Professional installation is recommended for optimal performance and safety.
4. Istruzioni per l'uso
Your InstallGear Keyless Entry System comes with two 3-button remote key fobs for convenient operation.

Figure 4.1: The two included 3-button remote key fobs.
4.1. Remote Key Fob Functions
- Pulsante di blocco (🔒): Press this button once to lock all vehicle doors. The vehicle's parking lights may flash once to confirm the lock action (if connected).
- Pulsante di sblocco (🔓): Press this button once to unlock all vehicle doors. The vehicle's parking lights may flash twice to confirm the unlock action (if connected).
- Trunk Pop Button (🚗): Press and hold this button for approximately 2-3 seconds to activate the trunk release function. This will open your vehicle's trunk or hatch (if connected and supported by your vehicle).

Figure 4.2: Unlocking your car with a press of a button.

Figure 4.3: Effortlessly popping your trunk remotely.
5. Manutenzione
5.1. Assistenza generale
To ensure the longevity and proper functioning of your keyless entry system:
- Keep the remote key fobs dry and away from extreme temperatures.
- Avoid dropping the key fobs or subjecting them to strong impacts.
- Periodically check the wiring connections for any signs of wear or corrosion, especially if the system was self-installed.
5.2. Remote Key Fob Battery Replacement
If the range of your remote key fob decreases significantly or it stops responding, the battery may need replacement. Refer to the specific key fob design for battery type and replacement instructions. Typically, this involves opening the remote casing and replacing a small coin-cell battery (e.g., CR2032).
6. Risoluzione Dei Problemi
This section addresses common issues you might encounter with your InstallGear Keyless Entry System.
| Problema | Possibile causa | Soluzione |
|---|---|---|
| System does not respond to remote. | Dead or low remote battery. Out of range. Wiring issue. | Replace remote battery. Move closer to the vehicle. Check all wiring connections to the control unit. |
| Vehicle battery drains quickly after installation. | Constant power draw from the unit. Incorrect wiring. | Verify that the constant 12V connection is correct and not drawing excessive current when the vehicle is off. Consult a professional auto electrician to diagnose parasitic draw. |
| Lock/Unlock functions work, but trunk pop does not. | Trunk release wire not connected or vehicle does not support remote trunk release. | Ensure the trunk release wire is correctly connected to your vehicle's trunk release mechanism. Confirm your vehicle has an electronic trunk release that can be triggered remotely. |
| La portata del telecomando è scarsa. | Low remote battery. Interference. Control unit placement. | Replace remote battery. Avoid areas with strong radio interference. Ensure the control unit is not obstructed by metal or other dense materials. |
| System was difficult to install. | Complexity of automotive wiring. Lack of vehicle-specific wiring knowledge. | This system requires advanced DIY skills or professional installation. Consult vehicle-specific wiring diagrams or seek assistance from a certified auto electrician. |
7. Specifiche
| Caratteristica | Dettaglio |
|---|---|
| Numero di modello | IGKE |
| Peso dell'articolo | 7.4 once (circa 210 grammi) |
| Dimensioni del pacco | 6.57 x 3.62 x 2.76 pollici (16.7 x 9.2 x 7 cm) |
| Dispositivi compatibili | Cars (Universal, requires vehicle-specific wiring) |
| Telecomando incluso | Yes (Two 3-button remotes) |
| Prima data disponibile | 30 marzo 2016 |
8. Garanzia e supporto
InstallGear products are designed for reliability and durability. For specific warranty information, including coverage period and terms, please refer to the documentation included with your purchase or visit the official InstallGear website. If you encounter any issues or require technical assistance, please contact InstallGear customer support through their official channels.
For the latest product information, FAQs, and support resources, please visit the InstallGear Store on Amazon.
Ask a question about this manual
Ask about setup, troubleshooting, compatibility, parts, safety, or missing instructions. Manuals+ will review the question and use this page’s manual context to help answer it.