1. Prodotto finitoview
This Mopar OEM Roof Cab Clearance Lamps Light Kit is designed to provide additional visibility and a distinct appearance for your Dodge Ram truck. The kit includes all necessary components for installation, ensuring a factory-like fit and finish.
1.1. Componenti del kit
Il kit in genere include:
- Five (5) Roof Cab Clearance Lamp Assemblee
- Cablaggio elettrico
- Lampadine
- Mounting Hardware (grommets, screws, zip ties)
- Modello di installazione
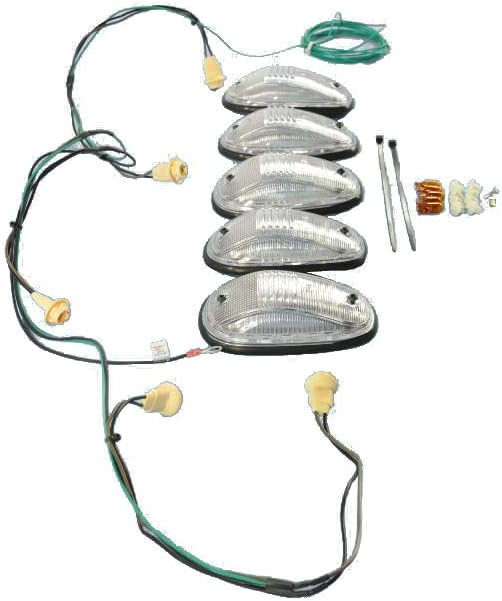
Image 1.1: Contents of the Mopar OEM Roof Cab Clearance Lamps Light Kit, including five lamp assemblies, wiring harness, bulbs, and mounting hardware.
2. Informazioni sulla sicurezza
Read all instructions carefully before beginning installation. Improper installation can lead to vehicle damage, electrical issues, or personal injury. If you are not confident in your ability to perform this installation, it is recommended to seek professional assistance from a certified automotive technician.
- Scollegare sempre la batteria del veicolo prima di eseguire qualsiasi intervento elettrico.
- Indossare adeguati dispositivi di protezione individuale, tra cui occhiali e guanti di sicurezza.
- Assicurarsi che tutti i collegamenti elettrici siano sicuri e adeguatamente isolati per evitare cortocircuiti.
- Use the correct tools for each step to avoid damage to components or the vehicle.
- Verify proper sealing after installation to prevent water leaks into the vehicle's cabin.
3. Configurazione e installazione
This section outlines the steps for installing the Mopar OEM Roof Cab Clearance Lamps. The process involves drilling into the vehicle's roof, so precision and care are essential.
3.1. Strumenti necessari
- Trapano
- Small drill bit (e.g., 1/8 inch for pilot holes)
- Drill bit for grommets (e.g., 15/64 inch or size specified by template)
- Step bit (7/8 inch for wiring holes)
- Spring-loaded center punch
- Nastro di misurazione
- Nastro adesivo
- Automotive-grade sealant (e.g., silicone or RTV)
- Spelafili/crimpatrici
- Nastro isolante o guaina termorestringente
- Double-sided tape (optional, for grommets)
- Torx bit or screwdriver set
- Clean cloths and rubbing alcohol for surface preparation
3.2. Passaggi di pre-installazione
- Review Istruzioni: Read the entire manual and the included Mopar instructions thoroughly before starting.
- Preparazione del veicolo: Parcheggiare il veicolo su una superficie piana e inserire il freno di stazionamento. Scollegare il terminale negativo della batteria del veicolo.
- Clean Roof Surface: Thoroughly clean the area of the roof where the lights will be installed. Ensure it is free of dirt, dust, and wax.
- Preparare il modello: Carefully cut out the provided installation template.
3.3. Foratura e montaggio
- Modello di posizione: Carefully position the template on the roof according to the vehicle's specifications. Use masking tape to secure it in place. Double-check measurements to ensure proper alignment.
- Segna i buchi: Use a spring-loaded center punch to mark the center of all drilling locations indicated on the template.
- Praticare i fori pilota: Using a small drill bit, drill pilot holes at each marked location.
- Drill Grommet Holes: Enlarge the pilot holes for the lamp mounting screws to the size specified for the grommets (e.g., 15/64 inch). Ensure these holes allow the grommets to fit snugly.
- Drill Wiring Holes: Use a 7/8 inch step bit to drill the larger holes for the wiring harness. Place a protective material (e.g., an old cloth or cardboard) underneath the drilling area inside the cabin to catch debris and prevent damage.
- Deburr Holes: Carefully deburr all drilled holes to remove any sharp edges.
- Buchi puliti: Clean around the drilled holes with rubbing alcohol to ensure proper sealant adhesion.
- Installare gli occhielli: Insert the grommets into the smaller mounting holes. If grommets spin, apply a small piece of double-sided tape to the underside of the grommet flange before inserting.
- Applicare il sigillante: Apply a bead of automotive-grade sealant around the edge of each drilled hole and around the base of each lamp assembly before mounting.
- Monte Lamps: Carefully place each lamp assembly over its respective holes, ensuring the wiring passes through the larger hole. Secure the lamps with the provided screws, tightening them gently to compress the sealant without overtightening.
3.4. Collegamenti elettrici
- Cablaggio del percorso: Route the wiring harness from the roof lamps down the passenger side A-pillar into the vehicle's cabin.
- Identificare la fonte di alimentazione: For 2010-2018 Dodge Ram models, locate the white wire with a green stripe in the passenger side A-pillar or near the clearance light fuse. This wire typically provides power for the clearance lights. Consult your vehicle's specific wiring diagram if unsure.
- Connetti alimentazione: Using appropriate wire connectors (e.g., T-taps or solder connections with heat shrink), connect the positive wire from the lamp harness to the identified power source wire.
- Collegare terra: Connect the ground wire from the lamp harness to a suitable chassis ground point within the vehicle. Ensure a clean, secure connection.
- Funzionalità di prova: Reconnect the vehicle's battery. Turn on the vehicle's parking lights or headlights to test if the new roof cab clearance lamps illuminate correctly.
- Cablaggio sicuro: Once tested, secure all wiring with zip ties to prevent rattling or interference with other vehicle components.
4. Istruzioni per l'uso
The Mopar OEM Roof Cab Clearance Lamps are designed to operate in conjunction with your vehicle's existing lighting system. Once properly installed and wired, they will illuminate automatically when your vehicle's parking lights or headlights are activated.
- Attivazione automatica: Il lamps will turn on when the vehicle's exterior lights (parking lights, low beams, or high beams) are switched on.
- Nessun controllo manuale: There is no separate switch for these lamps; their operation is integrated with the vehicle's lighting system.
5. Manutenzione
Regular maintenance ensures the longevity and proper function of your roof cab clearance lamps.
- Pulizia: Pulisci lamp lenses periodically with a soft cloth and mild automotive soap. Avoid abrasive cleaners that can scratch the lens material.
- Sostituzione della lampadina: Se tuttoamp stops illuminating, check the bulb. Replace with a compatible bulb type. Some users opt for LED bulbs for increased brightness and lifespan; ensure any replacement bulbs are compatible with your vehicle's electrical system.
- Ispezione del sigillante: Periodically inspect the sealant around the lamp bases for any signs of cracking or degradation. Reapply sealant as necessary to prevent water intrusion.
- Controllo del cablaggio: Occasionally check visible wiring for any signs of wear, fraying, or loose connections.
6. Risoluzione Dei Problemi
If you encounter issues with your roof cab clearance lamps, refer to the following troubleshooting guide:
- Lamps Not Illuminating:
- Check vehicle's parking lights/headlights to ensure they are on.
- Verify all wiring connections are secure and properly made (power and ground).
- Inspect bulbs for damage or burnout. Replace if necessary.
- Controllare i fusibili interessati nella scatola dei fusibili del veicolo.
- Perdite d'acqua:
- Inspect the sealant around each lamp base. Ensure there are no gaps or cracks.
- Verify that the grommets are properly seated and not damaged.
- Reapply automotive-grade sealant if any breaches are found.
- Luci tremolanti:
- Controllare che i collegamenti dei cavi non siano allentati.
- Garantire una corretta messa a terra.
- If using aftermarket LED bulbs, ensure they are compatible and do not require additional resistors.
7. Specifiche
| Caratteristica | Specificazione |
|---|---|
| Marca | Mopar |
| Numero di modello | 82211190AB.0 |
| Tipo di servizio del veicolo compatibile | Dodge Ram 1500, 2500, 3500 |
| Anni compatibili | 2010-2018 |
| Caratteristica speciale | Impermeabile |
| Cosatage | 35 watt |
| Voltage | 12 Volt |
| Posizione della parte automatica | Rear (refers to position on vehicle, not light direction) |
| Colore della lente | Chiaro |
| Materiale della lente | Policarbonato |
| Dimensioni articolo (L x P x A) | 9 x 6.5 x 5 pollici |
| Peso dell'articolo | 2.55 libbre |
| Numero di parte del produttore | 82211190AB.0 |
8. Informazioni sulla garanzia
For detailed warranty information regarding your Mopar OEM Roof Cab Clearance Lamps Light Kit, please refer to the official documentation provided with your purchase or visit the official Mopar websito. I termini e le condizioni della garanzia possono variare.
9. Supporto
If you require technical assistance, have questions about installation, or need to report a product issue, please contact Mopar customer service. You can typically find contact information on the Mopar official website or through your authorized Mopar dealer.
Mopar Ufficiale Websito: www.mopar.com