Introduzione
The C2G 40914 Compact Amplifier è progettato per amplify dynamic microphone or stereo audio signals, providing 15 Watts of power per channel to a sound reinforcement system. This amplifier features a discreet installation and remote control capability via an included wall plate. It is suitable for various audio setups requiring compact amplification and external volume management.
Cosa c'è nella scatola
Verificare che tutti i componenti siano presenti prima di procedere con l'installazione:
- Compatto Amppiù vivace
- Decorator Volume Control Wall Plate
- Copertura della piastra frontale
- Adattatore di alimentazione
- Bracket Mounting Screws 6-32 (25mm) qty. 2
- Wall Plate Mounting Screw M3.5 (8mm) qty. 3
- Manuale d'uso
Prodotto finitoview
Familiarizza con il amplifier and wall plate components.

Figura 1: Davanti view of the C2G 40914 Compact Amplifier. This image displays the local volume control knob, power indicator LED, 1/4 inch microphone input, 3.5mm auxiliary input, and input select switch.

Figura 2: Posteriore view of the C2G 40914 Compact Amplificatore. Questo view shows the speaker output terminals (L+, L-, R+, R-), the remote volume control port (RJ45), and the DC 12V power input.

Figura 3: Decorator Volume Control Wall Plate and face plate cover. The wall plate features a rotary volume knob and a power indicator LED.
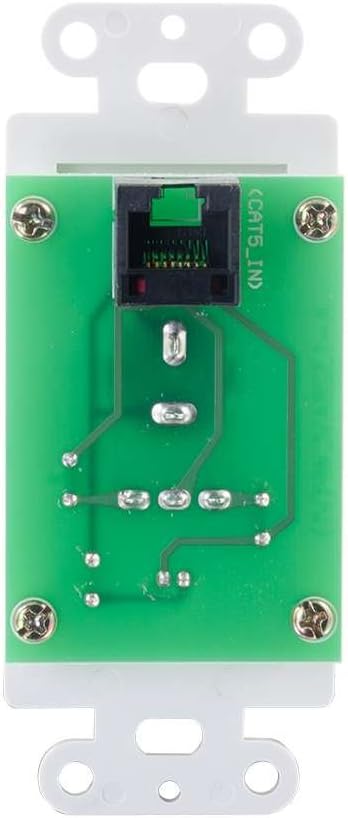
Figura 4: Posteriore view of the Decorator Volume Control Wall Plate, showing the RJ45 connector for remote communication with the amppiù vivace.
Impostare
-
Montaggio del Amplificatore:
IL amplifier includes a built-in mounting bracket. Secure the amplifier to a suitable surface using the provided 6-32 (25mm) mounting screws. Ensure adequate ventilation around the unit.
-
Collegamento degli altoparlanti:
Collega gli altoparlanti passivi ai terminali di uscita degli altoparlanti sul retro del amplifier (L+, L-, R+, R-). Ensure correct polarity (+ to + and - to -) for each speaker channel. The amplifier provides 15 watts per channel.
-
Collegamento di sorgenti audio:
- Ingresso microfono: Connect a dynamic microphone to the 1/4 inch MIC IN jack on the front panel.
- Ingresso ausiliario: Connect an audio source (e.g., smartphone, media player) to the 3.5mm AUX IN jack on the front panel.
-
Connecting the Remote Wall Plate:
Install the Decorator Volume Control Wall Plate in a standard wall box. Connect a Cat5e/Cat6 cable (not included) from the RJ45 port on the rear of the wall plate to the REMOTE port (RJ45) on the rear of the amplifier. Secure the wall plate with the provided M3.5 (8mm) screws and attach the face plate cover.
-
Alimentare il Amplificatore:
Connect the included power adapter to the DC 12V input on the rear of the amplifier, then plug the adapter into a standard AC power outlet. The power indicator LED on the amplifier and wall plate will illuminate.
Istruzioni per l'uso
-
Accensione/spegnimento:
IL amplifier powers on automatically when connected to power. The power indicator LED on both the amplifier and the wall plate will light up.
-
Selezione input:
Utilizzare il SELEZIONE INGRESSO switch on the front panel of the amplifier to choose between the MIC IN and AUX IN audio sources.
-
Controllo del volume:
IL amplifier offers both local and remote volume control options:
- Local Volume: Adjust the rotary knob labeled VOLUME sul pannello frontale del amppiù vivace.
- Remote Volume: Adjust the rotary knob labeled VOLUME on the Decorator Volume Control Wall Plate.
Utilizzare il SELEZIONA VOLUME accendi il amplifier to determine whether the local or remote volume control is active. Set to 'LOCAL' to use the amplifier's knob, or 'REMOTE' to use the wall plate's knob.
-
Utilizzo del microfono:
When MIC IN is selected, speak into the connected dynamic microphone. Adjust the volume using the selected volume control (local or remote) to achieve the desired output level.
Manutenzione
- Mantieni il amplifier and wall plate clean by wiping with a soft, dry cloth.
- Avoid using liquid cleaners or aerosol sprays, which may damage the unit.
- Assicurare una ventilazione adeguata attorno all' amplifier per evitare il surriscaldamento.
- Non esporre l'unità a umidità eccessiva o temperature estreme.
Risoluzione dei problemi
If you encounter issues with your C2G 40914 Compact Amplifier, fare riferimento alle seguenti soluzioni comuni:
-
Nessuna uscita audio:
- Ensure the power adapter is securely connected and the power indicator LEDs are lit.
- Verify that speakers are correctly wired to the amplifier's output terminals with correct polarity.
- Controllare che il SELEZIONE INGRESSO switch is set to the correct source (MIC or AUX).
- Confermare che il SELEZIONA VOLUME switch is set to the active volume control (LOCAL or REMOTE) and that the volume knob is turned up.
- Test with a different audio source or microphone to rule out source device issues.
-
Remote Volume Control Not Working:
- Ensure the Cat5e/Cat6 cable connecting the wall plate to the amplifier is securely plugged into both RJ45 ports.
- Verificare che il SELEZIONA VOLUME accendi il amplifier is set to 'REMOTE'.
- Check the wall plate's power indicator LED to ensure it is receiving power.
-
Audio distorto:
- Ridurre il livello del volume su entrambi i amplifier/wall plate and the audio source device.
- Assicurarsi che l'impedenza dell'altoparlante corrisponda a amplifier's requirements (typically 4-8 ohms).
- Controllare che tutti i collegamenti dei cavi non siano allentati o danneggiati.
Specifiche
| Caratteristica | Dettaglio |
|---|---|
| Dimensioni del prodotto | 1.95 x 1.3 x 4.05 pollici (L x L x A) |
| Peso dell'articolo | 1 libbra |
| Numero di modello | 40914 |
| Potenza di uscita | 15 Watts per channel (30W total) |
| Connettori di ingresso | 1/4 inch Dynamic Microphone, 3.5mm Stereo Audio Line Level |
| Connettori di uscita | Speaker Terminals (L+, L-, R+, R-) |
| Telecomando | RJ45 for external volume control wall plate |
| Alimentazione elettrica | DC 12V (Power Adapter included) |
| Dispositivi compatibili | Altoparlanti |
| Colore | Nero |
Garanzia e supporto
The C2G 40914 Compact Amplifier is thoroughly inspected and tested to ensure quality and comes with a warranty for your complete satisfaction. For specific warranty terms and conditions, please refer to the documentation included with your purchase or visit the official C2G websito.
For technical support, troubleshooting assistance, or further inquiries, please visit the C2G Store o i loro canali di supporto ufficiali.