
1. Introduzione
Grazie per l'acquistoasing the BLACK+DECKER 18V Lithium Cordless Drill Driver BDCDD186K2. This manual provides essential information for the safe and efficient operation, maintenance, and troubleshooting of your tool. Please read this manual carefully before use and keep it for future reference.
Safety First: Always wear appropriate personal protective equipment, such as safety glasses, gloves, and hearing protection, when operating power tools. Disconnect the battery before performing any adjustments or maintenance.
2. Prodotto finitoview
The BLACK+DECKER BDCDD186K2 is a versatile 18V lithium-ion cordless drill driver designed for various drilling and fastening tasks in wood and metal. It features a powerful motor, variable speed control, and multiple clutch settings for precise operation.

Figure 2.1: The BLACK+DECKER 18V Lithium Cordless Drill Driver BDCDD186K2.
Caratteristiche principali:
- Batteria agli ioni di litio da 18 V: Provides consistent power with minimal self-discharge and no memory effect.
- Coppia elevata: 40N·m maximum tightening torque for demanding applications.
- Cambio a 2 velocità: Offers variable speed control (0-360 / 0-1400 RPM) for optimized performance across different materials.
- 11-Position Clutch: Allows precise torque adjustment to prevent over-driving screws and damage to materials, including a dedicated drill mode.
- Design compatto e leggero: Enhances user comfort and reduces fatigue during extended use.

Figure 2.2: Diagram illustrating the key features of the drill driver, including the high-performance transmission and quick-release hex chuck.
3. Impostazione
3.1 Caricamento della batteria
Your drill driver comes with two 1.5Ah lithium-ion batteries and a rapid charger. Ensure the battery is fully charged before first use.
- Collegare il caricabatterie rapido a una presa di corrente standard.
- Far scorrere la batteria sul caricabatterie finché non scatta in posizione.
- La spia di carica sul caricabatterie si illuminerà. Una carica completa richiede circa 40 minuti.
- Una volta completata la ricarica, rimuovere la batteria dal caricabatterie.
Caution: Use only BLACK+DECKER specified chargers and batteries. Do not charge damaged batteries.

Figure 3.1: Included accessories: Rapid Charger, 1.5Ah Lithium-Ion Batteries (x2), and Kit Box.
3.2 Installazione e rimozione dei bit
The drill driver features a 1-10mm chuck for various drill bits and driver bits.
- Per installare una punta, ruotare il mandrino in senso antiorario finché le ganasce non sono sufficientemente aperte da consentire l'inserimento della punta.
- Inserire completamente la punta nel mandrino.
- Ruotare il mandrino in senso orario per serrare saldamente le ganasce attorno alla punta. Assicurarsi che la punta sia centrata e saldamente fissata.
- To remove a bit, rotate the chuck counter-clockwise until the jaws release the bit.
4. Istruzioni per l'uso
4.1 Accensione/spegnimento e controllo della velocità variabile
The tool is equipped with a variable speed trigger switch.
- To turn on, press the trigger switch. The speed increases as you press the trigger further.
- Per spegnere, rilasciare l'interruttore a grilletto.
4.2 Selezione dell'attrezzatura
The drill driver has a 2-speed gearbox for optimal performance.
- Marcia 1 (bassa velocità, coppia elevata): Select for heavy-duty drilling, driving large screws, or when maximum torque is required (0-360 RPM).
- Marcia 2 (alta velocità, bassa coppia): Select for fast drilling in softer materials or driving smaller screws (0-1400 RPM).
To change gears, slide the gear selector switch located on top of the tool. Ensure the tool is stopped before changing gears.

Figure 4.1: The 2-speed gear selector switch allows speed adjustment according to the task.
4.3 Impostazioni della frizione
The 11-position clutch allows you to adjust the torque output. This prevents over-driving screws and damaging the workpiece or screw head.
- Rotate the clutch collar to select the desired torque setting. Lower numbers indicate lower torque, suitable for smaller screws and softer materials. Higher numbers provide more torque for larger screws and harder materials.
- The drill symbol (drill mode) bypasses the clutch for maximum torque, ideal for drilling holes.

Figure 4.2: The 11-position clutch setting ring for precise torque control.
4.4 Perforazione e avvitamento
- Perforazione: Select the drill mode on the clutch collar. Choose the appropriate gear (Gear 1 for larger holes/harder materials, Gear 2 for smaller holes/softer materials). Apply steady, even pressure.
- Viti di guida: Select a clutch setting appropriate for the screw size and material. Start with a lower setting and increase if the screw is not driving fully. Use Gear 1 for larger screws and Gear 2 for smaller screws.

Figure 4.3: The drill driver in use for drilling into wood.

Figure 4.4: The drill driver in use for driving a screw.
5. Manutenzione
5.1 Pulizia
- Regularly clean the ventilation slots on the tool to prevent overheating.
- Utilizzare un morbido, damp panno per pulire l'esterno dell'utensile. Non utilizzare prodotti chimici aggressivi o detergenti abrasivi.
- Keep the chuck jaws free of debris for proper bit gripping.
5.2 Conservazione
- Conservare l'utensile e le batterie in un luogo fresco e asciutto, lontano dalla luce solare diretta e dall'umidità.
- Always remove the battery from the tool before storage.
- Store batteries partially charged (around 50%) if storing for extended periods to prolong battery life.
- Use the provided kit box for organized and protected storage.
6. Risoluzione Dei Problemi
| Problema | Possibile causa | Soluzione |
|---|---|---|
| Lo strumento non si avvia | Batteria non carica o inserita in modo errato. | Caricare la batteria. Assicurarsi che la batteria sia completamente inserita fino a sentire un clic. |
| Potenza o velocità ridotte | La batteria è scarica. | Ricaricare la batteria. |
| La punta scivola nel mandrino | Mandrino non serrato a sufficienza o ganasce sporche. | Serrare saldamente il mandrino. Pulire le ganasce del mandrino. |
| Surriscaldamento | Ventilation slots blocked. Continuous heavy use. | Pulire le fessure di ventilazione. Lasciare raffreddare l'utensile. Ridurre il carico. |
7. Specifiche
| Caratteristica | Specificazione |
|---|---|
| Numero di modello | BDCDD186K2 |
| Voltage | 18V |
| Tipo di batteria | Ioni di litio |
| Capacità della batteria | 1.5 Ah |
| Coppia di serraggio massima | 40 Nm |
| Velocità a vuoto (marcia 1) | 0-360 giri/min |
| Velocità a vuoto (marcia 2) | 0-1400 giri/min |
| Impostazioni frizione | 11 (including drill mode) |
| Dimensioni del mandrino | 1-10 millimetri |
| Dimensioni dell'utensile (L x P x A) | Dimensioni: 18 x 7.8 x 22.5 cm |
| Tool Weight (with battery) | 1.23 kg |
| Tipo di caricabatterie | Caricatore rapido |
| Tempo di carica approssimativo | 40 minuti |
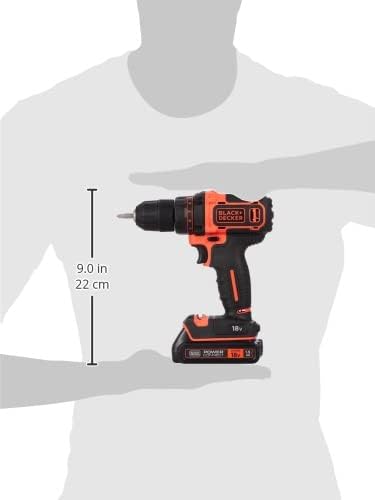
Figure 7.1: Approximate dimensions of the drill driver.
8. Garanzia e supporto
I prodotti BLACK+DECKER sono realizzati secondo elevati standard qualitativi e sono garantiti contro i difetti di fabbricazione. Per i termini e le condizioni di garanzia specifici, consultare la scheda di garanzia inclusa con il prodotto o visitare il sito ufficiale BLACK+DECKER. websito.
Per assistenza tecnica, pezzi di ricambio o assistenza, contattare l'assistenza clienti BLACK+DECKER tramite il loro sito ufficiale websito o le informazioni di contatto fornite nella confezione del prodotto.
Risorse online:
- Official BLACK+DECKER Websito: www.blackanddecker.com