
1. Introduzione
The Centralite Pearl Thermostat is designed to provide precise temperature control with an intuitive touch interface. It integrates seamlessly with various smart home platforms using ZigBee connectivity, offering efficient management of residential HVAC systems. This manual provides essential information for installation, operation, and maintenance of your Pearl Thermostat.
2. Caratteristiche principali
- Compatible with SmartThings, Spectrum, Cox, Time Warner Cable, Vera, and ZigBee platforms.
- Supports up to 2-stage calore e 2-stage cool HVAC systems.
- Designed for quick installation, typically within 15 minutes.
- Features a built-in power amplifier for extended wireless range.
- Equipped with responsive touch controls for user interaction.
3. Contenuto della confezione
Verifica che tutti gli articoli siano presenti nel tuo pacco:
- Pearl Thermostat
- Viti di montaggio (4)
- Batterie AA (4)
- Guida rapida
- Etichette di cablaggio
4. Installazione
Prima di iniziare l'installazione, assicurarsi che l'alimentazione del sistema HVAC sia disattivata tramite l'interruttore automatico per evitare scosse elettriche.
4.1 Mounting the Backplate
- Carefully remove your old thermostat from the wall. Note the wiring connections before disconnecting.
- Mount the Pearl Thermostat backplate to the wall using the provided mounting screws. Ensure it is level.
4.2 Cablaggio
The Pearl Thermostat features quick-connect terminals for tool-free wiring. Match the wires from your HVAC system to the corresponding terminals on the thermostat backplate. Use the included wiring labels for identification.

Figura 1: Posteriore view of the Pearl Thermostat backplate, illustrating battery compartments and quick-connect wiring terminals for HVAC system connection.
Common wiring configurations include:
- R/Rc/Rh: 24V AC power (usually red wire)
- C: Common wire (for continuous 24V power, often blue or black)
- W/W1: Heat (usually white wire)
- Y/Y1: Cool (usually yellow wire)
- G: Fan (usually green wire)
- O / B: Reversing valve for heat pumps
Insert each stripped wire end into its corresponding terminal until it is securely held.
4.3 Installazione della batteria
Insert the four AA batteries into the designated compartments on the back of the thermostat unit. Ensure correct polarity.
4.4 Attaching the Thermostat
Align the thermostat unit with the mounted backplate and gently push until it clicks into place. Restore power to your HVAC system at the circuit breaker.
5. Istruzioni per l'uso
The Pearl Thermostat features a clear LCD display and intuitive touch controls for easy operation.

Figura 2: Fronte view of the Pearl Thermostat, highlighting the digital display and touch-sensitive buttons for Mode, Hold, and Fan functions.
5.1 Regolazione della temperatura
Utilizzare il + E - touch areas on the right side of the thermostat to increase or decrease the desired temperature set point.
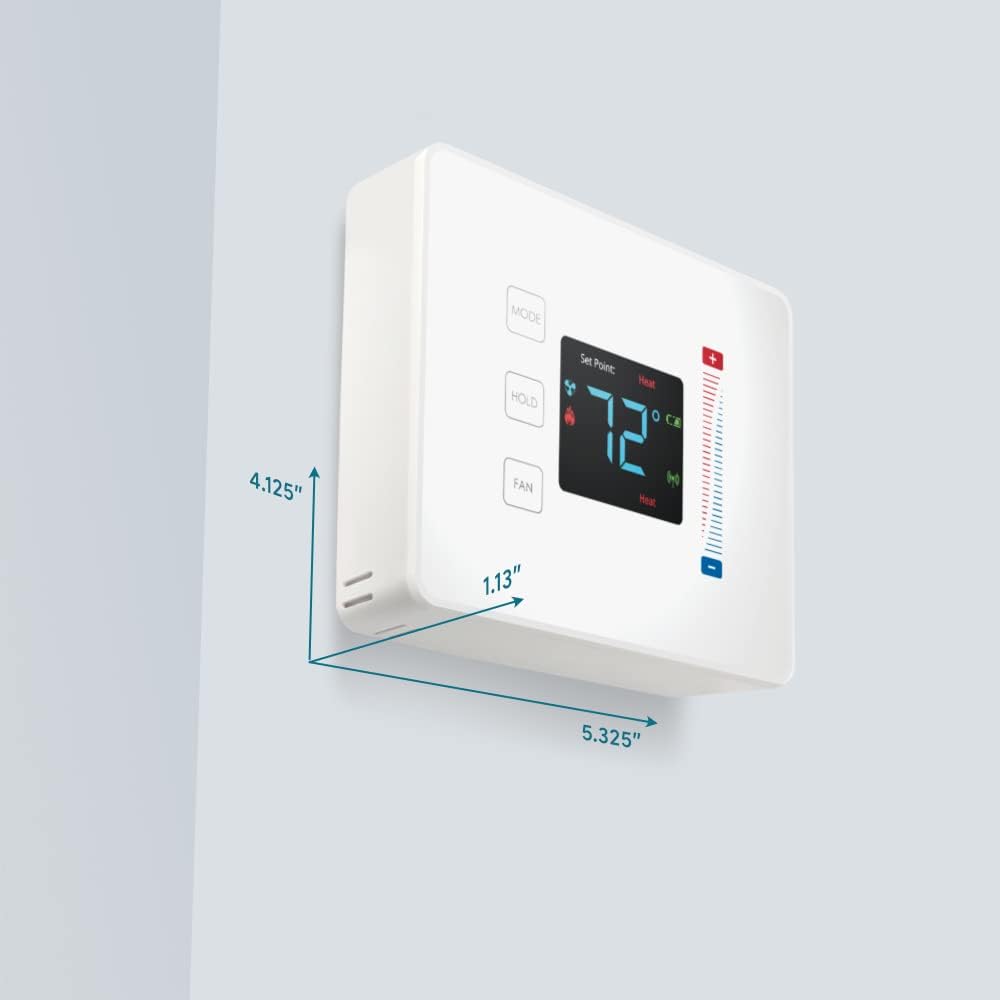
Figure 3: User interaction with the Pearl Thermostat's touch screen to modify temperature settings.
5.2 Selezione della modalità
Premere il tasto MODALITÀ button to cycle through available operating modes: Heat, Cool, Auto, Off.
5.3 Funzione di attesa
Premere il tasto PRESA button to maintain the current temperature setting indefinitely, overriding any programmed schedules. Press again to release the hold and resume the schedule.
5.4 Controllo della ventola
Premere il tasto FAN button to cycle through fan settings: Auto (fan runs only when heating or cooling) or On (fan runs continuously).
6. Manutenzione
6.1 Sostituzione della batteria
The Pearl Thermostat is powered by four AA batteries. When the battery level is low, a low battery indicator will appear on the display. To replace batteries:
- Gently pull the thermostat unit off its backplate.
- Remove the old AA batteries and dispose of them properly.
- Inserire quattro nuove batterie alcaline AA, assicurandosi della corretta polarità.
- Reattach the thermostat unit to the backplate.
Regular battery replacement ensures uninterrupted operation and maintains ZigBee connectivity.
6.2 Pulizia
Pulisci la superficie del termostato con un panno morbido eamp cloth. Avoid using abrasive cleaners or solvents, as these can damage the display and finish.
7. Risoluzione Dei Problemi
If you encounter issues with your Pearl Thermostat, refer to the following common troubleshooting steps:
- Nessun display/alimentazione: Check if the AA batteries are correctly installed and fully charged. Ensure power to the HVAC system is on at the circuit breaker.
- Il sistema HVAC non risponde: Verify that the wiring connections to the backplate are secure. Confirm the thermostat is in the correct operating mode (Heat/Cool/Auto).
- Connectivity Issues (ZigBee): Ensure your smart home hub is powered on and within range. Refer to your smart home hub's instructions for device pairing. You may need to initiate a re-pairing process.
- Letture di temperatura errate: Assicurarsi che il termostato non sia esposto alla luce solare diretta, a correnti d'aria o a fonti di calore che potrebbero interferire con il sensore interno.
- Thermostat Not Responding to Touch: Gently clean the screen surface. If the issue persists, try removing the thermostat from its backplate, waiting 30 seconds, and reattaching it to perform a soft reset.
8. Specifiche

Figure 4: Dimensions of the Centralite Pearl Thermostat.
| Specificazione | Dettaglio |
|---|---|
| Marca | Centralizzazione |
| Nome del modello | Centralite Pearl Thermostat |
| Numero di modello | 3000-wC |
| Tipo di controllore | SmartThings, Vera |
| Colore | Bianco |
| Tipo di controllo della temperatura | Programmabile, Digitale |
| Tecnologia di connettività | ZigBee |
| Fonte di alimentazione | Alimentato a batteria (4 batterie AA, incluse) |
| Peso dell'articolo | 0.97 libbre (circa 15.5 once) |
| Voltage | 230 Volts (HVAC system) |
| Materiale | Perla |
| Tipo di visualizzazione | LCD |
| Tipo di finitura | Raso |
| Tipo di controllo | Controllo touchpad |
| Metodo di controllo | Applicazione |
| Tipo di montaggio | Montaggio a parete |
| Retroilluminazione | SÌ |
| Dimensioni del prodotto (L x P x A) | 5.33 x 1.13 x 4.13 pollici |
| Codice UPC | 812489022264 |
9. Garanzia e supporto
For warranty information and technical support, please refer to the documentation included with your product or visit the official Centralite websito. Conserva la ricevuta d'acquisto come prova d'acquisto.