
1. Introduzione
The ACOPOWER Midas 30A MPPT Solar Charge Controller is designed to efficiently manage power flow from your solar panels to your battery bank. Utilizing advanced Maximum Power Point Tracking (MPPT) technology, it optimizes energy harvest and ensures safe, reliable charging for various battery types, including Sealed, Gel, Flooded, and Lithium (LiFePO4) batteries. This manual provides essential information for the proper installation, operation, and maintenance of your solar charge controller.
2. Informazioni sulla sicurezza
- Leggere attentamente tutte le istruzioni prima dell'installazione e del funzionamento.
- Assicurarsi che tutti i cablaggi siano eseguiti da personale qualificato e siano conformi alle normative elettriche locali.
- Scollegare sempre il pannello solare e la batteria prima di installare o regolare il controller.
- Use appropriate circuit breakers or fuses for each line to protect against overcurrent.
- Evitare di cortocircuitare i terminali della batteria o i terminali del pannello solare.
- Installare il controller in un'area ben ventilata, lontano da materiali infiammabili e dalla luce solare diretta.
- Durante l'installazione, indossare adeguati dispositivi di protezione individuale (DPI), come guanti e protezioni per gli occhi.
- Assicurare la corretta messa a terra del sistema.
3. Prodotto finitoview
The ACOPOWER Midas 30A MPPT Solar Charge Controller features a robust design and user-friendly interface for efficient solar power management.
Caratteristiche principali:
- Advanced MPPT technology with 99.5% tracking efficiency and 98% peak conversion efficiency.
- Automatic temperature compensation for optimized battery charging.
- Rileva automaticamente la tensione del sistema 12V/24V DCtage.
- Compatible with Sealed, Gel, Flooded, and Lithium-ion (LiFePO4) batteries.
- Supports multiple load control methods.
- Backlit LCD screen and die-cast aluminum design for durability.
- 4-seconditage battery charging (bulk, boost, float, and equalization).
- Comprehensive protection against reverse polarity, overcharging, over-discharging, overload, short-circuiting, and reverse current.
Dimensioni fisiche e componenti:

Figure 3.1: ACOPOWER Midas 30A MPPT Solar Charge Controller with dimensions.

Figure 3.2: Component diagram of the controller, highlighting ports and buttons.

Figura 3.3: Fronte view of the ACOPOWER Midas Y Series MPPT Solar Charge Controller.

Figure 3.4: High tracking efficiency of the MPPT controller.

Figure 3.5: The controller features an IP33 waterproof enclosure.
4. Impostazione
Luogo di installazione:
Mount the controller vertically on a wall or sturdy surface. Ensure there is ample space around the controller for proper heat dissipation. Avoid direct sunlight, high temperatures, and humid environments.
Schema elettrico:
Follow the wiring diagram carefully. Incorrect wiring can damage the controller and other components.
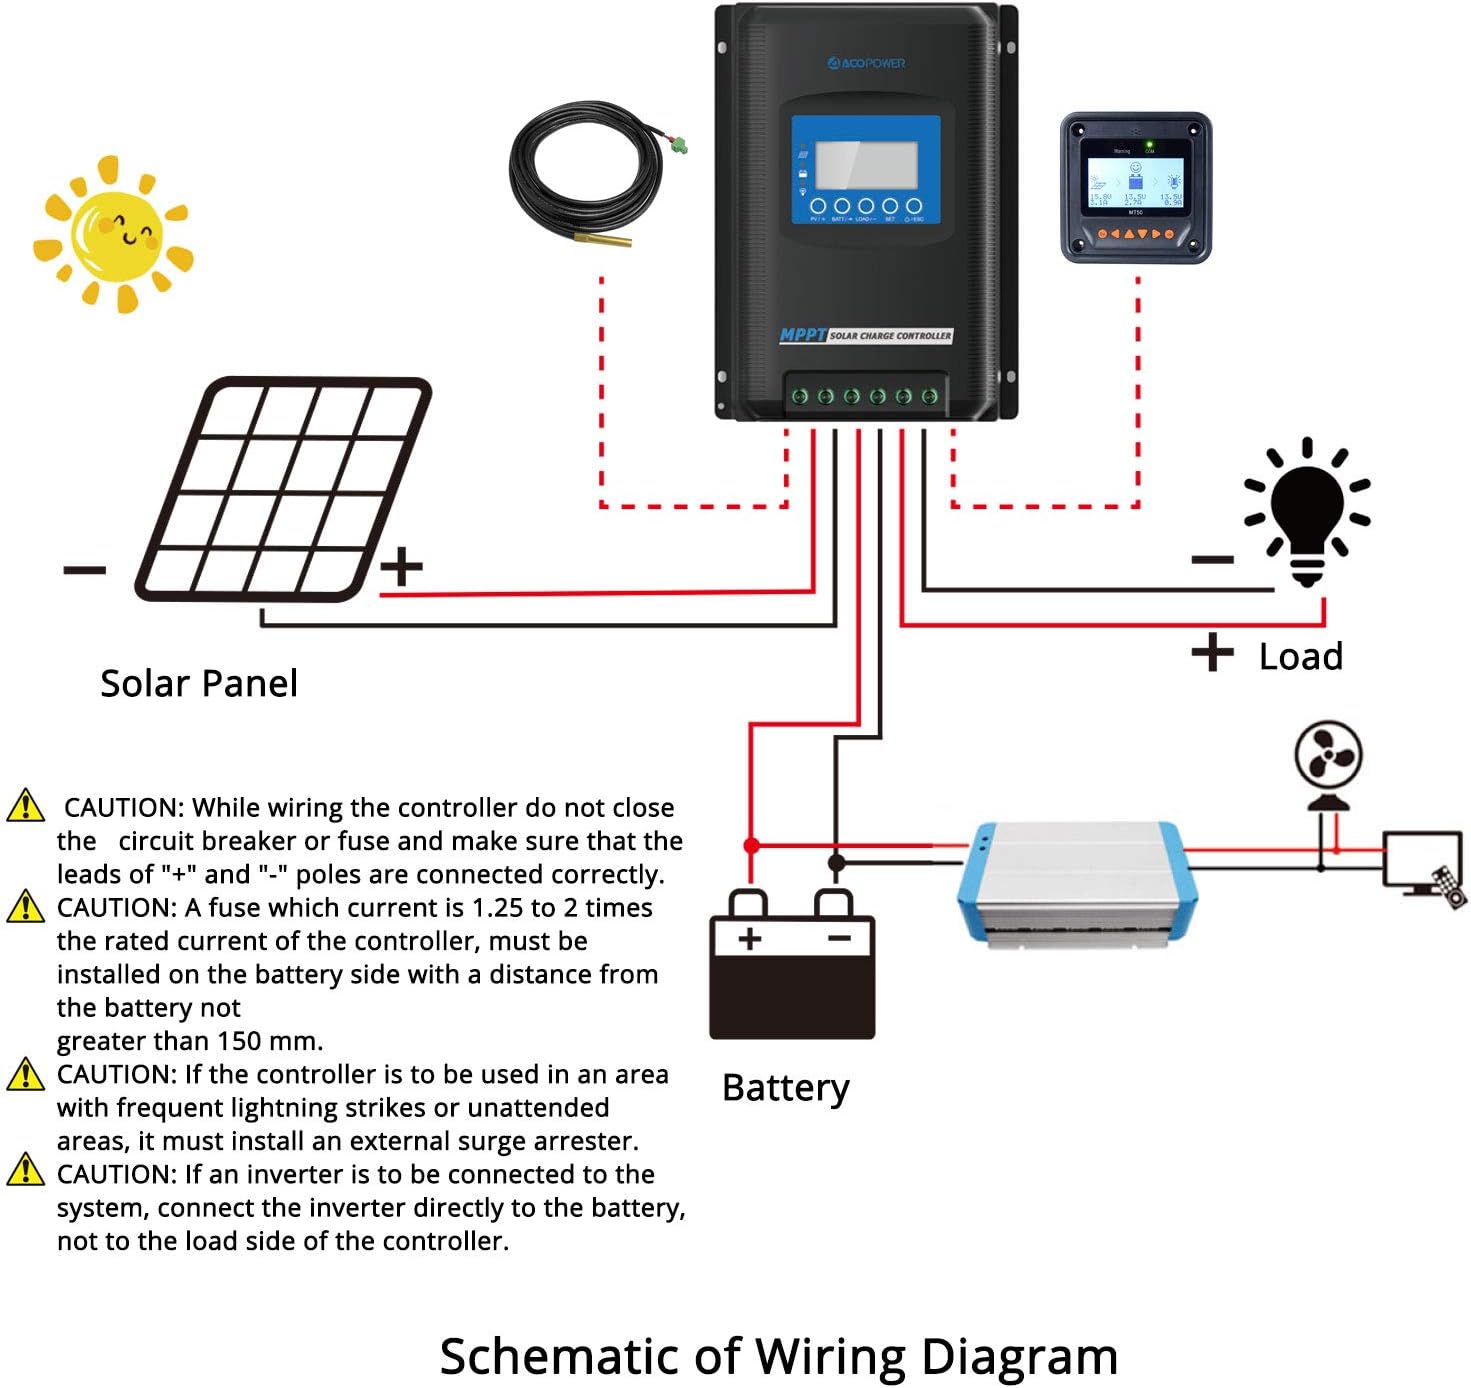
Figure 4.1: Schematic of Wiring Diagram.
Fasi di cablaggio:
- Montare il controller: Securely mount the controller to a wall using screws. Ensure controllers are at the same horizontal level with ample space for heat dissipation between devices.
- Remove Port Cover: Carefully remove the terminal cover from the bottom of the controller.
- Collegare i cavi della batteria: Connect the positive (+) and negative (-) battery cables to the corresponding terminals on the controller. Ensure the battery circuit breaker is open before connecting.
- Connect Solar Panel Cables: Connect the positive (+) and negative (-) solar panel cables to the corresponding PV input terminals. Ensure the solar circuit breaker is open before connecting.
- Connect Load Cables (Optional): If using the load output, connect the positive (+) and negative (-) load cables to the load terminals.
- Install Port Cover: Riposizionare il copriterminale.
- Accensione: First, close the battery circuit breaker. Then, close the solar circuit breaker. The controller display should power on.
CAUTION: While wiring, ensure the circuit breaker or fuse is closed and that the leads of "+" and "-" poles are connected correctly. A fuse with a current 1.25 to 2 times the rated current of the controller must be installed on the battery side with a distance from the battery not greater than 150 mm. If the controller is to be used in an area with frequent lightning strikes or unattended areas, an external surge arrester must be installed. If an inverter is to be connected to the system, connect the inverter directly to the battery, not to the load side of the controller.
Parallel Communication Setup (for multiple controllers):
If using multiple controllers in parallel, they can communicate to synchronize settings. Assemble the parallel communication cable by connecting red and black wires to the green terminal blocks as shown in the diagram. Connect these cables to the RS485 communication ports on each controller.

Video: Assembling the parallel communication cable. (Note: This video is for a different model series (POW-M80/M100-PRO) and is not directly applicable to the Midas 30A. No relevant videos for this specific model were provided by the seller.)

Video: Installation and wiring guide. (Note: This video is for a different model series (POW-M80/M100-PRO) and is not directly applicable to the Midas 30A. No relevant videos for this specific model were provided by the seller.)
After connecting the parallel communication cable, power on the controllers by closing the battery circuit breaker first. Set a unique parallel code for each controller. The device with the smallest code becomes the main controller, and other controllers will automatically synchronize their configurations with the main controller.
5. Istruzioni per l'uso
Display LCD e pulsanti:
The controller features an LCD display and multiple buttons for navigation and settings adjustment.

Figura 5.1: Esamples of various display settings.
Impostazione del tipo di batteria:
The controller is compatible with Sealed, Gel, Flooded, and User-defined (LiFePO4) battery types. To set the battery type:
- Press and hold the 'PV/SET' button to enter the setup program.
- Navigate through the settings using the 'BAT+' and 'BAT-' buttons.
- Select the desired battery type (SEL for Sealed, GEL for Gel, FLD for Flooded, USE for User-defined).
- For LiFePO4 batteries, select 'USE' and manually enter the specific parameters as per your battery manufacturer's recommendations.
- Press and hold 'PV/SET' again to save the settings and exit.
Parametri di monitoraggio:
The LCD display shows various parameters such as PV voltage, volume della batteriatage, charging current, load current, and temperature. Use the navigation buttons to cycle through these displays.
Controllo del carico:
The controller supports multiple load control methods. Refer to the detailed operating manual for specific programming of load timers and modes.
6. Manutenzione
- Ispezione regolare: Controllare periodicamente tutti i collegamenti elettrici per verificarne la tenuta e la corrosione.
- Pulizia: Mantenere il controller pulito e privo di polvere e detriti. Utilizzare un panno asciutto per la pulizia.
- Ventilazione: Assicurarsi che le aperture di ventilazione non siano ostruite per consentire una corretta dissipazione del calore.
- Stato della batteria: Monitorare il voltage and health regularly.
- Aggiornamenti del firmware: Controllare il produttore websito per eventuali aggiornamenti firmware disponibili.
7. Risoluzione Dei Problemi
If you encounter issues with your ACOPOWER Midas 30A MPPT Solar Charge Controller, refer to the following common troubleshooting steps:
- Nessun display/Nessuna alimentazione: Controllare i collegamenti della batteria e assicurarsi che l'interruttore della batteria sia chiuso. Verificare la tensione della batteriatage si trova all'interno del campo operativo.
- Nessuna ricarica: Check solar panel connections and ensure the solar circuit breaker is closed. Verify solar panel voltage is sufficient for charging. Check for shading on solar panels.
- Vol. batteria erratotage Lettura: Ensure the battery type setting is correct for your battery.
- Surriscaldamento: Ensure the controller is installed in a well-ventilated area and that its heat sinks are not obstructed. Reduce load if necessary.
- Codici di errore: If an error code appears on the display, consult the full product manual or contact customer support for specific interpretations and solutions.
If problems persist after attempting these steps, contact ACOPOWER customer support.
8. Specifiche
| Caratteristica | Specificazione |
|---|---|
| Marca | ACOPOTENZA |
| Modello | Midas 30A MPPT Solar Charge Controller |
| Colore | Nero |
| Materiale | Alluminio |
| Peso dell'articolo | 1.5 chilogrammi |
| Tipo di visualizzazione | LCD |
| Efficienza di tracciamento | 99.5% |
| Efficienza di conversione di picco | 98% |
| Volume di sistematage | 12V/24V DC Auto Detect |
| Compatibilità della batteria | Sealed, Gel, Flooded, Lithium-ion (LiFePO4) |
| Ricarica Stages | 4-seconditage (bulk, boost, float, equalization) |
| Caratteristiche di protezione | Reverse polarity, overcharging, over-discharging, overload, short-circuiting, reverse current |
9. Garanzia e supporto
The ACOPOWER Midas 30A MPPT Solar Charge Controller comes with an 18-month warranty. ACOPOWER is a US-based company offering local support for its products. For technical assistance, warranty claims, or further inquiries, please contact ACOPOWER customer service through their official channels.
10. Applicazioni
The ACOPOWER Midas 30A MPPT Solar Charge Controller is suitable for a variety of off-grid solar applications, providing reliable power management for:
- Veicoli ricreativi (RV)
- Camploro
- Boats and Yachts
- Remote Cabins
- Other off-grid power systems

Figura 10.1: Esamples of controller applications.