
1. Introduzione
This manual provides detailed instructions for the installation, operation, and maintenance of your ASRock AB350M-HDV MicroATX Motherboard. The ASRock AB350M-HDV is designed to support AMD Socket AM4 A-Series APUs (Bristol Ridge) and Ryzen Series CPUs (Summit Ridge), featuring a Digi Power design and 7 Power Phase design for stable performance. It supports DDR4 memory and offers various connectivity options including SATA3, USB 3.0, and an Ultra M.2 slot.
2. Prodotto finitoview
The ASRock AB350M-HDV motherboard is a MicroATX form factor board, ideal for compact PC builds. It features essential components for a modern computing system.

Figura 2.1: Angolato view of the ASRock AB350M-HDV Motherboard, showcasing its compact MicroATX design and various components.
Caratteristiche principali:
- Supports AMD Socket AM4 A-Series APUs (Bristol Ridge) and Ryzen Series CPUs (Summit Ridge).
- DDR4 memory support up to 3200+ (OC) for Ryzen CPUs and 2400 for A-series APUs.
- 1 PCIe 3.0 x16 slot and 1 PCIe 2.0 x1 slot for expansion cards.
- 4 SATA3 ports and 1 Ultra M.2 (PCIe Gen3 x4 & SATA3) slot for storage.
- 6 USB 3.0 ports (2 front, 4 rear) and 2 USB 2.0 ports for peripheral connectivity.
- Integrated Gigabit Ethernet for network connectivity.
- Video outputs: VGA, DVI, HDMI.

Figura 2.2: Dall'alto verso il basso view of the ASRock AB350M-HDV Motherboard, highlighting the CPU socket, RAM slots, M.2 slot, and PCIe slots.
3. Configurazione e installazione
Follow these steps carefully to install your ASRock AB350M-HDV motherboard and its components.
3.1 Installazione della CPU
- Individuare il socket della CPU AM4 sulla scheda madre.
- Sollevare la leva di carico sul lato della presa.
- Allineare il segno triangolare sulla CPU con il segno corrispondente sul socket. Inserire con cautela la CPU nel socket, senza forzarla.
- Abbassare la leva di carico per fissare la CPU in posizione.
- Installare il dissipatore della CPU seguendo le istruzioni del produttore.
3.2 Installazione della RAM (memoria)
- Locate the DDR4 DIMM slots. This motherboard has 4 slots.
- Aprire le clip su entrambe le estremità dello slot DIMM.
- Allineare la tacca sul modulo RAM con la chiave nello slot DIMM.
- Inserire saldamente il modulo RAM nello slot finché le clip non scattano in posizione. Assicurarsi che entrambe le clip siano chiuse.
3.3 Installazione del dispositivo di archiviazione (SATA e M.2)
Unità SATA:
- Connect one end of a SATA data cable to a SATA3 port on the motherboard.
- Collegare l'altra estremità del cavo dati SATA al disco rigido o all'SSD.
- Collegare un cavo di alimentazione SATA dall'alimentatore (PSU) al dispositivo di archiviazione.
SSD M.2:
- Individuare lo slot Ultra M.2 sulla scheda madre.
- Remove the M.2 screw and standoff from the slot.
- Inserire l'SSD M.2 nello slot con un'angolazione di 30 gradi.
- Push the M.2 SSD down and secure it with the screw and standoff.
3.4 Collegamenti di alimentazione
- Connect the 24-pin ATX power connector from your PSU to the 24-pin power socket on the motherboard.
- Connect the 8-pin (or 4-pin) ATX 12V power connector from your PSU to the corresponding socket near the CPU.
3.5 Collegamenti del pannello frontale
Connect the cables from your PC case (Power Button, Reset Button, HDD LED, Power LED, USB, Audio) to the corresponding headers on the motherboard. Refer to the motherboard layout diagram in your physical manual for exact header locations.
3.6 Installazione della scheda grafica
- Individuare lo slot PCIe 3.0 x16.
- Rimuovere il coperchio dello slot di espansione corrispondente dal case del PC.
- Align the graphics card with the PCIe slot and press it down firmly until it clicks into place.
- Fissare la scheda grafica al case con una vite.
- Collegare tutti i cavi di alimentazione PCIe necessari dall'alimentatore alla scheda grafica.
4. Istruzioni per l'uso
4.1 Primo avvio e configurazione BIOS/UEFI
- Dopo aver assemblato tutti i componenti, collega il monitor, la tastiera e il mouse.
- Accendi il sistema.
- Durante l'avvio, premere ripetutamente il tasto DEL or F2 tasto per accedere all'utilità di configurazione BIOS/UEFI.
- In the BIOS, you can configure boot order, system time, and other advanced settings. Save changes and exit to boot into your operating system installation media.
4.2 Installazione del driver
After installing your operating system, install the necessary drivers for the motherboard components. These typically include chipset drivers, audio drivers, LAN drivers, and any specific utility drivers. Drivers can be found on the ASRock official websito per il tuo specifico modello di scheda madre.
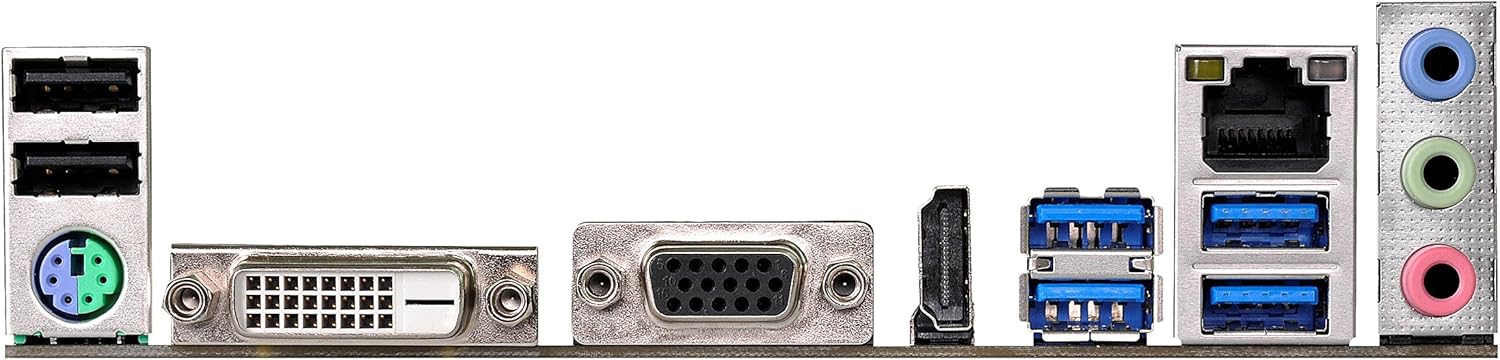
Figure 4.1: Rear I/O panel of the ASRock AB350M-HDV Motherboard, showing USB ports, video outputs (VGA, DVI, HDMI), LAN port, and audio jacks.
5. Manutenzione
Una corretta manutenzione garantisce la longevità e le prestazioni ottimali della scheda madre.
5.1 Pulizia
- Pulire regolarmente la scheda madre e i componenti dalla polvere utilizzando aria compressa.
- Prima di procedere alla pulizia, assicurarsi che il sistema sia spento e scollegato.
- Evitare di utilizzare detergenti liquidi direttamente sui componenti.
5.2 Aggiornamenti BIOS/UEFI
Controllare periodicamente l'ASRock website for BIOS/UEFI updates. Updates can improve compatibility, stability, and performance. Follow the instructions provided by ASRock carefully when performing a BIOS update to avoid system damage.
6. Risoluzione Dei Problemi
Questa sezione fornisce soluzioni ai problemi più comuni che potresti riscontrare.
6.1 Nessuna alimentazione / Nessun POST (Power-On Self-Test)
- Controllare i collegamenti di alimentazione: Ensure the 24-pin and 8-pin (or 4-pin) CPU power connectors are securely seated.
- Verifica PSU: Test your power supply unit (PSU) to ensure it is functional and providing adequate power.
- Riposizionare i componenti: Remove and re-install the CPU, RAM, and graphics card to ensure they are properly seated.
- Cancella CMOS: Refer to your physical manual for instructions on how to clear the CMOS (Complementary Metal-Oxide-Semiconductor) settings, which can resolve boot issues.
6.2 Nessuna uscita di visualizzazione
- Monitorare la connessione: Ensure your monitor is correctly connected to the graphics card or motherboard (if using an APU with integrated graphics).
- Scheda grafica: If using a dedicated graphics card, ensure it is properly installed and has sufficient power. Test with another graphics card if possible.
- APU Compatibility: If using an AMD A-Series APU, ensure your monitor is connected to the motherboard's video outputs (VGA, DVI, HDMI). Ryzen CPUs without integrated graphics require a dedicated graphics card.
6.3 Il sistema operativo non si avvia
- Ordine di avvio: Check the BIOS/UEFI settings to ensure the correct boot device (e.g., SSD/HDD with OS) is prioritized.
- Dispositivo di archiviazione: Verify that your storage device is detected in the BIOS.
- Installazione del sistema operativo: If the OS is newly installed, ensure the installation process completed successfully.
7. Specifiche
| Marca | AssoRock |
| Nome del modello | AB350M-HDV |
| Presa CPU | Presa AM4 |
| Tipo di chipset | Promontorio AMD B350 |
| Processori compatibili | AMD A-Series APUs (Bristol Ridge), Ryzen Series CPUs (Summit Ridge) |
| Tecnologia della memoria RAM | DDR4 |
| Velocità di clock della memoria | 2133 MHz (Base), up to 3200+ (OC) for Ryzen CPU |
| Slot di memoria disponibili | 4 |
| Interfaccia della scheda grafica | PCI Express (1x PCIe 3.0 x16, 1x PCIe 2.0 x1) |
| Total SATA Ports | 4 (SATA3) |
| Slot M.2 | 1 (Ultra M.2, PCIe Gen3 x4 & SATA3) |
| Porte USB totali | 8 (6x USB 3.0, 2x USB 2.0) |
| Uscite video | VGA, DVI, HDMI |
| Tipo di connettore di alimentazione principale | ATX a 24 pin |
| Fattore di forma | MicroATX |
| Peso dell'articolo | 1.3 libbre |
8. Informazioni sulla garanzia
The ASRock AB350M-HDV Motherboard comes with a Garanzia di 1 anni. For specific terms and conditions, please refer to the warranty card included with your product or visit the official ASRock websito.
9. Supporto
For further assistance, technical support, or driver downloads, please visit the official ASRock websito:
You can also find contact information for customer service and support resources on their websito.