NADAMOO Bur3072
NADAMOO QR Code Scanner User Manual
Model: Bur3072
1. Introduzione
This manual provides comprehensive instructions for the setup, operation, and maintenance of your NADAMOO Wireless 2D Barcode Scanner (Model: Bur3072). This device is designed for efficient and reliable barcode scanning, supporting both 1D and 2D barcodes from various surfaces, including paper and digital screens.
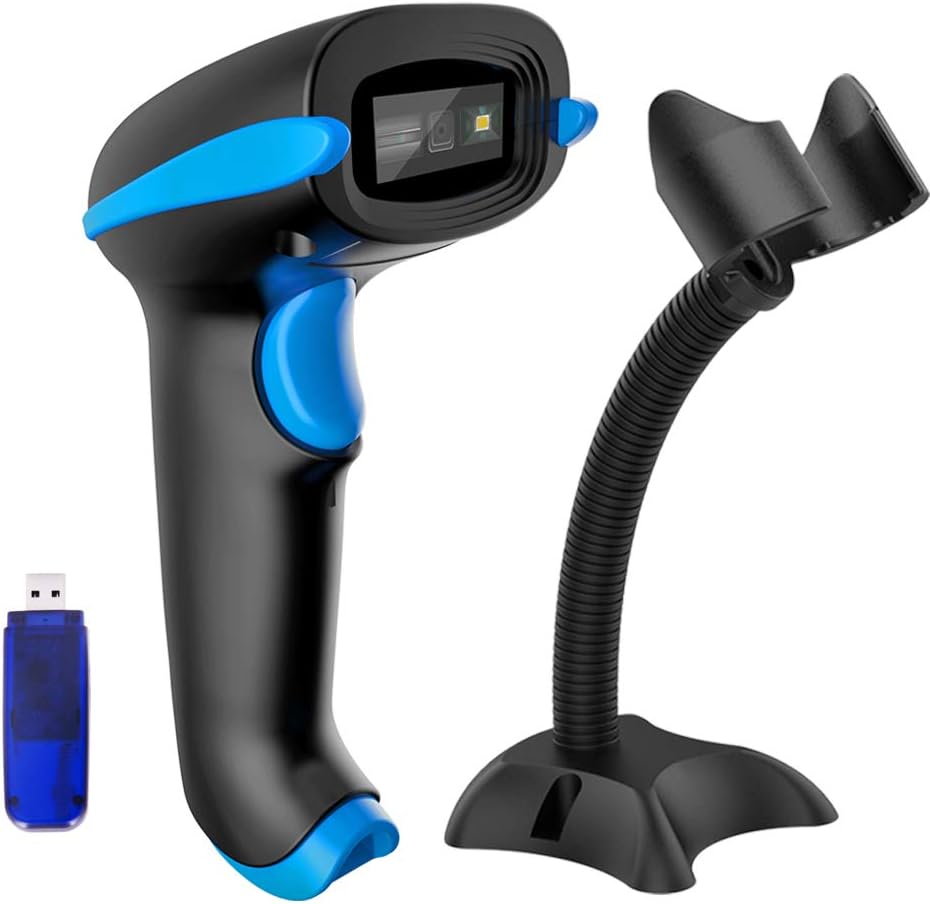
Image 1.1: The NADAMOO Wireless 2D Barcode Scanner, including the scanner unit, USB receiver, and a flexible stand.
The NADAMOO Bur3072 scanner utilizes advanced CMOS imaging technology, enabling it to capture barcodes quickly and accurately. Its versatile connectivity options and multiple operating modes make it suitable for a wide range of applications.
2. Caratteristiche del prodotto
- 1D & 2D Barcode Compatibility: Capable of capturing 1D barcodes (UPC, EAN, Code128, Code39, etc.) and 2D barcodes (QR Code, PDF417, Data Matrix, Aztec Code, Maxicode).
- CMOS Imaging Technology: Advanced digital image acquisition function allows identification of barcodes from screens (computer monitors, smartphones, tablets) and paper, even if blurred, colored, or distorted.
- Doppia modalità di connessione: Supports both wireless (433MHz with Mini USB Receiver) and wired (USB 2.0) connections for flexible deployment.
- Portata wireless estesa: Offers up to 400 meters (0.25 mile) transmission in open environments and up to 100 meters (328 feet) indoors with obstacles.
- Due modalità di caricamento:
- Modalità di caricamento istantaneo: Transmits scanned data directly to your connected device.
- Modalità di archiviazione: Stores up to 10,000 barcodes internally when out of range, allowing for batch upload later.
- Three Trigger Modes:
- Trigger manuale: Eseguire la scansione premendo il pulsante di attivazione.
- Rilevamento automatico: Automatically scans when a barcode is presented within its field of view.
- Scansione continua: Scans continuously without requiring trigger presses.
- Hands-Free Stand: Includes a stand that supports auto-sensing mode for convenient, hands-free operation.

Image 2.1: Illustration of the two connection modes: USB 2.0 wired and 433MHz wireless via a Mini USB receiver.

Image 2.2: Visual representation of the scanner's long-range transmission, showing up to 100 meters indoors with obstacles and 400 meters in open environments.

Image 2.3: Depiction of the two data upload modes: instant upload to a connected computer and storage mode for offline data collection.

Image 2.4: The scanner demonstrating its ability to read barcodes from digital screens and paper using CMOS imaging technology.

Image 2.5: The scanner positioned on its hands-free stand, highlighting its flexibility and suitability for auto-sensing operation.
3. Contenuto della confezione
Si prega di verificare che tutti gli articoli siano presenti nel pacco:
- NADAMOO Wireless 2D Barcode Scanner (Bur3072)
- Ricevitore Mini USB
- Cavo di ricarica USB
- Adjustable Hands-Free Stand
- Manuale dell'utente (questo documento)
4. Guida all'installazione
4.1 Caricamento dello scanner
Before first use, ensure the scanner is fully charged. Connect the USB charging cable to the scanner's charging port and the other end to a USB power source (e.g., computer USB port, USB wall adapter). The indicator light will show charging status.
4.2 Collegamento dello scanner
Lo scanner offre due metodi di connessione principali:
4.2.1 Wireless Connection (Recommended)
- Insert the Mini USB Receiver into an available USB port on your computer or host device.
- Turn on the barcode scanner. It should automatically pair with the receiver. A successful connection is usually indicated by a specific beep sound or LED indicator on the scanner.
- The scanner will function as a keyboard input device. Open a text editor (e.g., Notepad, Word) and scan any barcode to test the connection. The barcode data should appear in the text editor.
4.2.2 Connessione cablata
- Connect the USB charging cable directly from the scanner to a USB port on your computer.
- The scanner will be recognized as a USB HID device. No additional drivers are typically required.
- Test the connection by scanning a barcode into a text editor.
5. Istruzioni per l'uso
5.1 Scansione di base
To scan a barcode, aim the scanner's light beam at the center of the barcode. Ensure the entire barcode is within the scanning area. Press the trigger button (if in manual mode) or present the barcode (if in auto-sensing/continuous mode). A successful scan is indicated by a beep and/or a green light.
5.2 Trigger Modes Configuration
The scanner supports three trigger modes. To switch between modes, scan the corresponding configuration barcode from the included quick setup guide or the full user manual (PDF available online). Common modes include:
- Modalità di attivazione manuale: Requires pressing the trigger for each scan. (Default mode)
- Modalità di rilevamento automatico: Lo scanner rileva e scansiona automaticamente i codici a barre quando entrano nel suo campo di view, ideal for use with the hands-free stand.
- Modalità di scansione continua: The scanner continuously emits a scanning light and reads any barcode it detects without requiring a trigger press.
5.3 Modalità di caricamento dati
The scanner can operate in two data upload modes:
- Modalità di caricamento istantaneo: Scanned data is immediately transmitted to the connected device. This is the standard operating mode when within wireless range or connected via USB.
- Modalità di archiviazione: When out of wireless range, the scanner can store up to 10,000 barcodes in its internal memory. To upload stored data, bring the scanner back into range or connect via USB, then scan the "Upload Data" configuration barcode (refer to the full manual).
6. Manutenzione
6.1 Pulizia
Per mantenere prestazioni ottimali, pulire regolarmente la lente e l'esterno dello scanner. Utilizzare un panno morbido e privo di lanugine leggermente dampened with water or a mild, non-abrasive cleaning solution. Avoid using harsh chemicals, solvents, or abrasive materials that could damage the scanner.
6.2 Cura della batteria
- Caricare completamente la batteria prima del primo utilizzo.
- Evitare di scaricare completamente la batteria frequentemente, poiché ciò può ridurne la durata.
- If storing the scanner for an extended period, charge the battery to approximately 50% and store in a cool, dry place.
- Do not expose the scanner to extreme temperatures.
6.3 Conservazione
Store the scanner in a clean, dry environment away from direct sunlight, excessive heat, or cold. When not in use, it is recommended to place the scanner on its stand or in a protective case to prevent damage.
7. Risoluzione Dei Problemi
| Problema | Possibile causa | Soluzione |
|---|---|---|
| Lo scanner non si connette al computer. | USB receiver not properly inserted; scanner not powered on; out of wireless range; driver issue. | Ensure receiver is fully inserted. Turn on scanner. Move scanner closer to receiver. Try a different USB port. Restart computer. |
| Lo scanner non legge i codici a barre. | Barcode damaged/unreadable; incorrect trigger mode; insufficient lighting; scanner lens dirty; barcode type not enabled. | Check barcode integrity. Verify trigger mode (e.g., manual, auto-sensing). Ensure adequate lighting. Clean scanner lens. Scan configuration barcodes to enable specific barcode types if necessary. |
| I dati scansionati sono errati o incompleti. | Partial scan; incorrect data format settings. | Ensure the entire barcode is within the scan area. Refer to the full manual for data format configuration barcodes (e.g., adding prefix/suffix). |
| Lo scanner emette un segnale acustico ma non vengono visualizzati dati. | Not connected to host device; application not ready for input. | Confirm wireless connection (receiver inserted, scanner paired). Ensure the cursor is active in the target application (e.g., text editor, spreadsheet). |
| La batteria si scarica rapidamente. | Frequent use; aging battery; continuous scanning mode enabled unnecessarily. | Charge scanner fully. Consider replacing battery if old. Switch to manual or auto-sensing mode when not actively scanning to conserve power. |
For more detailed troubleshooting or advanced configurations, please refer to the complete user manual available for download from the NADAMOO websito o contattare l'assistenza clienti.
8. Specifiche
| Caratteristica | Dettaglio |
|---|---|
| Numero di modello | Bur3072 |
| Capacità di decodifica | 1D: UPC, EAN, Code128, Code39, Code11, Code93, Codebar, MSI, GS1, Matrix 2 of 5, Interleaved 2 of 5, Industrial 2 of 5, Standard 2 of 5. 2D: QR Code, PDF417, Data Matrix, Aztec Code, Maxicode. |
| Tipo di sensore | CMOS Imager |
| Connettività | 433MHz Wireless (with Mini USB Receiver), USB 2.0 Wired |
| wireless Range | Up to 400m (0.25 mile) in open space; Up to 100m (328 feet) indoors with obstacles. |
| Memoria interna | Fino a 10,000 codici a barre (in modalità di archiviazione) |
| Tipo di batteria | 1 batteria agli ioni di litio (necessaria) |
| Peso dell'articolo | 11.4 once (circa 323 grammi) |
| Dimensioni | 7.05 x 4.25 x 3.39 pollici (dimensioni imballo) |
| Dispositivi compatibili | Laptop, Desktop, Smartphone (via compatible adapters/OTG if applicable) |
9. Garanzia e supporto
NADAMOO products are designed for reliability and performance. For information regarding warranty coverage, please refer to the warranty card included with your product or visit the official NADAMOO websito.
For technical support, troubleshooting assistance, or any inquiries about your NADAMOO QR Code Scanner, please contact NADAMOO customer service. You can often find contact information on the manufacturer's websito o tramite il tuo punto vendita.
Visit the official NADAMOO Store for more products and information: NADAMOO Store
Ask a question about this manual
Ask about setup, troubleshooting, compatibility, parts, safety, or missing instructions. Manuals+ will review the question and use this page’s manual context to help answer it.