Introduzione
This instruction manual provides essential information for the proper installation, use, and maintenance of your JRL 7/8" Mid Handlebars. Please read this manual thoroughly before installation and retain it for future reference. Adhering to these guidelines will ensure optimal performance and safety.
Prodotto finitoview
The JRL 7/8" Mid Handlebars are designed for universal fit on various off-road vehicles, including ATVs, Pit Dirt Bikes, and other offroad motorcycles. These handlebars are constructed to provide a reliable and comfortable control interface for your vehicle. The blue color variant offers a distinct aesthetic.

Image: The JRL 7/8" Mid Handlebars in blue, showcasing the overall design and crossbar.

Image: A display of JRL 7/8" Mid Handlebars available in multiple colors, including red, green, black, gold, and blue.
Specifiche
| Caratteristica | Dettaglio |
|---|---|
| Marca | JRL |
| Modello | 7/8" Handlebars |
| Numero modello articolo | 7/8" Mid Handlebars |
| Numero di parte del produttore | Am-MB1068-2 |
| Colore | Blu |
| Peso dell'articolo | 15.5 once |
| Dimensioni del pacco | 28 x 6.75 x 3 pollici |
| Compatibilità del tipo di bici | ATV, Off Road Motorcycle, Pit Dirt Bike |
| Tipo di adattamento automobilistico | Vestibilità universale |
| Finitura esterna | Dipinto |
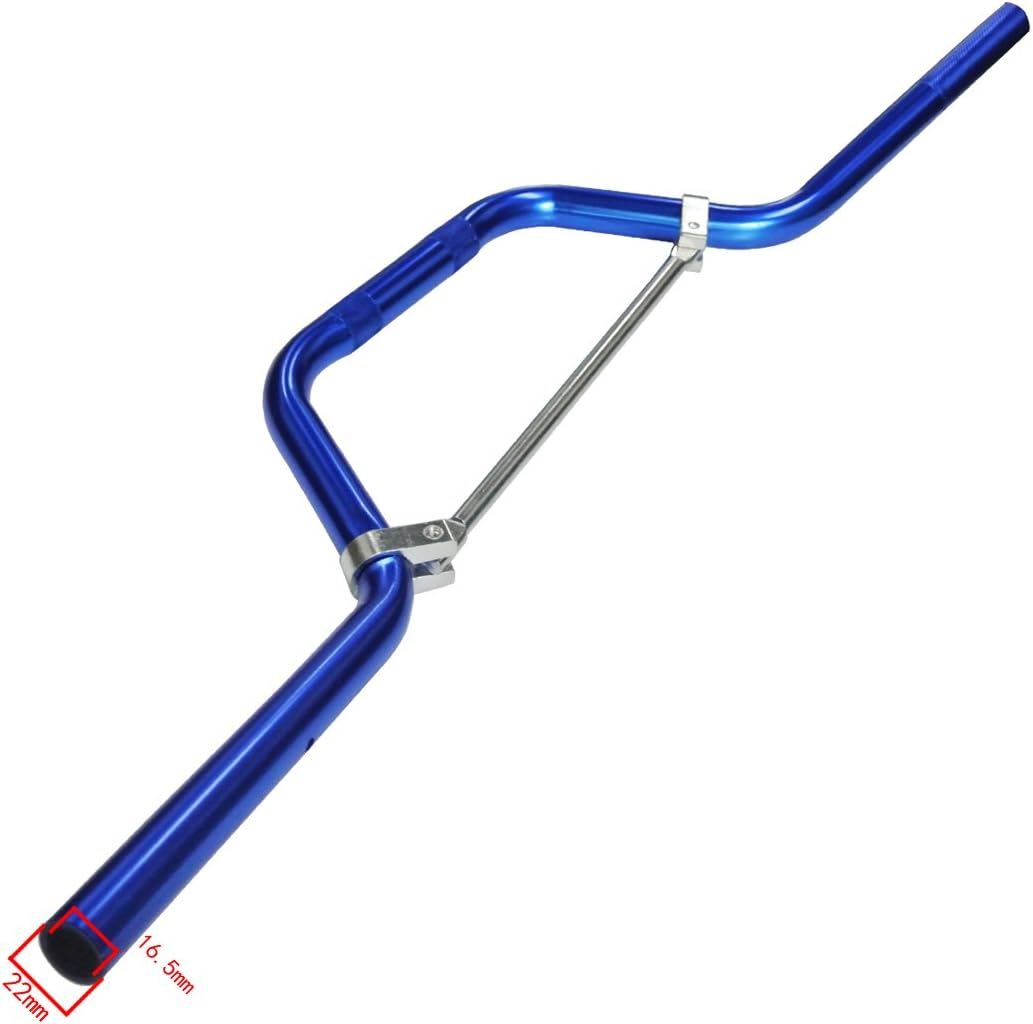
Immagine: dettagliata view of the handlebar end, showing a diameter of 22mm and an inner diameter of 16.5mm.

Image: The total length of the handlebar measured at 75cm, indicating its overall span.
Configurazione (installazione)
Proper installation is crucial for safety and performance. If you are unsure about any step, it is recommended to seek professional assistance.
Strumenti necessari (non inclusi):
- Appropriate wrenches or sockets for handlebar clamps.
- Screwdrivers (Phillips and flathead, as needed for controls).
- Chiave dinamometrica (consigliata per un serraggio preciso).
- Grease or anti-seize compound (optional, for bolts).
Fasi di installazione:
- Preparazione: Ensure your vehicle is stable and turned off. Remove any existing handlebars and controls. Clean the handlebar clamp area on your vehicle's triple clamp.
- Handlebar Placement: Position the new JRL 7/8" Mid Handlebars into the handlebar clamps. Ensure the handlebars are centered and aligned correctly.
- Serraggio iniziale: Lightly tighten the handlebar clamp bolts to hold the handlebars in place. Do not fully tighten yet.
- Mounting Controls: Slide your existing grips, throttle assembly, brake levers, clutch levers, and switchgear onto the new handlebars. Ensure all controls are positioned comfortably and functionally.
- Allineamento finale: Sit on the vehicle and adjust the handlebar angle and control positions for optimal comfort and control. Ensure there is no interference with other parts of the vehicle.
- Serraggio finale: Once satisfied with the positioning, tighten all handlebar clamp bolts and control clamp bolts securely. Refer to your vehicle's service manual for specific torque specifications for handlebar clamps. Overtightening can damage components, while undertightening can lead to dangerous movement.
- Controllo di sicurezza: Before riding, perform a thorough safety check. Ensure all bolts are tight, controls operate smoothly, and there is no binding or excessive play. Check brake and clutch lever free play.
Avviso di sicurezza: Incorrect installation can lead to loss of control and serious injury. If you are not confident in your ability to install these handlebars, please consult a qualified mechanic.
Considerazioni operative
While handlebars do not have "operation" in the traditional sense, proper riding posture and regular checks are essential for safe use.
- Postura di guida: Maintain a comfortable and balanced riding posture. Your arms should have a slight bend at the elbows, and your grip on the handlebars should be firm but relaxed.
- Control Accessibility: Ensure all controls (throttle, brakes, clutch, switches) are easily accessible and operate smoothly without requiring excessive reach or strain.
- Ispezione pre-corsa: Always perform a pre-ride inspection. Check that the handlebars are securely fastened and do not rotate or slip in their clamps. Verify that all controls function correctly.
- Consapevolezza: Be aware of your surroundings and adjust your grip and posture as needed for varying terrain and riding conditions.
Manutenzione
Regular maintenance will prolong the life of your handlebars and ensure continued safe operation.
- Pulizia: Clean the handlebars regularly with a mild soap and water solution. Avoid harsh chemicals or abrasive cleaners that could damage the painted finish.
- Ispezione: Periodically inspect the handlebars for any signs of damage, such as bends, cracks, or deep scratches. Pay close attention to the areas around the clamps and where controls are mounted.
- Tenuta del bullone: Regularly check the tightness of all handlebar clamp bolts and control mounting bolts. Vibrations from riding can cause bolts to loosen over time. Re-torque to specifications if necessary.
- Corrosione: While painted, inspect for any signs of corrosion, especially if riding in wet or humid conditions. Address any corrosion promptly to prevent further degradation.
Risoluzione dei problemi
This section addresses common issues you might encounter with your handlebars.
Issue: Handlebars feel loose or rotate.
- Soluzione: Check the tightness of the handlebar clamp bolts. Ensure they are torqued to the vehicle manufacturer's specifications. If the problem persists, inspect the clamps for wear or damage.
Issue: Controls (throttle, brake lever) slip on the handlebar.
- Soluzione: Stringere la clamp bolts for the slipping control. Ensure the handlebar surface is clean and free of grease where the controls are mounted. Some controls may benefit from a thin layer of friction paste if slipping continues.
Issue: Handlebars appear bent or damaged after an impact.
- Soluzione: If handlebars are bent or show signs of structural damage, they must be replaced immediately. Do not attempt to straighten bent handlebars, as this can weaken the material and lead to catastrophic failure.
Informazioni sulla garanzia
Specific warranty details for JRL products are typically provided at the point of purchase or on the manufacturer's official websito. Conservare la prova d'acquisto per eventuali reclami in garanzia.
For detailed warranty terms and conditions, please consult your retailer or visit the official JRL websito.
Assistenza clienti
Should you require further assistance, have questions regarding installation, or need to report an issue, please contact JRL customer support.
You may find contact information on the official JRL website or through your product retailer. When contacting support, please have your product model number (7/8" Mid Handlebars) and purchase details ready.