1. Introduzione e oltreview
Thank you for choosing the SENTRY JBS-NT310H Fire-Resistant Home Safe. This safe is designed to protect your valuable documents and possessions from fire. Please read this manual thoroughly before setup and operation to ensure proper use and maximum security.

Immagine 1.1: anteriore view of the SENTRY JBS-NT310H safe.
2. Informazioni sulla sicurezza
This safe is certified to JIS (Japanese Industrial Standards) for 1-hour fire resistance, providing protection for your items in the event of a fire. It is important to place the safe in a location that minimizes the risk of theft or damage.
- Non conservare liquidi infiammabili o contenitori pressurizzati all'interno della cassaforte.
- Assicurarsi che la cassaforte sia posizionata su una superficie stabile e piana.
- Keep the keypad dry and clean.

Image 2.1: The SENTRY JBS-NT310H safe is JIS certified for 1-hour fire resistance.

Image 2.2: The JIS mark indicates compliance with Japanese Industrial Standards for fire resistance.
3. Impostazione
3.1 Disimballaggio
Carefully remove the safe from its packaging. Inspect for any damage during transit. Retain packaging for future transport if needed.
3.2 Posizionamento
Choose a discreet and secure location for your safe. The safe is heavy (approximately 37 kg), so consider the floor's load-bearing capacity. Avoid placing it in areas prone to extreme humidity or direct sunlight.

Immagine 3.1: Es.ample of safe placement within a closet for discreet storage.
4. Istruzioni per l'uso
4.1 Powering the Keypad
The keypad requires four (4) AA batteries (not included). Open the battery compartment, typically located on the back of the keypad, and insert the batteries according to the polarity indicators.
4.2 Impostazione del codice di accesso
- With the safe door open, press the program button (usually located inside the safe door or on the keypad's interior).
- Enter your desired passcode, which can be between 4 and 16 digits.
- Press the program button again to confirm.
- Provare il nuovo codice di accesso con la porta aperta prima di chiuderla.
Importante: Only one passcode can be registered at a time. If you set a new passcode, the previous one will be overwritten. Keep your passcode confidential and in a secure location separate from the safe.

Image 4.1: The electronic keypad allows for a programmable passcode.
4.3 Apertura della cassaforte
- Inserisci il codice di accesso registrato sulla tastiera.
- Turn the handle clockwise (or as indicated) to open the door.
4.4 Chiusura e blocco della cassaforte
- Chiudere bene la porta della cassaforte.
- Turn the handle counter-clockwise (or as indicated) to engage the locking bolts. The safe will automatically lock.
5. Capacità di archiviazione
The SENTRY JBS-NT310H safe offers a 15-liter capacity, designed to accommodate A4-sized documents and other valuables. It includes an internal tray for organized storage.
- A4 Document Storage: A4 flat files can be stored horizontally without bending.
- Vassoio interno: A removable tray is included for smaller items, such as A4 paper or notebooks.
- Key Hooks: Key hooks are located on the inside of the door for convenient storage of spare keys or master keys.
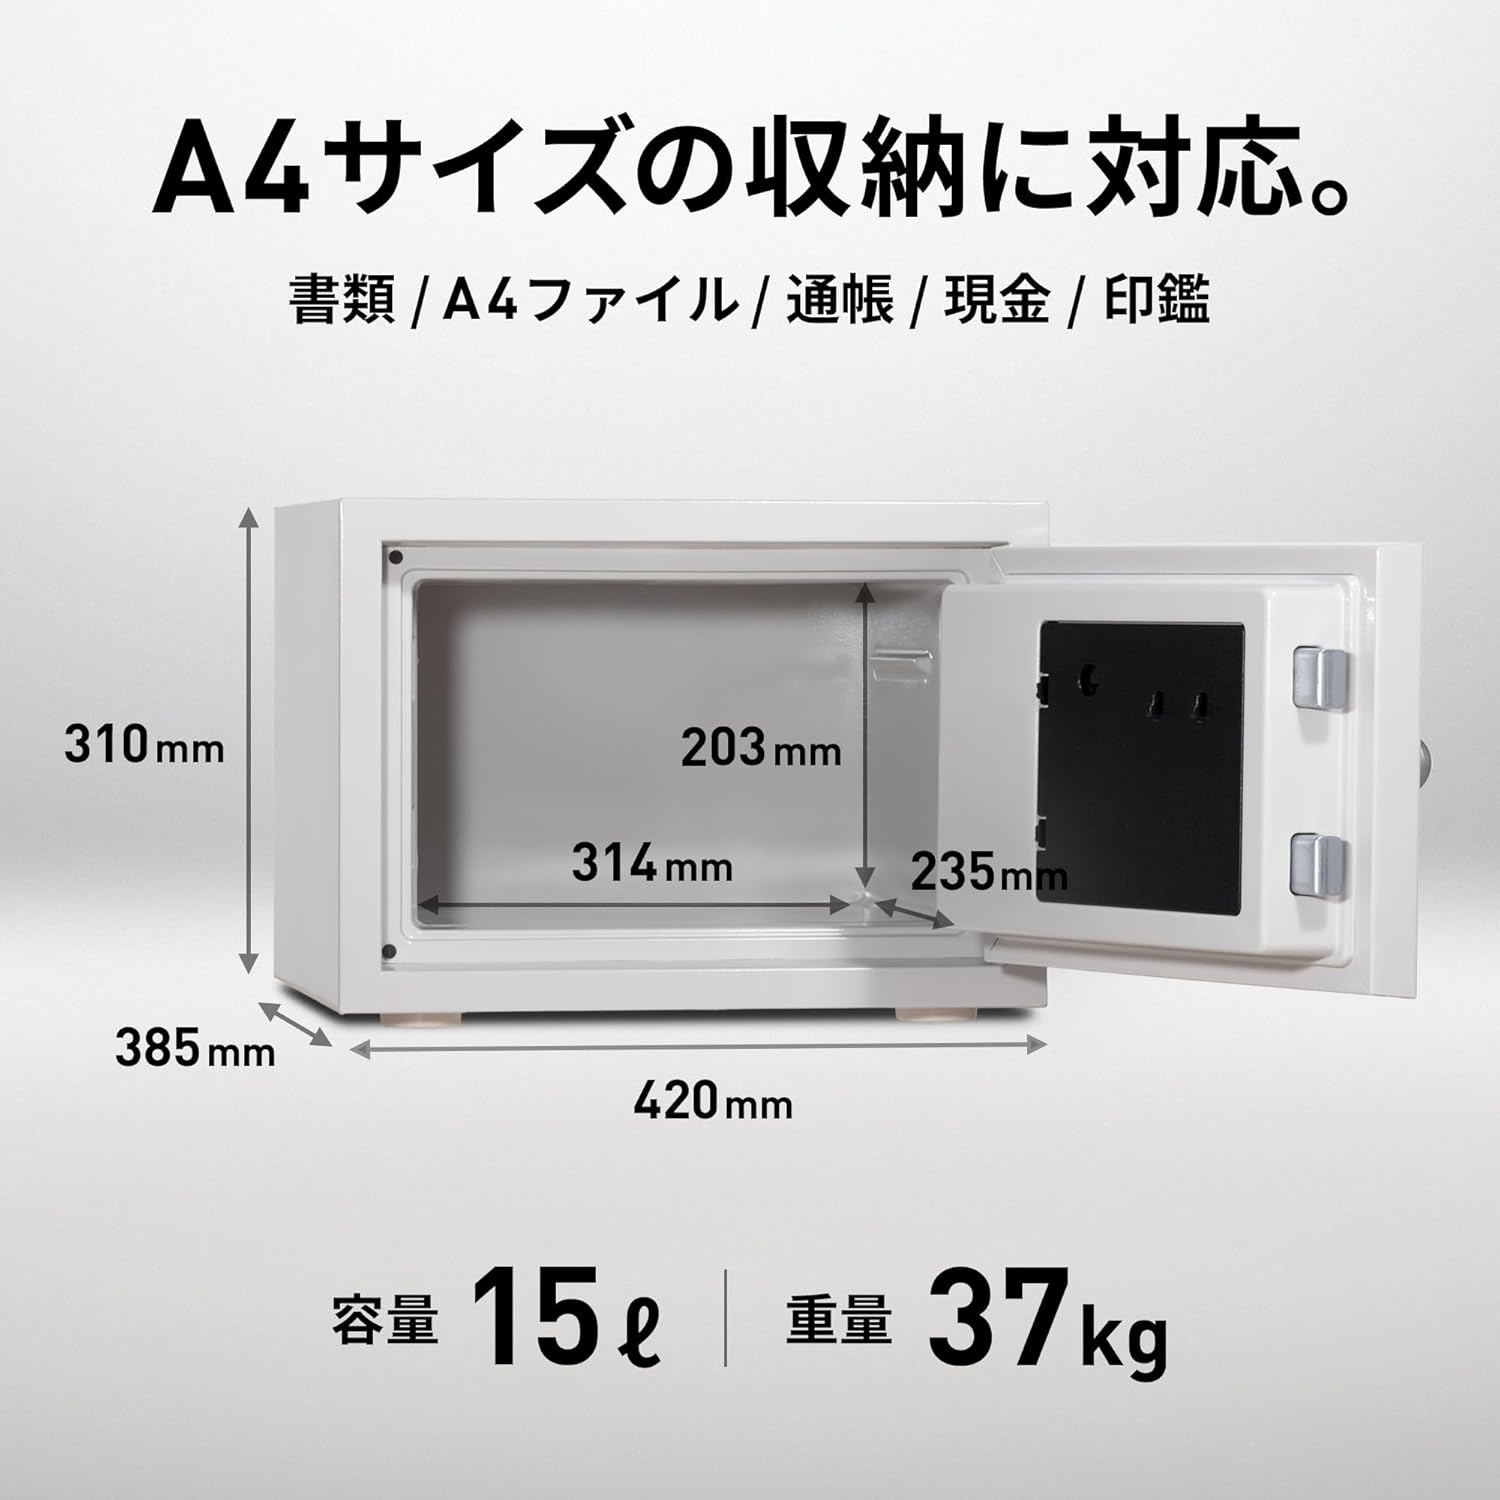
Image 5.1: Internal dimensions and A4 document storage capability.

Image 5.2: The safe interior with an A4 file and key hooks.
6. Manutenzione
- Pulizia: Pulisci l'esterno della cassaforte con un panno morbido eamp panno. Evitare detergenti abrasivi o solventi.
- Sostituzione della batteria: Replace the keypad batteries annually or when the low battery indicator appears. Use only new, high-quality AA alkaline batteries.
- Guarnizione della porta: Periodically check the door seal for any signs of wear or damage to ensure continued fire resistance.
7. Risoluzione Dei Problemi
- La tastiera non risponde: Controllare che le batterie siano installate correttamente e abbiano una carica sufficiente. Sostituirle se necessario.
- La cassaforte non si apre: Ensure you are entering the correct passcode. If the batteries are dead, use the emergency override key (if applicable to your model, though this model is keypad only).
- La porta non si chiude correttamente: Check for any obstructions around the door frame or locking bolts. Ensure the safe is on a level surface.
8. Specifiche
| Caratteristica | Dettaglio |
|---|---|
| Numero di modello | JBS-NT310H |
| Marca | SENTINELLA |
| Tipo di blocco | Electronic Keypad (4-16 digit programmable) |
| Resistenza al fuoco | JIS Certified, 1 Hour |
| Capacità | Circa 15 litri |
| Dimensioni esterne (L x P x A) | Circa. 42 cm x 38.9 cm x 31 cm |
| Dimensioni interne (L x P x A) | Circa. 31.4 cm x 23.5 cm x 20.3 cm |
| Peso | Circa 37 kg |
| Materiale | Acciaio legato |
| Colore | Grigio Bianco |
| Accessori inclusi | Vassoio 1 |
9. Garanzia e supporto
SENTRY provides comprehensive support for your safe:
- Garanzia del produttore: A 2-year manufacturer's warranty covers defects in materials and workmanship.
- Fire Replacement Guarantee: In the event of a fire, if your safe is damaged, SENTRY offers a free replacement of the damaged safe with a new one.
- Assistenza clienti: For product specifications, usage inquiries, lost keys, passcode issues, or product malfunctions, please contact SENTRY customer service.

Image 9.1: SENTRY offers a 2-year warranty and fire replacement guarantee.

Image 9.2: SENTRY customer service is available to assist with product inquiries and support.