Introduzione
This manual provides detailed instructions for the safe and proper installation, operation, and maintenance of your PureMounts PM-FM10-100 TV Bracket. This high-quality mounting system is designed for tilting and swiveling TV/monitor wall mounting, suitable for screens from 33 cm (13") to 69 cm (27") with a maximum load capacity of 25 kg and VESA compatibility up to 100x100. Please read these instructions thoroughly before installation.
Informazioni sulla sicurezza
- Capacità di peso: Do not exceed the maximum load capacity of 25 kg (55 lbs). Exceeding this limit can result in serious injury or damage to equipment.
- Dimensioni dello schermo: This mount is designed for screens between 13" and 27". Ensure your TV's VESA pattern and weight are within the specified limits.
- Tipo di parete: Ensure the mounting surface can safely support the combined weight of the mount and the display. Consult a professional if unsure about your wall's integrity.
- Utensili: Utilizzare strumenti adeguati per l'installazione. Indossare sempre occhiali protettivi.
- Montaggio: Assemble the product exactly as described in this manual. Incorrect assembly may lead to product failure or injury.
- Bambini: Tenere le parti di piccole dimensioni lontano dalla portata dei bambini.
Contenuto della confezione
Prima di iniziare l'installazione, verificare che tutti i componenti siano presenti e integri.

Figura 1: Contenuto della confezione. This image displays the main wall bracket, the TV mounting plate, a set of various screws for different TV models, washers, and wall plugs for secure installation.
- 1x PM-FM10-100 Wall Bracket Assembly
- 1x Screw Set (various sizes for TV and wall mounting)
- 1x Istruzioni di installazione (questo manuale)
Configurazione e installazione
Follow these steps carefully to ensure a secure and stable installation of your TV bracket.
Step 1: Determine VESA Compatibility
Before mounting, verify your TV's VESA pattern. This bracket supports VESA 75x75mm and 100x100mm. Measure the horizontal and vertical distance between the mounting holes on the back of your TV.

Figure 2: VESA Compatibility. The image highlights the VESA mounting patterns supported by the bracket: 75x75mm and 100x100mm.
Fase 2: contrassegnare i punti di perforazione
Hold the wall plate against the desired mounting location on the wall. Use a level to ensure it is straight. Mark the drilling points through the holes on the wall plate.
Step 3: Drill Holes and Secure Wall Plate
Drill pilot holes at the marked locations. Insert the appropriate wall anchors (if required for your wall type). Secure the wall plate to the wall using the provided screws. Ensure it is firmly attached.
Step 4: Attach TV Plate to TV
Attach the TV mounting plate to the back of your television using the appropriate screws from the screw set that match your TV's VESA pattern. Do not overtighten.
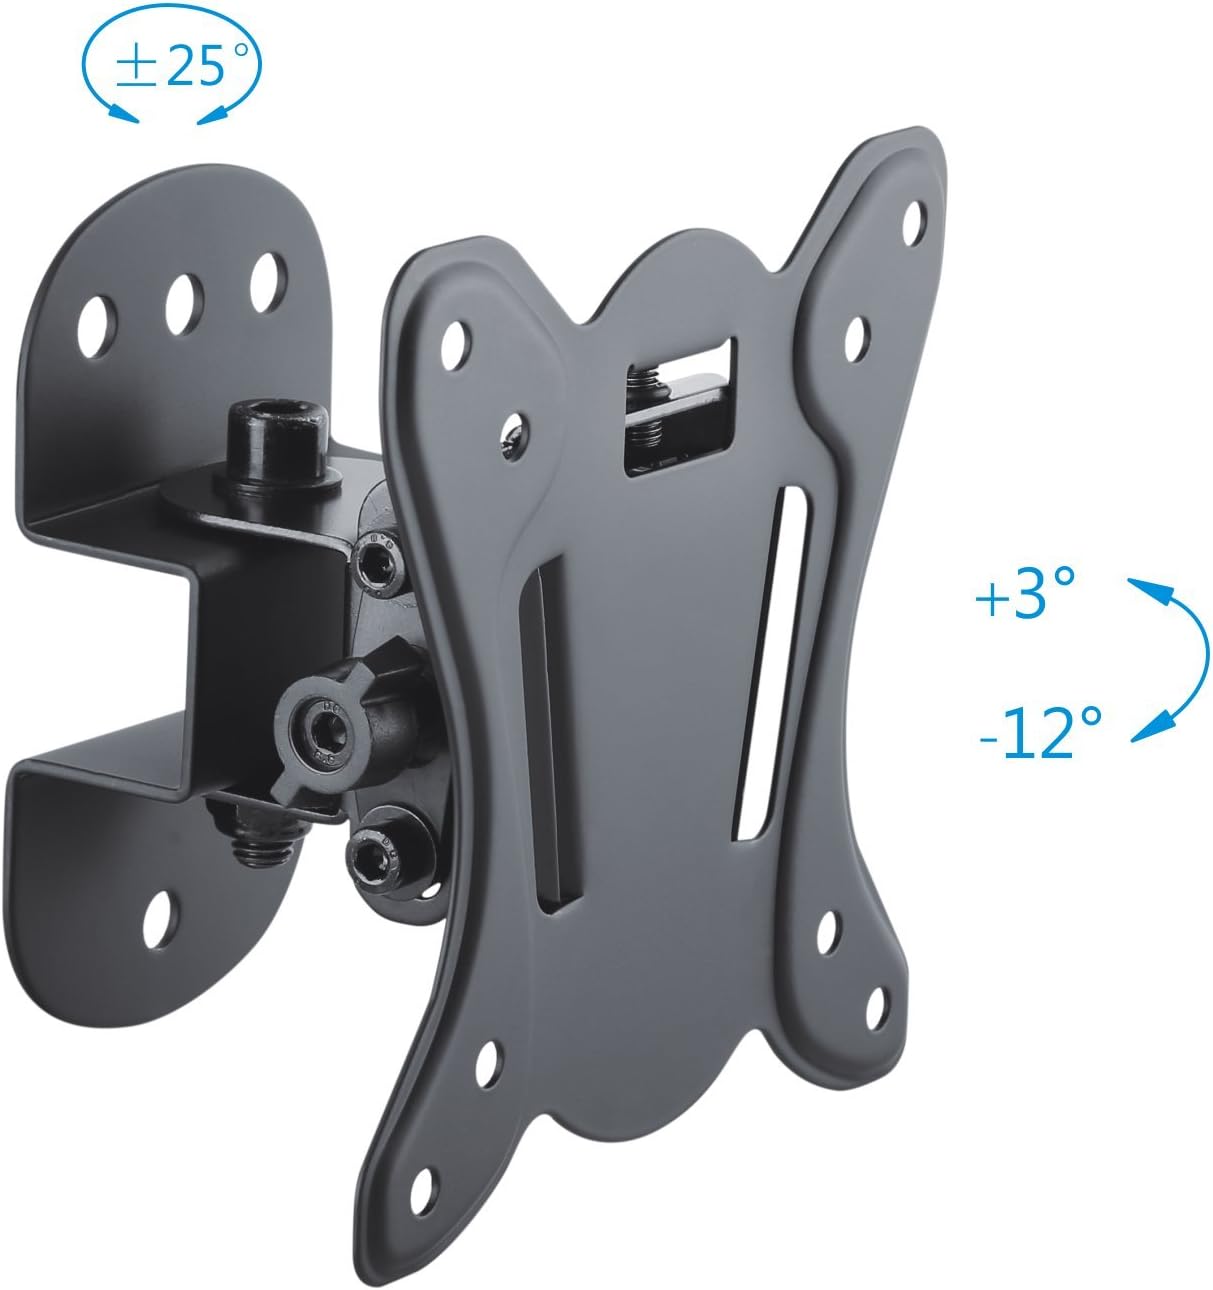
Figure 3: TV Plate and Adjustments. This image shows the TV mounting plate with its VESA hole pattern and the articulation points for tilt and swivel adjustments.
Step 5: Mount TV onto Wall Plate
Carefully lift the TV with the attached TV plate and hook it onto the wall plate. Ensure the connection is secure. You may need assistance for this step.

Figure 4: Mounted TV Examplui. This image illustrates the bracket installed on a wall with a TV, showcasing its compact design and how it appears in a room.
Regolazioni operative
The PureMounts PM-FM10-100 bracket offers flexible viewopzioni.
- Regolazione dell'inclinazione: The screen can be tilted from +3° to -12°. Loosen the tilt adjustment screws on the side of the bracket, adjust to the desired angle, and then retighten the screws to secure the position. This helps eliminate glare.
- Regolazione della rotazione: The screen can be swiveled from +25° to -25° (depending on wall distance and screen width). Gently push the screen to the desired left or right angle. The friction mechanism holds the position.
Manutenzione
Regular maintenance ensures the longevity and safe operation of your TV bracket.
- Pulizia: Pulire la staffa con un panno morbido e asciutto. Non utilizzare detergenti abrasivi o solventi.
- Ispezione: Controllare periodicamente tutte le viti e i collegamenti per assicurarsi che siano ben serrati e sicuri. Serrarli nuovamente se necessario.
- Danno: If any part of the bracket appears damaged or worn, discontinue use and contact customer support.
Risoluzione dei problemi
Se si verificano problemi durante o dopo l'installazione, fare riferimento ai seguenti problemi comuni e alle relative soluzioni.
| Problema | Possibile causa | Soluzione |
|---|---|---|
| La TV non è in piano dopo l'installazione. | Wall plate was not level during installation. | Remove the TV, loosen wall plate screws, adjust with a level, and retighten. |
| Bracket feels loose or unstable. | Le viti non sono completamente serrate o i tasselli a muro sono insufficienti. | Ensure all wall and TV mounting screws are securely tightened. Verify wall type and use appropriate anchors. Do not exceed weight capacity. |
| Cannot adjust tilt or swivel. | Adjustment screws are too tight or mechanism is stiff. | For tilt, slightly loosen the adjustment screws, adjust, then retighten. For swivel, apply gentle force; if still stiff, check for obstructions. |
Specifiche
Detailed technical specifications for the PureMounts PM-FM10-100 TV Bracket.

Figura 5: Dimensioni tecniche. This diagram provides precise measurements for the bracket, including VESA hole spacing, overall dimensions, and wall clearance.
- Modello: PM-FM10-100
- Tipo di montaggio: Montaggio a parete
- Tipo di movimento: Girevole, inclinabile
- Materiale: Metallo
- Colore: Nero
- Dispositivi compatibili: Televisione
- Minimum Supported Screen Size: 13 pollici (33 cm)
- Maximum Supported Screen Size: 27 pollici (69 cm)
- Compatibilità VESA: 75x75mm, 100x100mm
- Capacità di carico massima: 25 kg (55 libbre)
- Distanza dalla parete: 75 mm (circa)
- Angolo di inclinazione: da +3° a -12°
- Angolo di rotazione: ±25°
- Peso dell'articolo: 0.48 chilogrammi
Garanzia e supporto
For warranty information or technical support, please refer to the PureMounts official websito o contattare il rivenditore. Conservare la ricevuta d'acquisto per eventuali reclami in garanzia.